
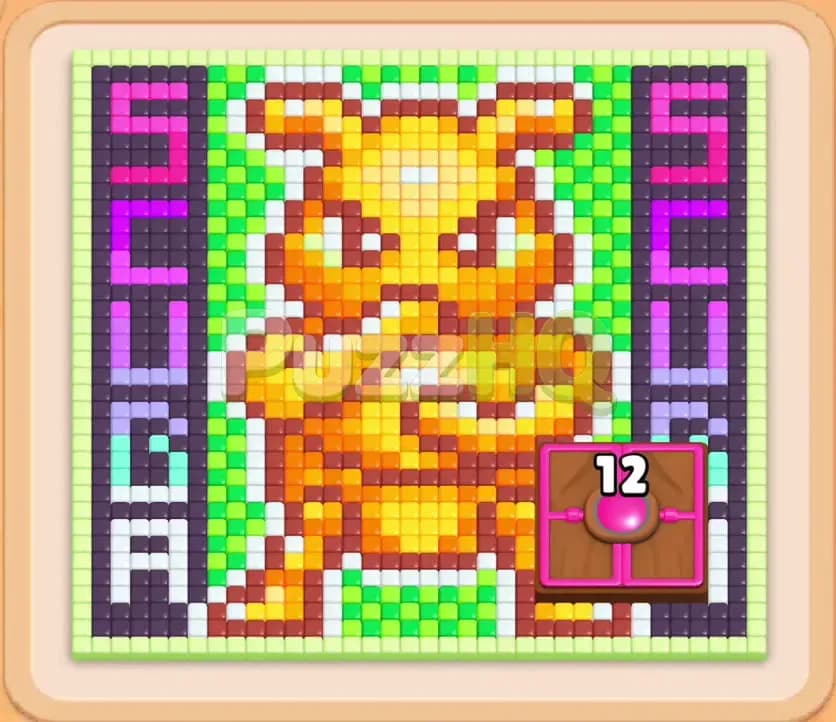
Colony Flow Level 1970 presents a complex board shaped like an armored monster framed by towering side pillars and a locked chest blocking the lower right path. Your primary objective is clearing the perimeter food tiles without choking your five waiting slots while managing specialized tray mechanics. Success here requires strict route planning, feeding the obstacle early, and opening pathways from the bottom edge upward into the center figure.
Colony Flow Level 1970 Walkthrough
Understanding the Starting Board
The playing field features a large yellow and orange beast centered against a vibrant green background, flanked by tall vertical columns of purple, magenta, dark purple, and white. A pink Hungry Door sits firmly in the lower right quadrant showing a requirement of 12 magenta food pieces before it unlocks. The ants emerge from a single nest hole positioned at the bottom center of the board, meaning all initial paths must branch out through the bottom border of white and light green tiles.
In the bottom selection tray, you face a crowded queue of numbered color blocks. Several deeper layers contain Hidden Boxes marked with question marks that keep their identity secret until higher blocks leave the tray and matching paths open. Later in the tray, you will also encounter Connected Boxes joined by a diagonal link, which require coordinated clearing. The central obstacle is the sheer density of the border and the Hungry Door, which restricts access to the right side of the board until you satisfy its hunger requirement.
The Key to Clearing Level 1970
The winning strategy revolves around aggressive bottom lane expansion while reserving slot space for multi step tasks. You must never pull a block into your waiting slots unless ants have an immediate, unobstructed path to every single tile required to exhaust that count. Because the Hungry Door demands twelve magenta tiles, you must direct your early ant trails toward accessible magenta clusters to remove that roadblock as early as possible.
Managing the five waiting slots requires rotating through high count perimeter colors like white and light green before diving deep into the central creature. If you load multiple colors from the creature body too soon, your ants will stall against outer layers, causing an irreversible traffic jam in your tray slots. Keeping at least one or two waiting slots completely empty guarantees that you can uncover Hidden Boxes without risking an immediate defeat.
How to Beat Colony Flow Level 1970
Step 1: Clear the bottom white border tiles
Your first move must focus on clearing the white tiles lining the bottom edge directly above the ant nest. Select the available white block from your tray to send white ants marching along the bottom row. These ants quickly chew through the floor perimeter, stripping away the baseline barrier and giving you direct line of sight to the green lawn tiles and the lower edges of the side columns. This essential opening move ensures that future ant streams have room to fan out toward both the left and right flanks instead of piling up at the nest exit.
Step 2: Feed the Hungry Door with magenta tiles
With the bottom edge cleared, direct your attention to the lower right where the Hungry Door blocks access to the right side column. Select the magenta block with value 14 from the tray. Magenta ants will immediately stream along the newly opened path, latching onto exposed magenta tiles and feeding directly into the Hungry Door. Watch the number on the chest drop from 12 down to zero. Once satisfied, the door vanishes completely, unlocking the lower right quadrant and creating a clean route up the right border.
Step 3: Strip away the lower green grass base
Now that both sides of the base are accessible, select the light green blocks to begin clearing the expansive patch of green tiles beneath the monster feet. Green ants emerge in dense waves, consuming the floor beneath the creature and exposing the creature lower limbs and claws. Clearing this green foundation is critical because it creates a wide central thoroughfare, allowing orange, yellow, and brown ants to reach the monster belly without bumping into blocked borders.
Step 4: Dismantle the lower claws and waistline
Select the yellow and orange blocks to send worker ants directly into the lower torso of the creature. The ants will systematically eat their way through the feet, legs, and coiled tail, peeling away the intricate orange shading layer by layer. As these tiles disappear, you relieve pressure on your active slots and free up room in the tray. Take note of how each completed block empties a waiting slot, keeping your tray flexible as you prepare to tackle the denser vertical side pillars.
Step 5: Uncover Hidden Boxes along the side columns
Begin working on the side columns by pulling purple and light blue blocks into your active tray. Ants will march up the outer edges, chewing through the lower sections of the purple pillars and exposing Hidden Boxes in your selection tray. As these question mark blocks rise to the surface, their colors are revealed. Target the newly revealed colors right away so that these formerly hidden blocks do not sit idle in your waiting slots. This keeps your ant trails moving fluidly up both walls.
Step 6: Carve out the monster chest and shoulders
Shift your focus back to the center of the board by selecting the high count brown and yellow blocks. The ants will swarm the creature chest, shoulders, and folded arms, carving deep into the core structure. As the body of the beast crumbles, the green background tiles behind its head become exposed from the inside out. Monitor your waiting slots closely during this phase, ensuring that every color you tap has a clear entryway into the creature upper body before you commit the move.
Step 7: Engage Connected Boxes and clear the upper pillars
As you approach the top of the board, Connected Boxes will enter your active tray options. These paired purple blocks must be selected with careful timing because pulling one brings its partner into play. Send purple and dark purple ants climbing up to the very top corners of the board, consuming the dark battlements and outer frame. The ants will wrap around the top boundary, steadily chipping away the final structural pillars that hold the upper pixel art together.
Step 8: Eradicate the head and remaining green background
With the side towers completely broken down, only the creature horned head and the surrounding green tiles remain. Select the final yellow and orange blocks to clear the face, eyes, and pointed ears. Immediately follow with the remaining light green block to consume the leftover background patches. The ants will converge on the final cluster of tiles above the nest, leaving no stragglers behind and successfully completing the board.
Why This Solution Works
The primary reason this sequence succeeds is that it prioritizes wide physical access before tackling high density figures. Colony Flow levels punish players who try to solve the center attraction first. By stripping the bottom perimeter white tiles, you give your ant colony the wide deployment zone needed to reach both sides of the board simultaneously.
Removing the Hungry Door early on is equally vital. Leaving that chest unopened cuts off half of your available paths, forcing you to pick colors solely from the left column and the creature center. That restriction rapidly fills the five waiting slots with blocks whose matching tiles sit trapped behind the right side obstacle. Satisfying the door with twelve magenta tiles eliminates this dangerous bottleneck before it can ruin your run.
Furthermore, this order of operations accounts for the unpredictable nature of Hidden Boxes and Connected Boxes. By keeping your active slots clear during the mid game, you create a buffer for whatever colors the mystery blocks reveal. When the Connected Boxes arrive in the late game, you have sufficient empty slots to accept the paired commitment without risk of overflowing your tray.
Final Thoughts
Patience and perimeter awareness turn Colony Flow Level 1970 from an overwhelming puzzle into a clean, systematic victory. Remember that unlocking the Hungry Door at the bottom right dictates the entire flow of the board. If you find yourself struggling with the timing of any particular ant trail or want to see the exact marching routes in real time, be sure to review the video solution above this guide to master the run.
Comments