
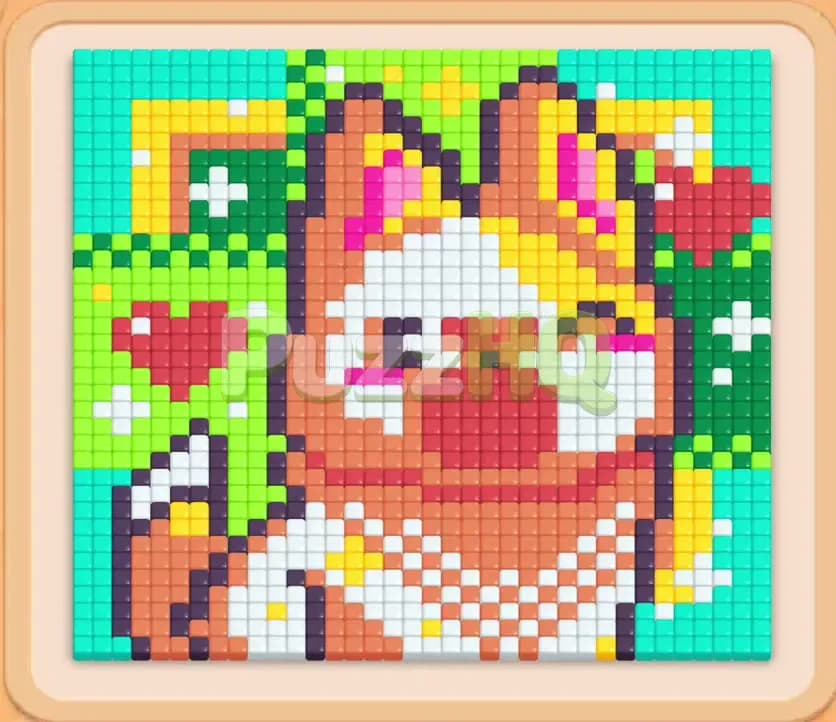
Colony Flow Level 574 presents a vibrant pixel art board depicting a cheerful puppy framed by lush foliage and bright decorative borders. Your primary objective is guiding ant streams through congested paths to devour every single food morsel without overwhelming your five waiting slots. Success on this stage demands strict discipline with connected boxes and a clear strategy for opening access to the central face.
Colony Flow Level 574 Board Breakdown
Starting Colors and Blocks
The starting canvas displays an intricate mosaic featuring a puppy with warm coral ears, a terracotta face, and a patterned white chest bib. Surrounding the animal is a vivid background composed of leafy green foliage, bright yellow corners, red hearts, and an outer frame of clean cyan tiles. Deep purple outlines define the ears, eyes, and jaw, forming barriers between the different color zones.
Your supply tray below contains multiple stacked rows of numbered blocks. The top accessible layer shows dark purple forty, dark purple forty two, yellow thirty five, cyan twenty five, and cyan thirty. Directly underneath lie coral thirty nine, mint green twenty, coral twenty, white thirty five, and mint green twenty three. Deeper within the tray are further reserves, including white thirty, pink nine, mint green twenty, yellow twenty five, and massive reserve blocks like white fifty and dark green forty five. Crucially, specific blocks share links through vertical or horizontal connector tubes, forming connected boxes that require coordinated clearing.
Paths, Obstacles, and Limited Space
The ant nest sits at the bottom center of the board, directly underneath the puppy chest and lower paws. At the start of the level, the direct path upward runs straight into dense white tiles and dark boundary lines. Ants cannot simply walk through unmatching tiles, so you must carve out paths layer by layer from the bottom upward.
Your biggest restriction is the row of five waiting slots resting just above the block tray. Every time you tap a block from the supply, it moves into an open slot and releases ants of that color toward available food. If all five slots become occupied while the active blocks cannot find any more matching food on the board, the colony stops moving and you fail the level immediately. Connected boxes add further pressure because pulling a linked block can rapidly fill your available slots if you have not opened paths for both colors.
Colony Flow Level 574 Complete Solution
Step 1: Clear the white chest bib and initial dark outlines
Begin by tapping the white thirty five block to send white ants directly into the chest bib resting above the nest. The white tiles disappear rapidly, opening the central corridor toward the lower jaw. Follow this immediately by selecting the dark purple forty block. Because the puppy outlines touch the central cleared area, dark purple ants march along the lower chin, eroding the outline tiles and knocking the block count down toward single digits. This initial combination keeps your waiting slots mostly clear because the white block exhausts itself and vanishes quickly, leaving you with open space to maneuver.
Step 2: Establish flank routes with yellow and secondary dark blocks
With the lower chest open, tap the yellow thirty five block. Yellow food sits along the upper right background and right ear tufts, so ants begin marching along the cleared right flank. At the same time, select the second dark purple block showing forty two. These ants reinforce the outline clearance around the right side of the face. Watch the counters tick downward as the dark purple block drops to eleven and the yellow block counts down to single digits. You now have a stable flow of worker ants traveling along both the center and the right boundary.
Step 3: Trigger connected yellow boxes and clear lower coral paws
As your initial yellow block drops to six, its linked partner yellow twenty five becomes primed. The ongoing stream of yellow ants continues devouring tiles on the upper right, steadily reducing this linked pair without stalling in your slots. Next, select the coral thirty nine block. Coral food represents the large cheeks and lower face of the puppy. The newly cleared chest area gives coral ants direct access to the chin and mouth region. The coral counter begins dropping rapidly, freeing up additional territory around the cheeks while your waiting slots hover comfortably around three occupied spaces.
Step 4: Dismantle white facial spots and top cyan borders
Select the white twenty eight block to target the white muzzle, cheek highlights, and eye sparkles that are now exposed. White ants flood the middle of the board, wiping out the facial details and exposing the inner pink tongue and cheeks. Next, tap cyan twenty five. Cyan ants route along the outer edges of the frame to eat the decorative borders and corner cross patterns. While cyan and white ants work simultaneously, feed in another dark purple block to maintain steady pressure on the eye sockets and ear edges. As white finishes, that waiting slot empties out instantly.
Step 5: Consume the red hearts and cheek accents with pink blocks
With the facial core largely stripped away, tap the pink nine block, followed shortly by the smaller pink five block. Pink ants surge into the mouth area and spread across to the left flank where the vibrant heart tiles sit nestled inside the green foliage. Devouring these pink patches removes the decorative elements and splits the surrounding green thickets into isolated clusters. The pink blocks count down quickly because the targets are concentrated together, preventing your tray slots from clogging up during this critical transition.
Step 6: Clear the outer green foliage and reveal the upper ears
Tap the dark green forty five block and the light green eight block. Green ants now have broad corridors on both the left and right sides of the canvas. They swarm the leafy background, clearing large swaths of foliage and opening the upper pathways leading into the puppy ears. While green clears, tap the coral forty one block, which carries a vertical link to coral twenty below it. These coral ants tackle the remaining ear tiles and forehead patches, rapidly reducing the large coral numbers while green tiles vanish around them.
Step 7: Strip the top cyan border and finalize green remnants
Select the cyan thirty block to finish off the remaining horizontal border running along the top of the canvas. Cyan ants march along the cleared outer tracks, methodically picking off the decorative line. Immediately follow up with the light green six block to clean up the last few leaf tiles lingering in the upper corners. Because your earlier moves created open paths on both sides of the board, these ants experience zero delay reaching their targets, allowing the blocks to cycle out of your five slots in rapid succession.
Step 8: Resolve connected dark blocks and finish the final tiles
Your supply tray now reveals the final connected dark purple blocks linked horizontally, alongside a small pink four block and stray white tiles. Tap the dark purple pair to send ants along the remaining ear tips, while deploying pink and white to target the tiny remnants near the top right. The dark purple counters reach zero just as the final pink tiles vanish into the nest. Every single food tile clears from the board, completing the level cleanly with empty waiting slots.
Key Moments in Colony Flow Level 574
The Move That Opens Up the Board
The critical turning point occurs when you clear the white chest bib in the early stage. That central white patch acts as a solid plug directly above the ant nest. Until those white tiles disappear, your ants have no path toward the middle of the canvas, which leaves the coral face and dark purple facial outlines completely inaccessible. Devouring that white cluster immediately turns a congested bottleneck into a wide highway, granting access to the jaw, cheeks, and right boundary paths.
Finishing the Remaining Food
The endgame requires careful pacing because you must handle connected dark purple blocks while only a tiny fraction of dark food remains on the board. If you tap the connected dark pair before clearing the surrounding green and cyan tiles, your ants can get delayed, leaving both slots occupied indefinitely. By clearing the cyan border and green leaves first, you ensure that the moment those dark purple ants emerge, they have an unobstructed sprint straight to the ear tips, closing out the board without risking a slot jam.
How to Avoid Getting Stuck on Level 574
The primary hazard in this level is pulling high count dark purple blocks before enough outline tiles are actually reachable. Dark purple tiles outline almost the entire character, but early on, most of those tiles are buried under dense layers of coral, green, and cyan. If you fill your waiting slots with multiple dark purple blocks when only eight or nine outline tiles are exposed, those blocks will sit idle in your slots, unable to count down until other colors clear the way.
Another major threat comes from mishandling the connected boxes. When you activate a block that shares a connector tube with another block beneath or beside it, you are committing valuable tray space to that color family. Always verify that an active, open path exists to sustain the full count of both linked blocks. If the path leads to a dead end after only ten or fifteen tiles, the second connected block will enter your waiting area and remain trapped there.
Finally, keep a close eye on your pink and cyan selections. These colors appear in limited quantities compared to the massive fields of coral and green. Deploying pink or cyan too early, before their specific corridors are carved open, will lock those slots up completely. Stride forward from the center outward, maintain at least two empty waiting slots whenever possible, and only deploy decorative accent colors when their paths are fully uncovered.
Final Thoughts
Patience and path awareness are the keys to conquering Colony Flow Level 574. By dismantling the central white bib first, respecting the timing of connected blocks, and systematically stripping the board from the inside out, you will keep your waiting slots open and guide your colony to a flawless victory. If any block transition or path opening feels tricky to visualize, take a moment to watch the solution video above the article for a clear visual demonstration of the entire run.
Comments