
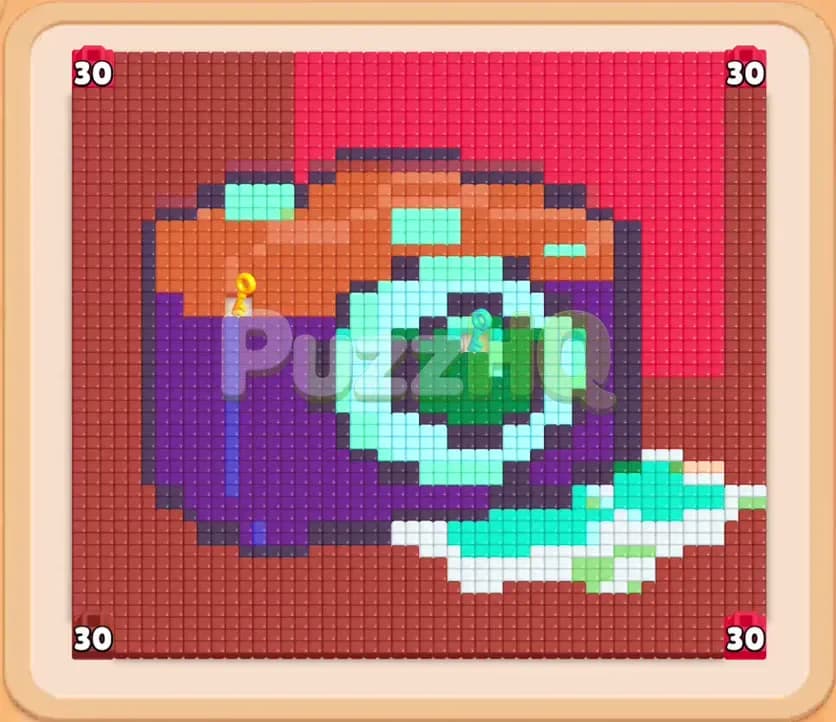
Colony Flow Level 740 presents an intricate puzzle where you must guide your ant colony to dismantle a colorful retro camera design. The layout packs multiple corner food pipes, tricky connected boxes, and lock mechanisms that will quickly overwhelm your waiting area if you pick colors out of turn. By following a disciplined clearing sequence and prioritizing open travel paths, you can clear every single tile without filling your bench.
Colony Flow Level 740 Board Breakdown
Starting Colors and Blocks
The food board displays an artistic pixel portrait of a purple vintage camera ejecting a white photograph against a warm reddish background. The primary colors across the board include brick red along the outer walls, dark purple across the camera body, warm orange on the upper casing, vibrant cyan framing the lens, emerald green in the camera eye, and clean white for the emerging photo print. Your ant nest sits centered at the bottom edge just beneath the board, directly aligned with the white photograph.
Down in your block selection tray, you start with several visible numbered options spread across multiple rows. The visible front row contains black five, pink ninety five, dark red fifty five, brown thirty five, and maroon forty five. Just behind them sit blue seventeen, red fifty, purple four, orange fourteen, and another blue four. Deeper layers reveal cyan thirty, orange forty seven, and hidden tiles waiting to move forward. Because the white photo sits right at your nest opening, clearing those bright white food tiles gives your ants their very first corridor into the rest of the camera structure.
Paths, Obstacles, and Limited Space
Space management is your greatest test on this stage. You have only five waiting slots above your block tray. If all five slots fill with blocks that cannot find active matching food on the board, your colony stalls and you lose immediately. The physical paths for your ants are tightly restricted at the start. Ants cannot simply walk across unmatched food tiles. They require open cleared space or directly adjacent matching colors to march forward.
Obstacles make this challenge even more demanding. Four food pipes sit in the far corners of the board, each marked with a thirty counter. If you leave these areas alone, they maintain constant pressure on your perimeter. Inside your block selection grid, you will encounter yellow lock and key elements, where locked blocks cannot be moved until you trigger the corresponding key block. Furthermore, pairs of connected boxes appear later in the tray, physically tethered together by a bridge. When you select a connected pair, both blocks transfer into your setup, requiring enough empty waiting slots and open food routes to absorb them simultaneously.
Colony Flow Level 740 Complete Solution
Step 1: Clear the White Photo Print Base
Your opening objective is to punch open a clear runway straight out of the ant nest. Select the white blocks from your tray, starting with the white sixty one and supporting white tiles. White ants immediately stream directly out of the nest into the lower right corner, chewing away the white photograph and uncovering the lower edge of the camera casing. Clearing this white cluster creates an immediate buffer zone directly above your nest, allowing future ant waves to navigate left and right toward other color groups without bottlenecking at the nest opening.
Step 2: Clear the Outer Teal Lens and Cyan Borders
With the white photograph out of the way, the cyan rim surrounding the central camera lens becomes exposed along its bottom edge. Select the cyan blocks, including cyan fifty, cyan thirty three, and cyan four. Cyan ants rush upward through the newly created clearing and strip away the lower circle of the camera lens. This action cuts deep into the heart of the pixel artwork, severing the purple camera casing into two distinct halves and preparing the board for wider clearing moves. Keep an eye on your waiting slots and do not tap cyan blocks that exceed the available cyan tiles on the board.
Step 3: Unlock the Yellow Key Block
Look down into your tray grid where a round purple tile displays a yellow key icon. Tapping this block sends purple ants up into the lower left purple casing. More importantly, collecting this key automatically disengages the yellow padlock block sitting in the second row of your tray. Unlocking this space is vital because it frees up trapped blocks beneath it, including high value green and cyan options that you will need shortly. Always clear keys the moment their color has an active target on the board so you prevent grid congestion down below.
Step 4: Dismantle the Purple Camera Body
Now that the purple paths are fully accessible, pick the purple blocks such as purple forty, purple forty three, and purple twenty. Your purple ants spread out in heavy swarms across both the left and right flanks of the camera body. As these purple tiles vanish, the structural bulk of the camera collapses. This massive clear opens vast walkways across the entire middle row of the board. The orange top plate and the bright green center of the lens are now completely accessible from multiple angles.
Step 5: Resolve the Connected Boxes Safely
As deeper layers of your tray slide forward, you will encounter pairs of connected boxes bound together by colored bars. In this phase, you will see pairs such as red fifty tethered to an adjacent box, and later cyan twenty seven linked with green twenty six. Before touching a connected pair, inspect the board to make sure both colors have clear, reachable food tiles. Tap the connected pair so both slide into play. The ants will divide their labor, with one color marching toward the remaining upper structure and the other consuming lens or border tiles. By verifying available targets beforehand, you ensure neither connected block sits idle in your five waiting slots.
Step 6: Suppress the Corner Food Pipes with Dark Red Blocks
With the center wide open, turn your attention to the outer borders and the four corner food pipes. Select the large dark red and brick colored blocks, such as red ninety, red fifty, and red thirty five. Red ants will push up the left and right borders, reaching directly into the territory surrounding the corner food pipes. Consuming the perimeter tiles deprives the corner pipes of expansion territory and steadily chips away at the outer background of the board.
Step 7: Clear the Central Green Lens and Orange Viewfinder
Focus on the remaining detailed elements of the camera. Choose the orange blocks like orange fourteen and orange forty seven to clean out the flash unit, top knobs, and viewfinder. Follow immediately with green blocks such as green thirty and green sixteen. Bright green ants travel into the very center of the lens, eating away the core pixels that were protected during the early game. This leaves only scattered edge tiles and residual background blocks.
Step 8: Clean Up the Remaining Border Tiles
You now enter the final cleanup stage with an almost empty board. The tray offers small, precise counts including brown two, red twenty six, cyan twenty six, red twenty five, and green sixteen. Tap these remaining units in order as their matching remnants appear on the board. Ants sweep along the uppermost red wall and finish off the last few cyan and green specks floating in the center. Once the final red tile vanishes, the stage clears completely.
Key Moments in Colony Flow Level 740
The Move That Opens Up the Board
The critical turning point on this stage occurs during the transition from the white photo print to the lower cyan lens ring. At the start, the purple camera body forms an impenetrable wall directly in front of the nest. By completely exhausting the white blocks first, you build a wide hallway that allows cyan ants to cut directly into the lens. Once that bottom lens segment breaks, the purple body loses its defensive geometry. That single sequence transforms a cramped, risky board into an open arena where ants can reach almost every sector freely.
Finishing the Remaining Food
The endgame demands patience because the final tiles are scattered along the extreme perimeter and within the corner pipes. Rather than rushing to empty the tray, pay close attention to the exact numbers remaining on the final blocks. You will have several blocks with values around twenty five and twenty six. Ensure you deploy colors that have an unbroken path along the outer wall. Releasing green and cyan ants to pick off the lingering center pieces while your red swarms clear the top edges ensures that your five waiting slots remain completely empty as the final victory screen appears.
How to Avoid Getting Stuck on Level 740
The primary trap on this level lies in mishandling the connected boxes in your selection tray. When two blocks are tethered together, tapping them commits two of your five precious waiting slots in a single action. If one of those colors cannot reach its food because another color is blocking the path, that block will sit frozen on your bench. If you already have two or three inactive blocks waiting, a poorly timed connected block will fill your last slots and trigger a sudden loss. Never tap connected boxes on impulse. Always verify that both linked colors have immediate work waiting for them on the board.
Another frequent mistake is ignoring the yellow key block while picking perimeter colors. The yellow padlock blocks access to an entire column of useful tiles. If you exhaust your visible purple and red options before using the key, you may find yourself forced into choosing colors that have no open paths, clogging your slots. Make unlocking that key a top priority the moment the purple camera base is exposed to your ant pathways.
Finally, keep a close watch on the corner food pipes. These structures sit at thirty on each corner and hold substantial food mass. If you leave them completely untouched while focusing solely on the center, the surrounding red and brown tiles will bottleneck your final moves. Chip away at the lower corners early so that when your red ants begin their major perimeter clear, they can flow directly into those corner zones without interruption.
Final Thoughts
Conquering Colony Flow Level 740 requires an organized strategy centered on clearing the lower white photograph, opening the lens, and carefully timing your connected boxes. By keeping your five waiting slots clear and resolving the yellow key early, you ensure your ant colony maintains smooth flow from start to finish. If any particular block transition feels tricky or difficult to visualize, refer to the helpful video walkthrough positioned above this guide to see the exact clearing rhythm in action.
Comments