
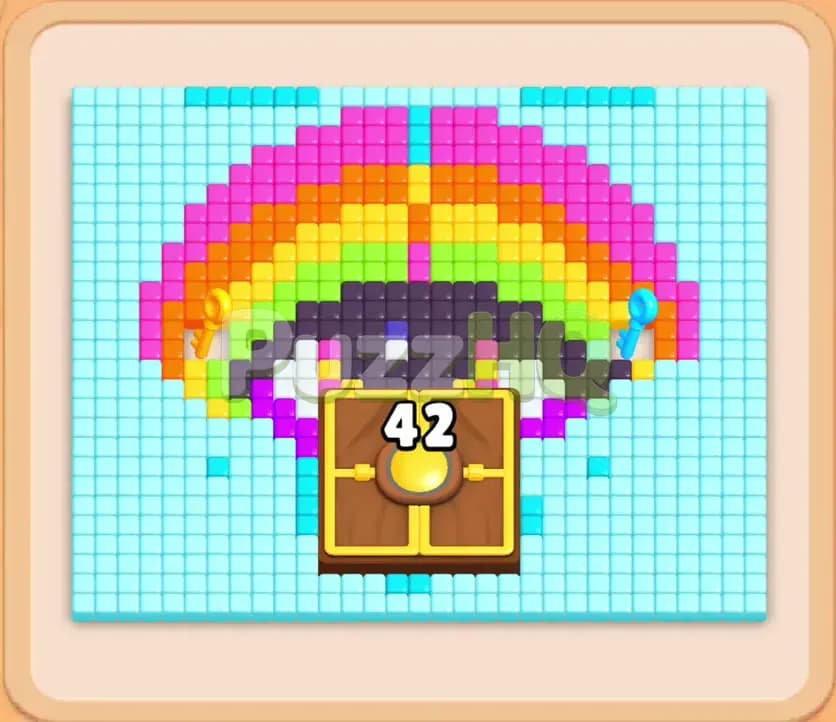
Colony Flow Level 754 presents a vibrant pixel art puzzle featuring a large arched rainbow canopy resting inside a light blue grid frame. A massive locked chest displaying a high counter sits squarely in the middle of the board, blocking access to the central food cluster beneath it. Solving this stage requires careful navigation around the exterior shell, unlocking a chained tray piece, and managing your waiting slots so your ant colonies never grind to a halt.
Colony Flow Level 754 Starting Setup
Reading the Board
The board displays an elaborate pixel art illustration shaped like a colorful umbrella or rainbow arch. A thick border of light blue food tiles lines the outer edges of the playfield, creating a protective barrier that seals off the inner rings. Beneath that light blue frame, you will see concentric arches composed of bright pink, yellow, and orange food tiles. Tucked directly under the colorful canopy is a dense mass of dark purple food tiles.
In the lower center of the grid, a large golden lock chest stamped with the number forty two covers the root of the structure. Until this counter drops to zero, none of your ants can reach the tiles underneath. Down in the selection tray, you start with various colored blocks, including several light blue blocks, pink blocks, dark purple blocks, and green blocks. Some of these blocks are connected boxes, linked together by flexible tubes that force them to interact as a pair. You can also spot a yellow block on the left side of the second tray row that is sealed behind a physical padlock.
What You Need to Watch Out For
The primary danger on this level is slot congestion caused by premature color commitments. You only have five waiting slots available between your selection tray and the nest hole. If you fill these slots with colors that cannot currently reach their matching food tiles on the board, your ants will stall and you will immediately fail the stage.
Because the outer light blue food completely encloses the rainbow canopy at the start, you cannot immediately route ants to the interior colors. Attempting to clear inner colors before tunneling through the light blue shell will strand blocks in your tray slots. Furthermore, the locked yellow block cannot be used until your ants collect the key from the board, and the central chest locks away forty two points of progress before it pops open. Every pick must directly support active eating or clear space for incoming tiles.
Colony Flow Level 754 Step by Step Walkthrough
Step 1: Open the Perimeter with Connected Light Blue Blocks
Begin your run by selecting the light blue blocks from the top row of your tray. Look specifically for the connected boxes linked by the blue conduit, pairing a light blue block of eighteen with the adjacent light blue block of twenty. Tapping these sends waves of light blue worker ants streaming out of the nest hole toward the perimeter.
The light blue ants immediately target the lower left and lower right boundaries of the outer frame. As they consume these perimeter tiles, the numbers on your active light blue blocks begin to tick downward rapidly. Stripping away the bottom corners of the frame creates your very first entry tunnels into the inner layers of the artwork. Keep your remaining tray slots completely empty during this opening rush so your ants have plenty of breathing room.
Step 2: Introduce Pink and Dark Purple to Breach the Inner Canopy
With entry points carved along the flanks, your next objective is to begin whittling down the colored arch. Select the pink eighteen block and the dark purple fifteen block from the freshly revealed positions in your tray. These blocks move into your waiting slots and trigger new columns of brightly colored ants.
The pink ants follow the open pathways on either side of the canopy, latching onto the vibrant pink stripe that runs over the crest of the arch. Simultaneously, your dark purple ants march right into the lower belly of the arch, chewing through the upper portion of the dark purple cluster above the locked chest. As these tiles disappear, the physical paths through the center of the board widen significantly, giving your colony direct line of sight to deeper tile sections.
Step 3: Clear Path Obstacles and Unlock the Padlocked Yellow Block
Now that the lower flanks are clear, look closely at the revealed food tiles near the bottom curve of the arch. A small key tile rests along this route, guarded by neighboring green and light blue food. Select the green fifteen block from your tray to send green workers up the newly carved path.
As the green ants devour their designated targets, they sweep over the key location. Collecting this key immediately breaks the padlock on the yellow fifteen block waiting in your lower tray. At this stage, your waiting slots hold light blue, pink, and green blocks that are actively working down their counters. The chest in the center of the board remains at its starting count of forty two, but your pathways are now broad enough to sustain multi color feeding lines.
Step 4: Deploy Yellow and Pink to Advance the Canopy Breakdown
With the yellow block unlocked, tap the yellow fifteen block and pull in another pink block from your tray. Yellow ants pour out of the nest and surge up both sides of the canopy, attacking the yellow stripe wedged between the pink and orange layers.
At the same time, your secondary pink ants finish off the remaining pink food tiles along the upper arc. Watch the central chest closely during this sequence. As your ants clear away the surrounding structural tiles and push deeper into the core, the counter on the chest drops sharply from forty two down to twenty nine. Your waiting slots will temporarily hold four active blocks, but because both yellow and pink ants have unrestricted access to huge food clusters, these blocks deplete steadily without risking a stall.
Step 5: Strip the Upper Border and Push the Chest Counter Down
Turn your attention back to the light blue frame running across the very top of the board. Select the fresh light blue blocks from your tray, including the eight and eighteen counters that have moved into your active selection rows. These light blue ants travel along the outer edges, eating away the upper ceiling of the frame.
While the ceiling vanishes, select another purple block to keep pressure on the dark tiles in the center. Your purple ants crawl directly above the locked chest, chewing through the thickest part of the interior shadow. This coordinated assault forces the chest counter down again, dropping from twenty nine to twenty eight, and then plunging down to thirteen. Clearing this area frees up two of your waiting slots as the earlier pink and yellow blocks hit zero and leave the tray.
Step 6: Deploy Green and Orange to Isolate the Final Structure
At this point, the rainbow canopy is mostly disassembled. The pink band is entirely gone, leaving behind scattered patches of yellow, orange, and purple food. Tap the green block with counter two and the orange block with counter fifteen to deal with the intermediate colors.
Your green ants quickly clean up the stray green accents along the lower edges, instantly emptying their slot. The orange ants then take over, streaming along the mid arch to consume the bright orange strip that sits directly above the dark core. With the chest counter now reduced to five, only a handful of prerequisite tiles remain before the central obstacle shatters completely. Keep one slot empty at all times as these blocks rapidly count down toward completion.
Step 7: Shatter the Central Chest and Clean Up the Core
Select the final purple block of five along with the remaining orange and light blue blocks. As the last required surrounding tiles are eaten, the golden chest counter strikes zero and the chest completely vanishes from the board.
Beneath where the chest once sat, a cross shaped cluster of dark purple and black food tiles is finally revealed. Black and dark purple ants charge straight up the center lane into the newly exposed zone, while orange and cyan ants sweep up the final scraps along the upper corners. Because you preserved open slots throughout the endgame, all four active colonies work in tandem, draining their numbers simultaneously. Once the last purple tile in the center disappears, the board clears and victory is yours.
Colony Flow Level 754 Winning Strategy
The Most Important Moves
The absolute turning point of this level is the deliberate sequence you use to breach the outer light blue border. If you choose to pick colors from your tray simply because they display high numbers, you will jam your waiting slots within the first twenty seconds. The outer shell must be broken on both the left and right corners before pink or dark purple can do any meaningful work.
Another vital decision is securing the key tile early in the run. Leaving the green path untouched delays the unlocking of the yellow fifteen block in your tray. If that yellow block remains locked, your selection options become severely restricted, forcing you to pick colors that have nowhere to run. Prioritizing the green worker path guarantees that your yellow ants enter the board at the exact moment the yellow rainbow stripe becomes accessible.
Keeping the Ants Moving
Managing your five waiting slots on this board requires maintaining a healthy balance between high capacity blocks and quick clearing low number blocks. When you have two large twenty count blocks slowly working through the dense outer border, ensure that your other slots are occupied by smaller numbers like the green two or the quick pink tiles that clear out fast.
Always track whether an incoming block has an open path before tapping it. If the dark purple cluster is walled off by pink food, do not place a purple block into your waiting slots until the pink ants have carved a wide highway through that section. By letting one color clear the doorway for the next, your slots cycle continuously and your ants never stop moving.
Colony Flow Level 754 Final Tips
Take your time when surveying the block tray at the start of the stage. Notice how the connected boxes link specific light blue blocks together. Tapping one activates both, which takes up two of your precious waiting slots at once. You must account for this double slot commitment before making your move, ensuring you have enough open space for your ants to flow smoothly.
Keep your eyes on the chest counter as you progress through the middle phase of the level. The chest does not require you to tap on it directly. It naturally counts down as you dismantle the surrounding food network. Knowing that the hidden purple tiles underneath will only emerge after forty two points of progress helps you pace your purple block selections so you do not waste slots waiting for the chest to open.
If any path transition or block combination feels tricky to visualize during your own playthrough, consider watching the video guide linked at the top of this page to see the exact ant routes in real time.
Comments