
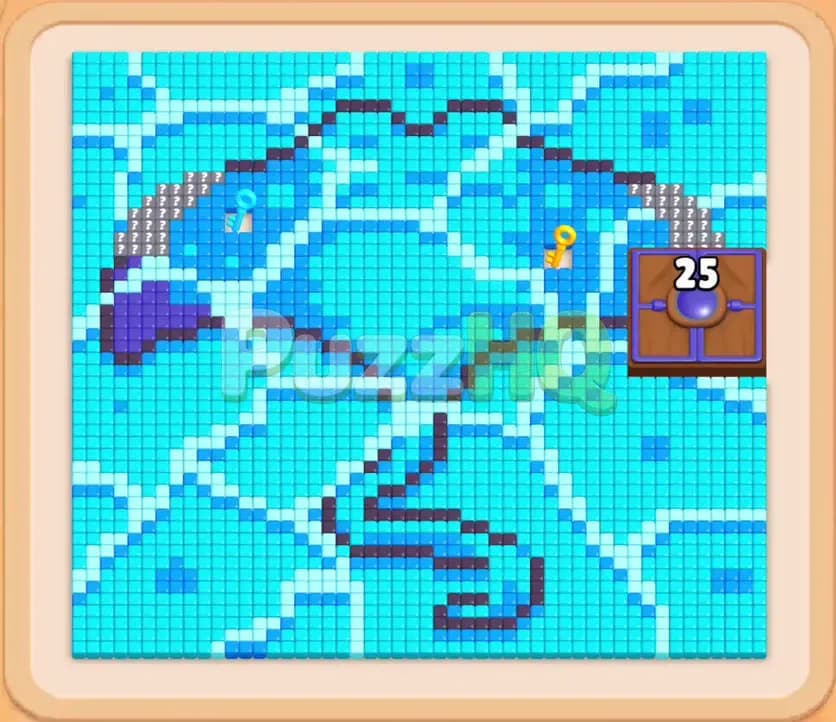
Colony Flow Level 610 presents a massive mosaic shaped like a giant dome canopy that tests your ability to navigate tight spaces while managing crowded tray slots. The main challenge comes from balancing multiple restricted pathways, a Hungry Door that demands twenty five food tiles, and a golden key needed to release a padlocked tray block. You must guide your ants along the lower boundaries first so that the central and upper sections become accessible without overloading your five waiting slots.
Colony Flow Level 610 Walkthrough
Understanding the Starting Board
When you start Colony Flow Level 610, the board displays a wide pixel art structure resembling a giant mushroom cap perched over a winding dark purple stem. The vast majority of the canopy consists of light blue, cyan, and deep blue tiles, with smaller white accents dotting the upper curve. Your ant nest sits centered at the very bottom edge of the board. From this nest, the ants only have immediate access to the lowest light blue and cyan clusters along the bottom left and bottom right corners, as well as the initial segments of the dark purple stem.
Several special mechanics control your progress through this stage. On the right side of the canopy, a wooden Hungry Door blocks access to the upper right quadrant until your ants eat twenty five tiles of food. Just behind that area lies a golden key embedded among the cyan tiles. Looking down at your tray, you have four visible blocks in the top row, four in the second row, and four in the third row. Among these tray blocks, you will notice question mark icons marking Hidden Boxes whose colors remain concealed until the blocks above them clear out. You will also see a padlocked block that remains completely unusable until your ants collect the golden key from the board. In addition, certain blocks are linked together as Connected Boxes, meaning you must consider how clearing one will bring its partner into play. The five waiting slots above your tray are your strict limit, so you cannot tap blocks carelessly without matching accessible food.
The Key to Clearing Level 610
Success on Colony Flow Level 610 depends on respecting the natural flow of open paths from the bottom perimeter toward the top crest. Because the center is choked by the winding stem and the Hungry Door seals off the right wing, opening the lower cyan and light blue tiles must be your first objective. Clearing these bottom sections widens the runway around the edges of the board, allowing your ants to bypass the central congestion and reach the twenty five food tiles needed to satisfy the Hungry Door.
Slot discipline is critical throughout the entire run. With only five waiting slots available, picking blocks whose matching food tiles are buried behind walls of other colors will cause an instant loss. You must ensure that every block you move into a waiting slot can immediately send ants into action. Once the Hungry Door vanishes, the path to the golden key clears. Grabbing that key unlocks the padlocked block in your tray, which provides the high number count needed to demolish the dense cyan core. Hidden Boxes will reveal their true colors as you exhaust the upper rows of the tray, so maintaining open slots gives you the flexibility to adapt to newly revealed colors without stalling your ant colony.
How to Beat Colony Flow Level 610
Step 1: Clear the Lower Cyan Clusters to Open Side Runways
Begin by selecting the cyan 34 block and the cyan 20 block from the front row of your tray. The ants stream out of the bottom nest and immediately divide between the lower left and lower right borders where bright cyan tiles sit exposed. As these blocks count down, select the cyan 80 block to keep a steady supply of workers flowing into the lower flanks. The bottom light blue and cyan boundary tiles vanish rapidly, exposing deeper layers of food and creating wide corridors that run along both sides of the central dark purple stem. By focusing strictly on these exposed cyan tiles, you empty your waiting slots quickly while carving out the perimeter space your ants need to maneuver around the lower obstacles.
Step 2: Feed the Hungry Door Along the Right Flank
Now that the lower right passage is open, select the dark blue 22 block and the light blue 40 block from the tray. Your ants follow the right boundary upward toward the wooden barrier displaying the number 25. This Hungry Door requires your ants to consume twenty five food tiles before it will open. Direct your light blue and cyan workers to clear the food lining the border directly in front of this door. As the counter on the Hungry Door counts down from twenty five to zero, the wooden barrier dissolves into the background. Removing this obstacle provides direct entry into the upper right corner of the canopy and exposes the golden key sitting just inside the food cluster.
Step 3: Advance Toward the Golden Key and Clear Connected Boxes
With the right entrance unlocked, select the Connected Boxes from your tray, which include linked cyan blocks. Move the cyan 40 and cyan 72 blocks into your active slots to unleash a heavy rush of ants into the upper right wing. The ants wrap around the outer perimeter of the canopy, chewing through the thick cyan wall that protects the golden key. Watch your waiting slots carefully during this push. Do not tap any dark purple blocks yet because the central stem remains narrow and awkward to navigate. Let your cyan blocks count down until the food surrounding the key disappears, prompting an ant to grab the key and carry it off the board.
Step 4: Unlock the Padlocked Block and Reveal Hidden Boxes
Picking up the golden key instantly removes the yellow padlock from the locked block in your tray, turning it into an active cyan 30 block. At the same time, clearing the blocks from the second row reveals several Hidden Boxes beneath them, exposing their numbers and true colors. Tap the newly unlocked cyan 30 block along with the cyan 35 block to target the deep layers across the middle of the canopy. The ants surge through both the left and right corridors, eating into the dense center from both sides simultaneously. Because these high value cyan blocks match the largest food deposit on the board, your waiting slots clear out steadily without any danger of clogging.
Step 5: Dismantle the Central Dark Stem and Mid Canopy
With the bulk of the cyan canopy reduced to thin strands, the winding dark purple stem in the center becomes fully reachable from multiple angles. Select the dark purple and dark blue blocks that have now become active in your tray, including the 20 and 34 blocks. The ants march directly into the winding stem, dismantling it segment by segment from the bottom upward. At the same time, dispatch any remaining light blue blocks to clean up the patches bordering the central core. As the dark stem disappears, the lower half of the board becomes completely vacant, leaving your ants with unimpeded access to the remaining arch of the upper canopy.
Step 6: Sweep the Remaining Upper Crest to Finish the Board
Only the uppermost band of the canopy remains, made of scattered cyan, light blue, and deep purple tiles. Select your final tray blocks in sequence, starting with the light blue 21, the dark blue 5, the cyan 21, and the cyan 32 block, finishing with the small dark 3 block. Your ants sprint up the cleared side paths and spread across the very top arc of the pixel art. Every remaining block in your waiting slots finds its target without delay. The ants devour the final cluster of pixels, clearing the board entirely and securing your victory on Colony Flow Level 610.
Why This Solution Works
The primary reason this solution succeeds lies in how it respects the physical geometry of the board. The starting layout traps your ants at the bottom, facing a narrow winding stem in the middle and solid food walls on both sides. Trying to tackle the dark purple stem early would be a disastrous mistake. The stem tiles are arranged in a thin serpentine path that only allows a few ants to feed at a time. Committing a dark purple block too soon forces that block to sit in a waiting slot for an extended period, eating up valuable space while other accessible colors pile up in your tray.
By prioritizing the cyan and light blue food along the outer edges, you take advantage of broad surface areas where dozens of ants can feed simultaneously. This rapid consumption ensures that high count blocks drop to zero quickly, keeping your five waiting slots rotating smoothly. Clearing the lower right flank serves a dual purpose by creating an open road straight to the Hungry Door. Because the door requires twenty five tiles, sending ants along that wing satisfies the requirement naturally during normal expansion, unlocking the upper right zone without any wasted moves.
Unlocking that upper quadrant is the exact trigger that solves the rest of the puzzle. It grants access to the golden key, which is the only way to release the padlocked block sitting idle in your tray. Leaving that block locked would deprive you of thirty essential points of clearing power, eventually forcing you to draw too many low value blocks and jamming your waiting tray. Once the key is collected, the padlocked block activates, the Hidden Boxes reveal their colors, and the winding stem can be approached from the sides rather than from a single choked entrance. Every phase of this walkthrough flows logically into the next, ensuring your ants always have open pathways and your waiting slots never hit the fatal five block limit.
Final Thoughts
Colony Flow Level 610 looks intimidating due to the massive volume of food tiles, but breaking down the board along the perimeter keeps the solution clean and manageable. Focus on opening the outer wings, feeding the Hungry Door early, and collecting the golden key before attempting to clear the dense core. If you find yourself unsure about the exact timing of a particular move or want to verify how the ants pathfind around the Hungry Door, take a moment to watch the video walkthrough above this article for a clear visual guide.
Comments