
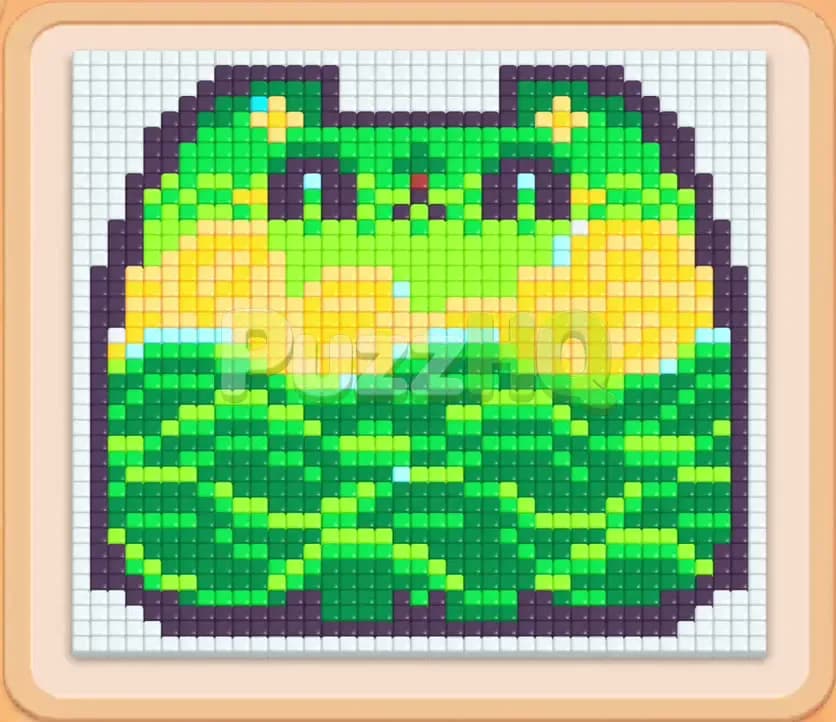
Colony Flow Level 690 brings a bright frog picture to your screen along with a tricky mix of deep stacks and linked puzzle pieces. You will have to think through your tray order carefully because five waiting slots can fill up fast if you pull the wrong color too early. Clearing this board demands solid planning, steady attention to the ant paths, and smart handling of hidden and connected pieces.
Colony Flow Level 690 Overview
What You Are Working With
At the top of your screen sits a detailed pixel art frog made out of several distinct food tile colors. The frog features a dark purple outline, deep green waves across the lower belly, bright green and lime green highlights across the face, and warm yellow patches filling out the cheeks and eyes. A few light blue accent tiles sit tucked near the side boundaries. Below the picture, the ant nest hole releases your eager workers as soon as a matching colored block enters the waiting area.
Between the ant nest and your stacks sits the waiting area, which holds up to five blocks at a time. Beneath the waiting row, you face five columns of stacked number blocks. Every block carries a countdown number showing how many food tiles your ants will chew through before that block vanishes.
This board introduces two crucial obstacles in the stacks. First, you have Hidden Box blocks that show up with a question mark symbol. You cannot see their true color until you clear the blocks resting in front of them and open an exit path. Second, you have Connected Boxes. These are pairs of blocks linked together with a solid bridge. You cannot pull one without pulling the other, which means grabbing a connected pair immediately occupies two of your five precious waiting slots. Managing those twin slots without clogging your board is the central challenge of this stage.
What It Takes to Clear Level 690 Board
Clearing the board requires you to strip away the food tiles from the outside inward, steadily revealing paths for your ants while burning through the exact countdown numbers on your blocks. The outer dark purple border and lower green waves are the easiest targets early on because your ants can reach them right out of the nest. As those outer sections disappear, paths open into the lime green cheeks and the bright yellow center.
Your primary danger is the five slot limit in the waiting area. If all five slots fill with blocks whose colors cannot currently reach matching food tiles on the picture, your ants grind to a halt. When the ants stop and your slots are completely jammed, you instantly lose the level. Winning means you always keep at least one active block working on the board, ensuring that a waiting slot empties out before you draw your next piece.
Colony Flow Level 690 Step by Step Solution
Step 1: Clear the exposed dark green tiles along the bottom edge of the frog.
Begin by selecting the dark green block from the top row of your tray stacks. The ants stream out of the nest hole immediately and attack the dark green waves at the bottom of the frog picture. This block carries a healthy count of thirty, which burns down steadily as the ants chew away the bottom boundary. Because this block finds matching food right away, it does not linger in your waiting slots for long. Clearing these lower green tiles exposes the layer of yellow tiles sitting directly above them and gives your ants wider room to march.
Step 2: Deploy the dark purple block to peel away the outer frame.
Tap the dark purple block with forty points from the left side of your active row. Your ants rush up the outer left and right edges of the frog portrait, devouring the dark purple border tiles. This forty count is large, but having it active right now is safe because the entire perimeter of the picture is wide open for your ants to reach. While this block counts down, your waiting slots stay clean, and you expose the lighter green tiles that make up the frog chin and sides.
Step 3: Use the bright green block to expose the first Hidden Box.
Pull the bright green block from the center column to consume the mid level green tiles across the frog face. As your ants clear this green section, the block below it in the middle stack shifts into view. This reveals the first Hidden Box marked with a question mark. By running the bright green block down to zero, you clear the physical obstruction above that mystery block, preparing it to reveal its color on your next rotation. You still have plenty of open waiting slots because your blocks are actively clearing food instead of sitting idle.
Step 4: Draw the light green block to consume the frog cheeks.
Select the light green block with thirty five points to target the lime colored tiles around the eyes and mouth. The ants spread outward across the upper face, eating away light green pixels in rapid succession. This step is vital because it creates a clear gap between the outer frame and the inner yellow core. Removing these tiles also thins out the top of the board, giving you clean visual lines to see which colors remain blocked.
Step 5: Uncover the first Hidden Box and draw the connected pair into the waiting slots.
Now tap the question mark block that has opened up in the middle stack. It reveals a bright light blue block. Immediately behind it rests a set of Connected Boxes linked by a sturdy bridge. When you draw this connected pair, both blocks slide together into your waiting row, instantly taking up two spaces. One block is light blue and the other is white. Because the light blue accent tiles along the left and right border walls are now exposed, your ants start feeding on them right away, ticking the light blue block down to zero quickly so that slot reopens before any jam can happen.
Step 6: Feed the yellow block to wipe out the cheeks and eyes.
With your waiting area safe and down to a single occupied space from the white block, pull the yellow block with thirty five points. Your ants immediately surge into the center of the frog face, tearing through the bright yellow tiles on both cheeks. This yellow block counts down rapidly. Removing these large patches of yellow frees up the entire middle cavity of the picture, leaving only small patches of green and dark purple behind.
Step 7: Burn through the remaining dark purple border tiles.
Tap the next dark purple block from your tray to clean up the top arches of the frog head and ears. The count on this block drops steadily from twenty eight down toward zero. The ants follow the newly opened corridors along the top of the frame. Because the path remains entirely clear from bottom to top, the ants never pause, ensuring that your waiting slots continue to cycle without any dangerous pileups.
Step 8: Clear the second row of bright green tiles across the belly.
Bring in another green block from the lower stacks to eat through the remaining green horizontal stripes. The ants march in a dense line, clearing out twenty to thirty tiles across the belly area. As these green tiles vanish, the bottom half of the picture becomes completely hollowed out, leaving the board wide open for any stray colors to find clean paths to the top.
Step 9: Reveal and deploy the second Hidden Box from the center column.
Clear the blocking tile in front of the second question mark block in the middle column. Once open, this Hidden Box reveals a deep red block with a very small count. Pull it into the waiting row. Since there is a matching target on the board, your ants consume it almost instantly. Getting rid of this single point piece keeps your waiting area practically empty and clears out the center stack down to its base.
Step 10: Clear the remaining light green clusters around the crown.
Select the final light green block from the tray to mop up the scattered lime tiles around the frog eyes and forehead. Your ants divide into two tidy streams, one heading up the left eye and the other taking the right eye. The number counts down to zero, opening up direct line of sight to the very last cluster of yellow tiles floating in the center.
Step 11: Empty the final yellow and green tiles to finish the picture.
Draw your last remaining yellow block, followed by the small green cleanup block. The ants make quick work of the final four yellow pixels and the last stray green corner. Every single pixel of the frog disappears into the nest, leaving a completely blank grid above and an empty tray below.
Final Thought
Colony Flow Level 690 tests your ability to juggle twin connected blocks while managing hidden tiles in your central stack. If you ever feel stuck on the timing of that connected pair or find your waiting row filling up too fast, take a moment to watch the video above this article to see the exact block rotation in real time. Keep your paths open, stay patient with your waiting slots, and you will clear the board with room to spare.
Comments