
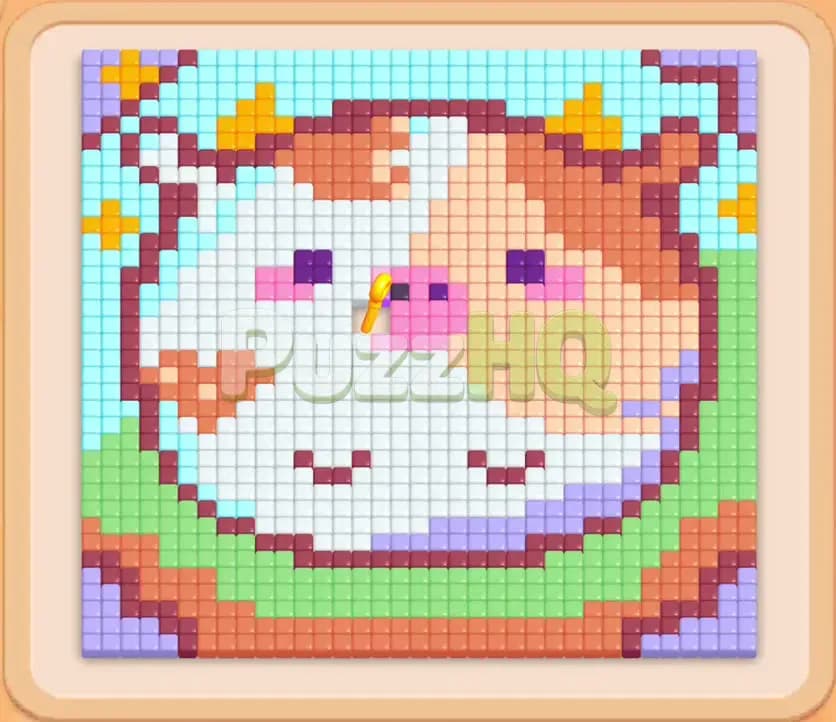
Colony Flow Level 910 presents a deceptively crowded pixel art board featuring a chubby animal face surrounded by lush greenery and a light blue sky. Your primary challenge is navigating a tight sequence of outside perimeter colors while working around a locked block and a hidden mystery box in the tray. If you select blocks without opening immediate paths for the ants, your five waiting slots will jam rapidly, bringing your colony to an abrupt halt.
Colony Flow Level 910 Walkthrough
Understanding the Starting Board
The pixel art displays a charming animal with dark brown ears, reddish brown patches, cream cheeks, a pink nose, deep purple facial features, a bright green leaf base, and a light blue sky border. At the center of the face rests a golden key waiting to be collected.
Your bottom tray begins with five active columns of colored blocks. The top visible row holds cream forty seven, yellow twelve, dark brown forty, reddish brown forty five, and cream forty two. Beneath these sit more colors including pink twenty six, light blue thirty, lavender twenty four, dark maroon fifty five, and bright green forty. Critical special elements are also present. You will spot a yellow block marked with a lock icon, a locked green block, a purple block holding a key requirement, and a hidden mystery box marked with question marks in the lower left column.
The nest sits at the bottom center. When ants leave the nest, their only immediate access points run along the lower corners and bottom perimeter. The outer edges of the image consist of dark maroon, green, and cream tiles. The inner facial tiles and the golden key remain completely blocked until you carve open the right flank of the portrait.
The Key to Clearing Level 910
Success on this stage demands strict discipline with your five waiting slots. Because several blocks in the tray possess high counts, pulling them without an open path guarantees that they will sit idle in your waiting slots.
Your winning strategy revolves around peeling away the right perimeter using dark brown and cream tiles. This allows your ants to burrow straight toward the purple feature near the center where the golden key rests. Once you send ants to collect that key, the locked block in your waiting slots activates and clears out. Managing the tray to continuously feed active ants while revealing the hidden mystery box ensures that you never run out of room.
How to Beat Colony Flow Level 910
Step 1: Open the right edge with dark brown and cream
Begin by selecting the dark brown forty block along with the top row cream blocks. Your ants immediately pour out of the nest and march up the right side of the board. They start chewing through the dark brown corner tiles and transition into the cream sections of the cheek. As these tiles disappear, a tunnel begins to form on the right half of the animal face. Keeping these early selections moving prevents your slots from backing up.
Step 2: Queue the pink and reddish brown blocks
With the right perimeter thinning out, choose the pink twenty six and the reddish brown forty five. The ants continue their loop around the right edge and wrap upward toward the forehead. The reddish brown tiles on the upper right vanish quickly, exposing the inner layer of facial tiles. Meanwhile, the pink block sits ready in your waiting slots, waiting for the path to the nose and cheek patches to fully connect.
Step 3: Clear the purple tile to grab the golden key
Tap the purple block that displays a single tile count. The tunnel you carved on the right now connects directly into the center of the face, exposing the small purple spot right beside the golden key. A swift stream of purple ants marches directly to this spot and consumes the tile. Picking up the golden key unlocks the locked green block that has been occupying one of your waiting slots, instantly setting up your ants to eat the massive green leaf area at the bottom of the board.
Step 4: Unleash green ants on the bottom leaf base
Now that the green block is unlocked, green ants burst forward from the nest toward the bottom border. They clear out broad swaths of green food tiles along the lower frame, stripping away the entire foundation under the animal. Removing these green rows creates open space along the bottom of the board, allowing ants to access lower cheek tiles from both sides rather than funneling exclusively through the right flank.
Step 5: Strip away the light blue border
Select the light blue thirty block from the tray. Your light blue ants take the newly opened perimeter path along the left and top boundaries, eating through the entire sky background. This wide sweep exposes the left ear, the outer cream edge of the left cheek, and several interior spots that were previously unreachable. As the light blue tiles clear, the tray drops down to reveal additional selections, including deeper purple and light cream blocks.
Step 6: Empty the cream facial tiles
With both flanks open, pull the remaining cream blocks showing forty eight and forty nine. A massive swarm of cream ants floods the center of the illustration, devouring the forehead, cheeks, and chin. Because the outer shell of the animal has already been dismantled, these ants spread out smoothly across the middle of the board without getting held up behind barrier tiles. Both cream blocks tick down rapidly and leave your waiting slots completely empty.
Step 7: Clear the dark brown patches and reveal the mystery box
Select the dark brown forty block and the reddish brown blocks that surfaced in the tray. The ants march into the top brow and the side spots, eating the remaining brown patterns on the animal head. Clearing these columns in your tray also triggers the hidden mystery box in the bottom left, unlocking its true color so you can integrate it into your clearing rotation without guessing.
Step 8: Clean up the facial details with purple and yellow
Tap the purple twenty seven and the yellow thirteen blocks. Purple ants tackle the remaining facial outlines and eyes, while yellow ants gather the golden accents on the horns and brow. Because all surrounding cream and brown tiles are already gone, the ants reach these isolated detail tiles instantly. Both blocks empty out in seconds, keeping your slots completely clear for the final phase.
Step 9: Sweep the remaining perimeter accents and finish the board
Your tray now offers your final set of blocks, consisting of low count reddish brown, lavender, and green tiles. Select these finishing blocks in rapid succession. Small groups of ants scurry to the remaining corners, cleaning up the leftover leaf tips and stray ear tiles. Once the final tile disappears into the nest, the level is complete.
Why This Solution Works
The entire architecture of this puzzle relies on a bottleneck around the golden key. In the opening moments, almost all food tiles in the center of the board are inaccessible because they are walled off by perimeter layers. If you select center colors like purple, yellow, or pink too early, those blocks sit in your waiting slots with nowhere for the ants to go. Since you only have five slots to work with, two stagnant blocks will quickly doom your run.
By dedicating your initial moves strictly to dark brown and cream on the right side, you carve a direct channel toward the golden key. Grabbing that key is the single most important event in the level because it liberates the locked green block. The green block would otherwise occupy a slot permanently, cutting your margin of error down to just four slots.
Once the key is collected and the bottom green foundation is eaten away, the board opens in every direction. Ants can navigate through the bottom, right, and top edges freely. This freedom of movement allows you to clear high count blocks like light blue and cream without any risk of stalled ants. Revealing the mystery box only after opening the board ensures that you never get surprised by an incompatible color during the critical midgame transition.
Final Thoughts
Patience and careful route planning on the right perimeter make all the difference in this stage. As long as you prioritize the golden key before committing too many center colors to your waiting slots, the board will open up smoothly. If you want to double check the exact timing of any ant movements or block selections, be sure to watch the walkthrough video above for extra visual guidance.
Comments