
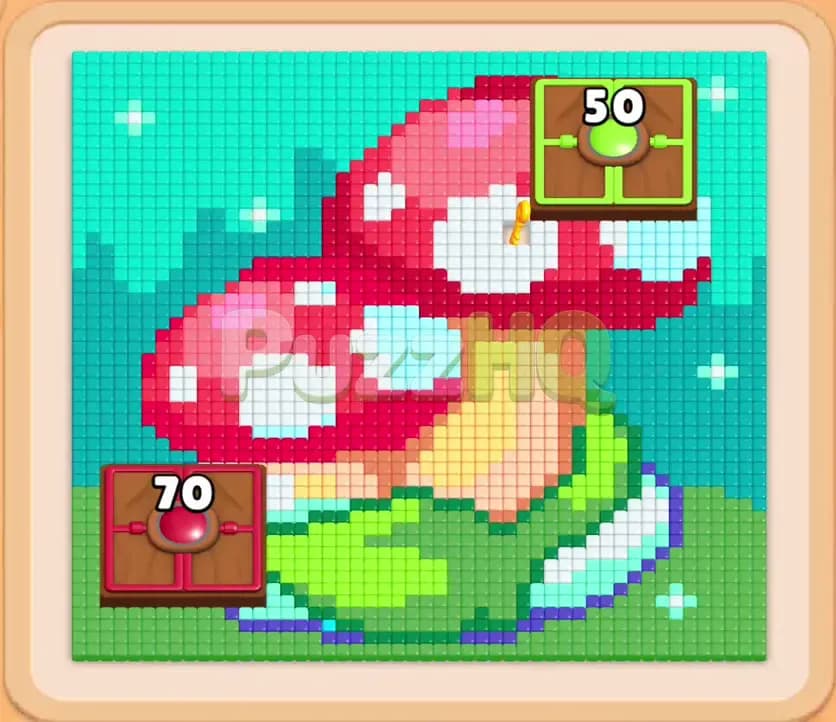
Colony Flow Level 920 tests your patience with tight board routes and bulky doors that block your march. You face a colorful mushroom portrait packed with high count tiles that can easily clog your tray if you rush your pulls. Winning requires careful slot management, steady color matching, and deliberate moves that keep your worker ants constantly chewing through food tiles.
Colony Flow Level 920 Overview
What You Are Working With
The board features a pixel art picture of two forest mushrooms with bright red caps and clean white spots. Beneath the caps sit peach stems rooted in a strip of green grass, all framed by a wide teal sky. Two hungry doors stand directly on the picture, physically barring your ants from reaching the food behind them. On the left side rests a brown hungry door demanding seventy food points to open, while the top right corner holds a green hungry door that demands fifty food points. Your ants must feed matching food into these hungry doors to dissolve them and unlock the rest of the board.
Down in your tray, you work with five columns of numbered color blocks. These blocks feed your colony as your ants march from the nest hole toward matching colors on the board. You also have connected boxes linked by visible tubes, meaning pulling one block pulls its partner or leaves it vulnerable. Further down the columns rests a lock and key block that seals off lower reserve tiles until you claim the key. Above your tray sit five waiting slots. If all five waiting slots fill up with blocks that have no valid path to food on the board, your colony stalls and you lose the game on the spot.
What It Takes to Clear Level 920 Board
Clearing this board requires opening both hungry doors without choking your waiting slots. The seventy point hungry door on the left must be fed with red food tiles, which means your red ants must chew down the mushroom cap while simultaneously delivering food to the barrier. Meanwhile, the fifty point green hungry door guards the upper right edge of the cap and demands green tiles from the grass below.
You must cycle through outer teal blocks first to carve open marching corridors around the picture perimeter. As paths widen, you free the key in your tray, dismantle the connected boxes, and pour matching ants into both hungry doors. Once both doors vanish, the remaining red caps, peach stems, and white spots become fully exposed. You then empty the remaining tray blocks cleanly, maintaining at least one active marching line until the entire picture disappears.
Colony Flow Level 920 Step by Step Solution
Step 1: Open the outer border with teal blocks
Begin by pulling the large teal blocks sitting in your top tray row. The outer rim of the board consists of teal sky tiles that sit completely exposed to the nest hole. Your teal ants stream along the edges immediately, chewing through the sky and creating wide corridors around the entire portrait. This initial perimeter route is vital because it gives future ants space to reach the central mushroom without colliding into blocked obstacles. Watch the teal numbers count down and leave at least two waiting slots open as you transition toward your first interior colors.
Step 2: Break into the connected boxes to release red blocks
Turn your attention to the connected boxes in the middle tray columns. These linked blocks tie up red and green values that you desperately need for the board barriers. Pull the available green block to trigger the connection and drag the large red block into play. Your red ants immediately lock onto the lower left mushroom cap, chewing red tiles and beginning the assault on the seventy point brown hungry door. Keep an eye on your waiting slots here, making sure you only pull a connected pair when the active color already has a direct, unobstructed line to matching food.
Step 3: Route red ants into the left hungry door
Keep your focus squarely on the left side of the mushroom picture where the seventy point hungry door sits. As your red ants chomp through the lower red cap tiles, they channel their energy directly into the hungry door counter, dropping it from seventy down into the low forties. Do not pull random white or peach blocks while this door is still standing. Pulling colors that cannot reach their tiles will park them uselessly in your waiting slots. Let the red ants run their course until the door numbers plummet and the wood barrier shatters completely.
Step 4: Claim the key block to unlock your bottom tray rows
With the left side clearing up, shift your focus down to the tray where the lock block sits under a column of green and yellow numbers. Pull the upper green and tan blocks so the key block reaches the top position. Once you tap the key, the padlock on the lower row pops open, granting you full access to deep reserve blocks including massive white and teal reserves. This move prevents your tray from starving later when you need specific colors to clean up the mushroom stems.
Step 5: Work through the green grass tiles
Now that the left door is gone and your tray reserves are open, pull the green blocks from your tray to clear the patch of grass beneath the mushrooms. The green ants march along the bottom edge, rapidly eating away the foliage and exposing the bottom borders of both peach stems. Clearing the grass also creates an essential open lane along the bottom of the board, allowing peach and white ants to maneuver freely without getting stuck behind the green barrier.
Step 6: Feed the green hungry door at the top right
Direct your green ants upward toward the top right hungry door that requires fifty green points. Because you have already cleared the grass, your green blocks send workers up the right perimeter path directly into the door mechanism. Watch the countdown drop from fifty to thirty four, and then down to zero. The door dissolves, finally granting your ants open access to the upper right section of the large mushroom cap and the hidden white spots beneath it.
Step 7: Clear the peach stems and white mushroom spots
With both hungry doors removed from the board, pull your peach blocks followed by your white blocks. Peach ants swarm the mushroom stems in the center of the picture, removing the central pillar of tiles. Right behind them, white ants rush into the newly uncovered white spots scattered across both red caps. Because white tiles sit in isolated clumps, only pull one white block at a time to ensure your waiting slots do not get cluttered while the ants navigate from spot to spot.
Step 8: Wipe out the remaining red cap and sky fragments
Finish off the level by pulling your remaining red and light blue blocks from the bottom tray row. Red ants clean up the final ragged edges of the mushroom caps while teal ants snap up the stray sky pixels in the corners. With all paths wide open and no doors remaining, the ants sprint across the board in long streams. The numbers on your final tray blocks drop to zero, clearing the waiting slots completely and finishing the picture.
Final Thought
Colony Flow Level 920 demands absolute discipline with your waiting slots while you feed the two hungry doors blocking your march. If you ever feel stuck on which block to pull next, watch the video above this article to see the exact movement timings and tray order in action.
Comments