
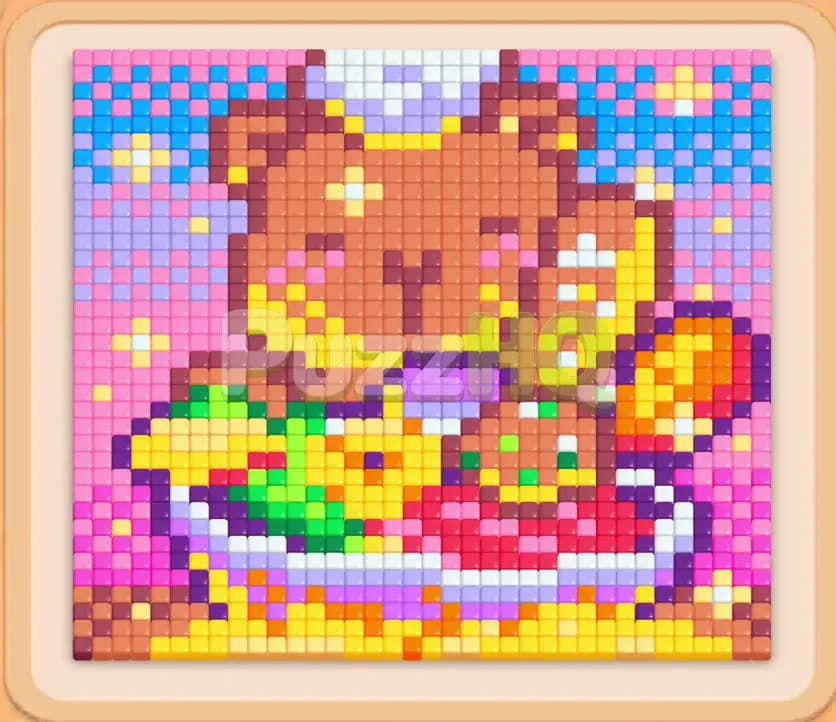
Colony Flow Level 1120 presents a dense pixel art board that looks intimidating at first glance, but it yields quickly once you understand the perimeter routes. You must guide your ant colony around the edges of a colorful food bowl picture featuring a capybara surrounded by fresh ingredients and a starry background. Clearing this puzzle requires steady slot management and clean timing so your ant lines never stall.
Colony Flow Level 1120 Overview
What You Are Working With
The main board displays a pixel art portrait of a friendly brown capybara resting in a feast bowl. The bowl contains crisp green lettuce, bright red slices, golden yellow citrus wedges, and warm orange toppings. Framing this feast is a broad pink border with patches of blue sky and bright yellow stars along the upper corners.
Your ants enter from the nest hole centered directly below the board. To clear food tiles, you pull colored number blocks from the lower supply tray into your five waiting slots. Each block displays a counter that decreases each time an ant carries away a matching pixel.
This level includes connected boxes in the supply tray. These linked units consist of two blocks joined by a rigid bridge piece. When you move a connected pair into your waiting area, it occupies two adjacent slots at the exact same time. You cannot separate them, so you must always maintain enough open slots to fit both halves without jamming your workspace.
What It Takes to Clear Level 1120 Board
To wipe the picture clean, your ants must access every single colored pixel from an open border. Because the image is packed tightly, inner colors like the green greens, red toppings, and center capybara fur remain blocked during the opening moments. You have to strip away the outer pink border and upper star tiles first to carve clean corridors toward the center.
Your primary threat is the five slot limit. If all five waiting slots fill up with blocks whose colors cannot reach matching tiles on the board, your colony stops moving and you immediately lose. Surviving means maintaining at least one active ant trail at all times, burning down numbers quickly, and clearing space before picking up wide connected boxes.
Colony Flow Level 1120 Step by Step Solution
Step 1: Peel away the lower pink border to unlock side channels
Start by selecting the pink blocks sitting in your front tray to target the outer pink frame right above your nest. The pink pixels along the bottom and lower sides sit completely exposed, offering the most direct routes for your ants. Pull the pink block into your waiting slots and let the ants march along both bottom flanks. As the counter winds down toward zero, watch the lower frame dissolve. This opening action clears critical walking space along both the left and right outer walls, which prevents your waiting tray from backing up right at the start.
Step 2: Feed the orange side toppings to widen the entrance
Bring in an orange block from the tray to engage the orange slices resting on the right side of the bowl. Ants immediately divert up the newly opened right flank to reach these exposed citrus pieces. Keep your eyes on the remaining numbers on this block as the counter drops from the high teens down into single digits. By stripping the right side toppings early, you widen the path toward the upper rim of the bowl and prevent incoming orange tiles from cluttering your queue later.
Step 3: Insert the first yellow connected box while keeping slots open
Check your waiting line to confirm you have at least three empty spaces, then pull the yellow connected box from the tray. Because this linked piece claims two slots at once, bringing it in with a crowded tray will instantly cause a loss. The yellow block activates immediately because the yellow tiles along the bottom of the bowl and upper stars are now accessible. Yellow worker ants stream toward the yellow wedges and corner star accents. Both connected halves register ant strikes, reducing their counters and vanishing together as soon as their quotas hit zero.
Step 4: Deploy purple blocks to strip the outer frame corners
Select the dark purple block to dissolve the decorative shadows and border pixels along the bottom edge of the bowl. Your ants will split along the left and right base paths, carrying away the dark purple outline piece by piece. Clearing this dark foundation separates the food bowl from the background and exposes the lower white bowl base. Make sure this block completely finishes and leaves your waiting area before you introduce any new center colors.
Step 5: Send white ants to dissolve the bowl rim and sparkles
With the outer frame thinning out, pull the white block from your tray into an open waiting slot. Your ants will hustle up both flanks to chew through the white rim of the bowl and the tiny white sparkles nestled in the upper corners. The white counter counts down steadily as tiles disappear from the upper canopy and lower dish. Removing these white segments establishes broad highways into the middle layers of the picture, giving your colony direct line of sight to the inner vegetables.
Step 6: Clear the red and green ingredients across the center dish
Now that the white rim is gone, the green lettuce leaves and red tomato slices sit completely open to incoming paths. Pull a green block first to send green ants straight into the crisp leafy pile beneath the capybara. Once the green number ticks down toward single digits, drop in a red block to start dismantling the tomato chunks. Running these two vegetable colors back to back carves out the entire lower half of the capybara body, ensuring your waiting slots remain breezy and clear of congestion.
Step 7: Release blue ants to erase the upper sky corners
Pull the blue block into your available waiting slot to target the blue sky patches in the upper left and upper right corners. The ants will climb the tall outer avenues you created earlier and swarm across the top blue field. Watch the blue counter drop swiftly as the background dissolves. Erasing these sky sections strips away the final backdrop tiles and leaves the brown capybara completely isolated in the center of the board.
Step 8: Chew through the main capybara body with brown blocks
Draw your primary brown blocks into the waiting area to begin dismantling the capybara head and ears. Since brown forms the largest color block on the board, your ants will create a dense, continuous stream from the nest directly up the center channel. Let the brown counter tick down steadily. Avoid pulling random extra blocks while this heavy color processes so your waiting slots do not fill up unexpectedly.
Step 9: Resolve the final yellow connected box to clear the remaining garnish
As the brown tiles thin out, you will uncover the remaining yellow pieces that sit on top of the capybara head. Pull the final yellow connected box into your open slots. Because you preserved room in your waiting bay, the two linked yellow segments slide in without triggering a jam. Yellow ants rush up the center to consume the final crown tiles, burning off the remaining points on both linked halves until the pair vanishes from your tray.
Step 10: Sweep up the final crumbs to finish the board
Your board now has only tiny fragments of brown fur and stray white highlights remaining. Pull your final brown and white singles to clear out the last few pixels. The worker ants quickly march over the empty board, snatch up the final crumbs, and carry them down into the nest hole. With all tiles erased and the tray empty, the picture clears and you secure victory on this stage.
Final Thought
Keeping your waiting slots clear is the secret to conquering Colony Flow Level 1120, especially when handling those wide connected boxes that occupy two spaces at once. Always clear outer borders before trying to touch center ingredients so your ants never hit an invisible dead end. If any of the path choices feel tricky to visualize while playing, take a moment to watch the video above this article to see the exact tile order in action.
Comments