
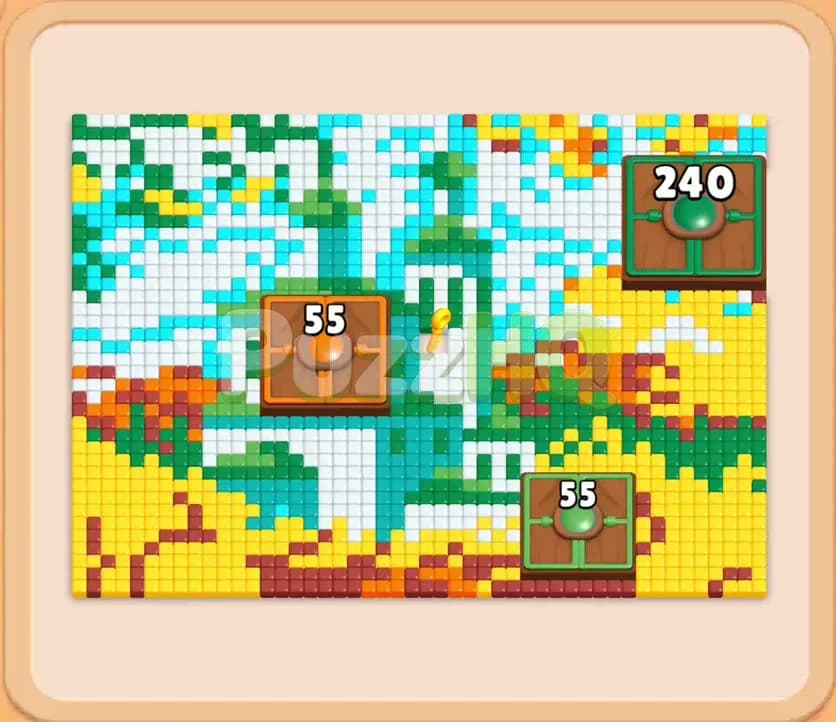
Colony Flow Level 1134 presents a massive landscape of classical architecture, dense foliage, and open skies that can overwhelm you if you pull blocks without a clear target. Finding the correct Colony Flow Level 1134 solution requires carefully managing your five waiting slots while whittling down the massive Hungry Doors that seal off large portions of the board. With multiple layers of colorful tiles and a locked tray block complicating your choices, this guide covers every move needed to clear the map completely.
Colony Flow Level 1134 Starting Setup
Reading the Board
The puzzle opens with an intricate pixel art scene depicting ancient temple columns surrounded by green hills, golden ground, and a sprawling blue and white sky. Across this landscape sit three large Hungry Doors with counters that demand hundreds of matching food pieces before they swing open. Near the center rests an orange Hungry Door marked with fifty five, while the lower right features a green Hungry Door also displaying fifty five. Over in the upper right, a massive green Hungry Door dominates the sky with a staggering requirement of two hundred and forty food tiles.
At the bottom of the screen, you have five empty waiting slots above a multi layer tray packed with numbered blocks. The visible front line includes maroon twenty six, orange twenty, yellow forty, dark green forty, and light yellow forty six. Peeking out from the second layer are cyan thirty two, yellow forty, dark red thirty, light yellow forty five, and teal forty. Furthermore, beneath the second layer sits a cyan block with a padlock symbol, meaning the Lock and Key mechanic is in play. You must free up the corresponding key from the board to unlock that trapped block before it becomes available for selection.
What You Need to Watch Out For
The primary danger on this board is slot suffocation caused by the three Hungry Doors. Because each door requires a high volume of food, sending ants to work on tiles that do not feed directly into open pathways will leave your waiting slots clogged with active blocks. If you place five blocks into the top row and their ant trails stall out behind unopened doors or inaccessible tile clusters, you instantly run out of moves and fail the level.
You also have to balance the high value green blocks with the smaller accent colors like maroon, brown, and orange. The dark green and teal blocks carry massive numbers, but picking them too early without exposing their matching tiles will cause the blocks to linger in your slots. Clearing the perimeter colors systematically ensures that paths widen, keys are collected, and the Hungry Doors steadily tick down to zero without ever freezing your workflow.
Colony Flow Level 1134 Step by Step Walkthrough
Step 1: Open Pathways Across the Lower Ground
Begin by tapping the accessible blocks on the front layer of the tray that directly target the exposed edges of the landscape. Selecting the orange twenty and yellow forty sends steady columns of ants marching into the lower field, stripping away the sandy golden tiles and the earthy foundation beneath the center structure. As these ants feast on the perimeter, the central orange Hungry Door immediately begins registering deliveries, dropping its counter from fifty five down toward thirty five.
At the same time, pull the light yellow forty six and dark green forty to tackle the green slopes along the left and bottom right borders. These selections clear out the initial buffers of ground tiles, opening wider corridors for future swarms. Watch your tray uncover the second tier, revealing white blocks, teal blocks, and the locked cyan thirty two. Your waiting slots currently cycle through blocks cleanly because the bottom edge of the board has plenty of exposed food for the ants to reach without hesitation.
Step 2: Push Toward the Center Door and Unlock the Key
With the ground layer broken open, you can now direct attention to the lower right green Hungry Door and the center orange door. Bring in white nineteen, teal eleven, and yellow three to clear out the scattered fragments surrounding the center temple area. The white ants carve directly through the bright clouds and column highlights, while the teal and yellow ants clear out mixed patches around the lower borders.
As these paths deepen, your ants collect the key nestled within the terrain, releasing the padlock from the cyan block in the lower tray. Meanwhile, the steady consumption of orange tiles brings the center Hungry Door down from thirty five to twenty five, and the green consumption drops the top right door from one hundred and eighty down toward one hundred and twenty. Keep your slots rotating by selecting the cyan nineteen and cyan eight to clear out the lower sky fragments, ensuring that no more than three or four slots remain active at any given moment.
Step 3: Crack the Lower Green Door and Drain the Center
Now that the board has widened considerably, focus on whittling down the lower green Hungry Door, which displays thirty five, and the center door, now down to twenty. Select dark green thirty four, cyan thirty, and yellow thirty from your newly accessible tray options. The dark green ants split their efforts, feeding both the lower right green door and the massive upper right door.
Add the white thirty one and white thirty five into the mix. A heavy swarm of white ants streams into the sky and the intricate marble work of the temple columns. The center orange door drops to single digits, and the lower green door sheds its requirement steadily as green foliage vanishes from the hillsides. Because these numbers are high, keep an eye on your remaining tray blocks so you do not queue up duplicate colors before the current swarms finish eating their target paths.
Step 4: Dismantle the Temple and Vanquish the Orange Door
Continue by deploying teal twenty one, cyan six, and yellow three to finish stripping the golden soil and mid level structures. As these ants clear the final orange and yellow accents near the middle, the center orange Hungry Door completes its counter, drops to zero, and opens completely. This clears a massive spatial bottleneck right in the heart of the board.
Behind the opened orange door, the green columns and white entablature of the classical temple stand fully exposed. Tap yellow forty two, orange twenty, and dark red thirty to eliminate the stubborn brick colored accents and surrounding hillside patches. The lower green Hungry Door is now down to fifteen, and the massive top right green door has plummeted to forty three. With the center open, your ant paths have straight, uninterrupted lines from the nest straight into the upper half of the board.
Step 5: Finish the Lower Green Door and Expose the Secret Chamber
Your next objective is clearing the remaining green tiles around the bottom right corner to eliminate the lower green door once and for all. Select teal nine, yellow twenty nine, and the remaining green blocks from your tray. The green ants rush into the lower structure, delivering the final fifteen points needed to open the lower green Hungry Door.
Once that door pops open, the bottom half of the screen is virtually spotless, leaving only the upper temple ruins and the looming top right green door with forty points remaining. Select white forty and dark red ten to clear out the lingering fragments near the top left corner and around the temple base. The top right door ticks down to exactly forty, waiting for the final push of green food to trigger its release.
Step 6: Trigger the Giant Upper Door
With only the temple and the top right door left on the board, target the green tiles forming the temple columns. Pull dark green fifteen and cyan thirty. The green ants devour the temple pillars and transport the food directly into the top right green Hungry Door. The counter winds down from forty to zero, and the gigantic door swings open to reveal a hidden chamber packed with dense clusters of white, blue, and yellow food tiles.
At this stage, you might feel a brief spike of panic seeing dozens of new tiles suddenly flood the upper right corner, but your tray is perfectly prepared. The waiting slots should be nearly empty, giving you full freedom to pull the exact blocks needed for this final hidden room.
Step 7: Clear the Final Hidden Chamber
The newly exposed chamber contains fresh layers of white clouds, golden sun tiles, and bright cyan sky. Tap white thirty three, orange, and yellow seven, followed quickly by white twelve and cyan four. A massive, multi colored highway of ants forms along the right perimeter of the screen, wrapping around the border and plunging straight into the hidden enclave.
The white ants strip the clouds away in seconds, the yellow ants consume the golden core, and the cyan ants polish off the remaining blue backdrop. Watch the remaining numbers on your blocks drop to zero in rapid succession. Once the last tile in the upper right pocket disappears, the entire board clears out, and victory is yours.
Colony Flow Level 1134 Winning Strategy
The Most Important Moves
The absolute turning point of this level is managing the center orange Hungry Door while freeing the locked cyan block in your tray. If you ignore the center door and try to tunnel exclusively into the upper sky, your paths get squeezed into narrow choke points that slow down your ant flow. Committing to the orange and yellow ground tiles early guarantees that the center door disappears, opening a wide highway for the rest of the puzzle.
Equally critical is pacing your green block selections. The massive green door in the upper right requires two hundred and forty food, which means green blocks will spend long stretches of time sitting in your waiting slots while their numbers slowly decline. You must pair green selections with smaller, fast clearing blocks like yellow, orange, or teal. That way, slots constantly open up while the green ants perform their long term work.
Keeping the Ants Moving
To prevent your five waiting slots from jamming, never place two high number blocks of the same color into the active row unless there is an abundance of exposed tiles on the board. When you select a block with thirty or forty points, ensure that the matching food is actually reachable from the current ant tunnels. If those tiles are buried behind Hungry Doors or other colors, those blocks will sit completely idle.
Pay close attention to how ants route around the board edges. In this level, ants love to skirt along the outer borders when traveling to the top right corner. Keeping those outer edges free of obstructing tiles allows the swarms to travel at maximum speed, cutting down the travel time between the nest and the food. Fast travel times mean numbers drop quickly, freeing up your waiting slots for the next necessary color.
Colony Flow Level 1134 Final Tips
When you replay or attempt this level, practice patience during the mid game transition. It is very easy to feel rushed when three different Hungry Doors are visible on screen at once. Remember that the doors do not have timers, so you can take as long as you need to scan your tray and select the ideal color. Focus on the doors with the smallest requirements first, as opening the fifty five point doors gives you immediate breathing room and clears space for better pathing.
Always monitor the progression of the lock and key. Do not waste moves trying to guess what is under the locked block. Simply clear the natural path of tiles leading toward the key, pick it up, and fold that newly unlocked cyan block into your rotation when the upper sky tiles become your main target.
If any pathing choice or block order seems tricky to follow while playing, take a moment to watch the video above the article. Seeing the exact ant streams navigate the borders will make your victory on this challenging stage much easier.
Comments