
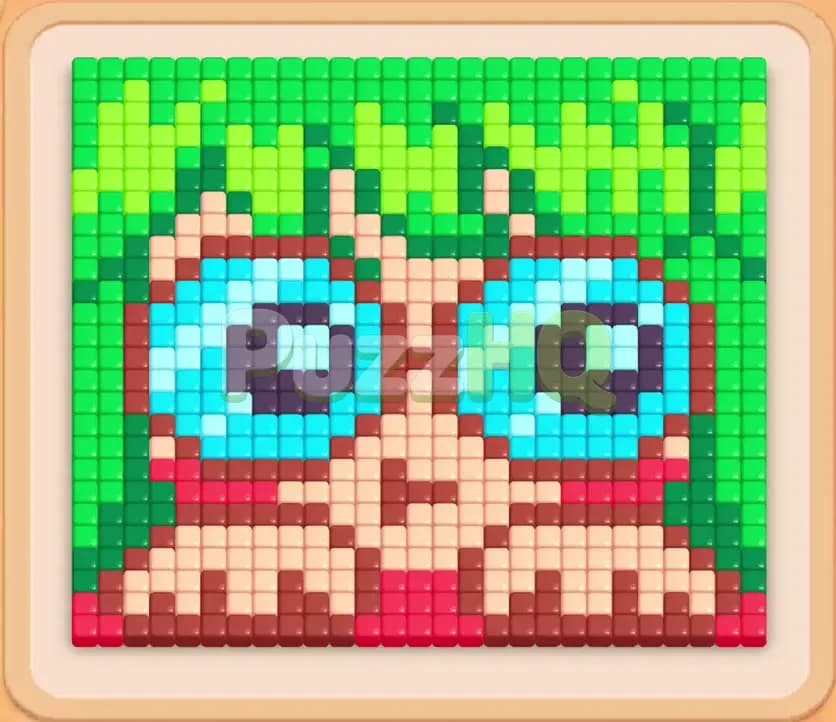
Colony Flow Level 110 presents a vibrant pixel art character sporting oversized glasses and spiky hair, surrounded by dense layers of food tiles. Your main objective is to guide your ants through this intricate maze of colors by releasing the correct blocks from the bottom tray without clogging your five waiting slots. If you choose colors whose food tiles are trapped behind exterior barriers, your waiting slots will quickly fill up and bring your entire colony to an abrupt halt. Clearing this stage requires opening outer paths systematically before diving into the internal features of the portrait.
Colony Flow Level 110 Walkthrough
Understanding the Starting Board
The starting layout forms a colorful portrait of a boy with bright green spiky hair, large cyan glasses framing dark blue pupils, peach beige skin tones, and a red shirt collar along the bottom. Framing the entire portrait is a wide perimeter of green food tiles, while two beige blocks representing hands or feet anchor the lower corners. The nest sits directly below the board, meaning the ants must first move into the lower border before they can branch out toward the sides or head upward into the hair.
Looking at your bottom tray, you will see several tiered rows of colored numbered blocks. The visible options include beige 35, light green 21, cyan 18, and green 27 on the top visible row, with numbers like red 25, light green 50, dark red 29, and green 30 sitting just beneath them. Further down the queue, you can spot cyan 36, cyan 50, dark blue 34, and green 20 waiting to be revealed as the upper blocks disappear.
Standard open paths dictate the entire flow of this puzzle. There are no gimmicks like chocolate, locks, hungry doors, or expanding food pipes on this board. Your main obstacle is the physical layering of the food tiles. The dark blue pupils are completely sealed inside the cyan eye frames, the red shirt is partially boxed in by the bottom beige hands, and the facial skin is buried under the hair and glasses. Choosing an interior color too early will leave that block sitting idle in your waiting slots, drastically reducing your room for maneuver.
The Key to Clearing Level 110
Success on this level depends on peeling away the outer protective shells before touching the inner colors. Your five waiting slots provide very little margin for error. If all five slots become occupied by blocks that cannot find a clear walking path to their matching tiles, the run ends instantly. Therefore, your primary directive is to maintain an open ant highway by targeting outer edge colors first.
The winning order revolves around clearing the bottom beige anchors and the surrounding green frame early. Once the ants consume the lower beige sections, a wide opening emerges right in front of the nest, giving you direct access to the red shirt. Similarly, chewing down the outer green borders exposes the external edges of the cyan glasses. Only after the cyan glasses begin to dissolve can you safely introduce dark blue blocks to devour the pupils. Managing the numbers on your blocks so they exhaust completely before you pull new colors will keep your waiting slots clean and ready for action.
How to Beat Colony Flow Level 110
Step 1: Open the lower perimeter with green and beige blocks
Begin the level by selecting green 27 and beige 35 from the top row of your tray. Green ants immediately rush out of the nest and begin chewing along the lower green border and the outer margins, while beige ants march toward the lower hand tiles. The beige number quickly drops toward 24 as the ants take apart the bottom corners. Stripping away these lower border tiles is vital because it establishes clear exits from the nest. Without this initial move, the central path remains pinched, preventing your ants from spreading freely across the playfield.
Step 2: Clear the red collar and widen the entrance
With the bottom beige tiles receding, the red shirt collar becomes fully exposed to incoming paths. Select the red 25 block from the tray. Your red ants will immediately charge into the lower section, targeting the red shirt and reducing the block number down to 11 and eventually 4. At the same time, select green 35 to keep the green ants chewing away at the vertical green borders flanking the portrait. This dual pressure rapidly empties out the lower third of the board and creates a wide central boulevard for the ants to march through.
Step 3: Tear down the green side walls and activate cyan
Now that the lower paths are wide open, you need to strip away the side walls that enclose the head. Select green 34 from the tray to continue the assault on the green foliage, followed by cyan 18. Cyan ants stream straight up through the cleared base and latch onto the outer rims of the giant spectacles. The green ants steadily strip the side borders, turning the frame count down and revealing deeper tray blocks. By addressing cyan now, you begin weakening the thick barrier that hides the dark blue center of each eye.
Step 4: Attack the exposed dark blue pupils
As the cyan ants dismantle the outer spectacle frames, the inner dark blue pupils finally become reachable. Select dark blue 34 from the bottom tray. Dark blue ants will march straight through the gaps in the cyan spectacles to attack the pupils, reducing the block count to 10 in rapid succession. At the same time, draw another red 14 block to finish off the lingering red shirt tiles and red cheek accents. Clearing red completely frees up a waiting slot, which gives you crucial flexibility as more blocks enter the queue.
Step 5: Peel back the glasses and expose the inner face
Continue breaking down the eye regions by selecting cyan 11 and an additional cyan 18 block. The cyan ants rapidly clear out the bridge of the glasses and the lower rims, exposing the delicate peach beige tiles that make up the character cheeks and nose. As these cyan blocks hit zero and leave the tray, your dark blue blocks will also finish eating the pupils, vacating two full waiting slots. This dramatic clearance opens up the entire core of the character face, allowing paths to branch directly into the upper half of the board.
Step 6: Carve into the dense spiky hair
With the lower face open, your primary focus shifts to the massive clump of green hair across the top of the canvas. Select green 43 and light green 19 from the tray. Your green ants will stream up through the center of the face and branch out to consume the spiky hair strands. As the green numbers tick down, select green 34 and green 33 to maintain continuous pressure on the foliage. The solid block of green hair begins to break apart into smaller, isolated clusters, revealing the upper forehead and temple tiles beneath.
Step 7: Clear out the remaining facial contours and side remnants
Now you must clean up the lingering fragments around the eyes and temples. Select cyan 33 and red 25 to wipe out the remaining eye contours and any stray red highlights. Follow this by activating a beige block to send ants across the freshly uncovered forehead and cheekbones. Because the hair is largely gone, the ants have completely unrestricted access to every part of the upper board. The waiting slots remain safe because every active block has an abundance of matching food tiles waiting along clear pathways.
Step 8: Perform the final sweep on the remaining hair and base
Finish off the level by selecting beige 36 and green 43 to clean up the final tiles. Beige ants clean away the remaining chin and forehead tiles, while green ants devour the very tips of the spiky hair strands. Watch as the numbers on your final blocks tick smoothly down to zero. The last remaining food tiles vanish from the canvas, and your waiting slots clear completely as the victory animation bursts across the screen.
Why This Solution Works
The primary reason this solution succeeds is strict adherence to outer layer elimination before touching inner colors. In Colony Flow Level 110, the board is constructed like an onion, where each concentric ring of tiles shields the inner details. The dark blue pupils are the most obvious trap on the board. Selecting dark blue at the start would be fatal because the pupils are completely enclosed by cyan glasses and green borders. An unplayable dark blue block would sit trapped in a waiting slot for several minutes, stealing twenty percent of your reserve capacity and making a tray jam almost inevitable.
Another vital element of this strategy is opening the nest perimeter early. Because the ants must physically walk from the nest at the bottom into the puzzle area, any congestion right outside the nest creates a bottleneck. Clearing the beige hands and the bottom green edge instantly widens the exit corridor. This wide corridor allows multiple streams of ants, such as green, red, and cyan, to march simultaneously without stalling one another. A wider path also ensures that as soon as an interior color becomes exposed, ants can reach it without waiting for an adjacent lane to clear.
Queue management in the bottom tray also dictates the flow of this walkthrough. Several large blocks, including green 43 and green 50, require a massive number of matching tiles to clear out. By systematically attacking the dominant colors like green and cyan in measured waves, you avoid having two massive blocks of the same color competing for limited tiles. Instead, each block is introduced when there are more than enough accessible tiles to drain its counter rapidly. This steady rhythm guarantees that your five waiting slots never fill up, allowing you to complete the level smoothly.
Final Thoughts
Patience and path planning make Colony Flow Level 110 fully manageable once you understand how to peel away the outer portrait layers. Always remember to prioritize the outer green borders and bottom beige tiles before touching the glasses or the pupils. If you ever feel uncertain about an ant movement or need to verify path access before tapping a block, take a moment to look at the video above the article for a visual check on the exact route.
Comments