
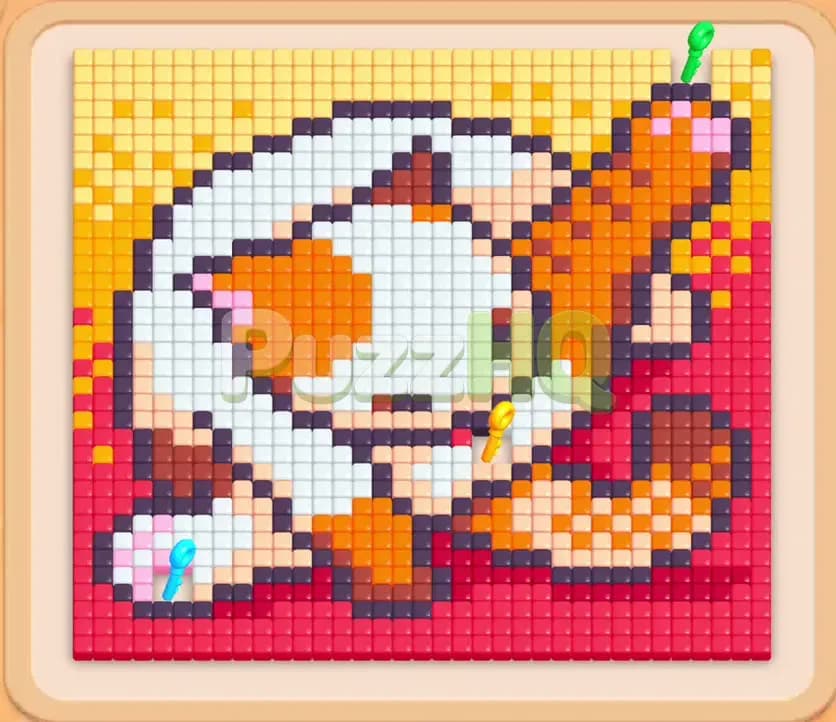
Colony Flow Level 120 presents a tricky pixel art board where a curled cat rests against a bright yellow background and a red base border. The main challenge comes from managing cramped waiting slots while juggling connected blocks and multiple locked stacks in your tray. You need to focus on chewing through the outer perimeter in a disciplined order so your ants can grab keys and open up the rest of your tray before your slots fill up completely.
Colony Flow Level 120 Walkthrough
Understanding the Starting Board
When you start Colony Flow Level 120, you face a detailed pixel art cat made of white fur, orange spots, dark brown outlines, and small peach accents. Surrounding the upper portion of the cat is a broad field of yellow food tiles, while the bottom of the board is framed by a thick horizontal strip of red food tiles. Several keys sit directly on the board among the food tiles. A green key rests near the top right yellow area, a cyan key sits by the lower left paw, and a yellow key waits inside the lower body area.
Looking down at your tray, you immediately notice two major special elements that dictate your moves. The first is a connected red block combining values of 120 and 72 with a solid bar between them. Because this is a pair of connected boxes, selecting it consumes two of your five waiting slots at the same time. The second element is the lock and key system. Three separate vertical columns in your bottom tray are locked behind yellow, green, and cyan padlocks. You also have open blocks for yellow with a value of 149, peach with 75, dark brown with 80, orange with 35, and white with 40. Your primary obstacle is the lack of breathing room in your five waiting slots, because committing two slots to the connected red block leaves you with only three slots to handle every other color until those red tiles vanish.
The Key to Clearing Level 120
Success on this board depends entirely on timing your color selections so that food tiles disappear from the outside inward. Because the yellow food forms the entire upper perimeter and the red food seals the bottom edge, you cannot reach the internal white and orange tiles right away. If you tap white or peach too early, those blocks will sit idle in your waiting slots, causing an immediate game over when all five slots clog up.
The winning strategy requires you to commit the connected red block alongside the large yellow block right at the start. That leaves two remaining slots for dark brown and orange, which strips away the outer outline and frees up the path to the green key. Once that green key enters your possession, the green lock in your tray pops open to reveal crucial low count blocks. From there, you gradually chip through the left side to release the cyan key, then dig into the center to collect the yellow key. Keeping at least one waiting slot free whenever possible ensures your ants never stall.
How to Beat Colony Flow Level 120
Step 1: Select the Connected Red Block and Yellow Block
Begin the stage by tapping the connected red block and the yellow 149 block from the top row of your tray. The connected red block immediately occupies two waiting slots, showing its combined values as red ants begin swarming from the nest toward the long red border at the bottom of the board. Tapping the yellow block takes up a third waiting slot, sending a huge line of yellow ants to chew through the top and side background tiles. These two colors must start early because their tile counts are massive and they block all physical access to the inner portions of the cat. Watch your red count drop rapidly as the bottom border thins out, while the yellow ants steadily work their way down toward the green key located in the upper right quadrant.
Step 2: Deploy Dark Brown and Orange to Strip the Outer Outline
With three slots in use, you have room for two more blocks before your tray jams completely. Tap the dark brown 80 block and the orange 35 block. Dark brown ants immediately travel along the exposed upper outline of the cat, chewing away border tiles and separating the yellow background from the white body. At the same time, orange ants stream toward the tip of the tail and the outer orange fur patches. As these ants clear their targets, you create multiple entry points into the body of the figure. The dark brown number drops swiftly because its tiles are openly accessible along the top curves, which prevents your waiting slots from staying packed for too long.
Step 3: Collect the Green Key and Free the First Locked Column
Keep your focus on the top right area where your yellow ants are finishing the surrounding background. As the yellow tiles around the top edge vanish, the ants walk over the green key and collect it automatically. Collecting this key instantly unlocks the green lock sitting in the middle of your tray. This reveals a brown 15 block underneath and unlocks adjacent options. By this point, your dark brown block has cleared its initial quota and cleared out of its waiting slot, leaving you with open space. Your yellow block will also be whittled down to a single digit number, meaning your queue is finally stabilizing after the intense opening pressure.
Step 4: Add Orange to Continue Chewing the Tail and Back
Now that you have an open waiting slot, tap another orange 35 block from your active options. The orange ants swarm directly to the curled tail and the large orange spots along the back of the cat. Because the dark brown outline along the top has already been eaten, the orange tiles are fully exposed and clear without hesitation. Your connected red block is still sitting in your first two slots with a low number, patiently waiting for the last few red tiles along the bottom corners to become reachable. Adding orange keeps the flow of ants steady while preventing any idle pauses that could interrupt your progress across the board.
Step 5: Gather the Cyan Key and Clear Lower White Fur
Turn your attention to the lower left region where your ants have eaten through the red base and the outer edge of the cat's paw. This clears a direct walkway to the cyan key. Once an ant walks across that tile, the cyan key triggers and pops open the cyan lock in your tray. This unlock exposes a fresh white 38 block and additional brown choices beneath it. Tap the white 40 block now that the cat's back and sides are open. White ants quickly swarm across the spine and upper torso of the cat, rapidly knocking down the white tile count and opening up the dense middle section of the picture.
Step 6: Grab the Yellow Key and Unlock the Final Tray Stack
With the white fur being eaten away, the inner chest and belly area of the cat opens up completely. This exposes the yellow key resting near the center of the figure. Your ants march across the open space, pick up the yellow key, and release the yellow lock on the left side of your bottom tray. This opens up the remaining stacks of peach and brown blocks. Tap the peach 75 block and another white block to deal with the inner facial shading and remaining chest tiles. At this stage, your five waiting slots will hold your lingering connected red block, orange, peach, and white, but every active color has a clear path to follow, so your ants never get stuck.
Step 7: Clear the Final Core Tiles and Finish the Level
As the white and peach ants clear away the face, ears, and belly, the last isolated red tile at the edge of the base is finally consumed. The moment that tile disappears, your connected red block clears completely, instantly freeing up two waiting slots in your tray. With plenty of empty room, tap the remaining dark brown, orange, and white blocks from your tray. The ants quickly converge on the final few tiles in the middle of the cat, wiping out the dark brown facial details, the last orange patch, and the remaining belly fur. Once the very last food tile is eaten, the board clears and you complete the stage.
Why This Solution Works
The entire puzzle in Colony Flow Level 120 revolves around the connected red block. Because connected boxes require two waiting slots instead of one, you must operate with only three flexible slots for the vast majority of the stage. If you make the mistake of pulling colors that lack open paths, those three remaining slots will fill up in seconds, ending your run. Activating red and yellow immediately is essential because those colors form the outer shell of the artwork. Clearing them strips the boundary and gives every other color room to travel.
The lock and key mechanics also dictate your order of operations. The green key at the top right must be collected first because the yellow background naturally leads your ants straight to it. Unlocking the green stack gives you access to lower value blocks that clear quickly, ensuring you can rotate fresh blocks in and out of your waiting slots. The cyan key follows naturally as the red base erodes, which unlocks the white blocks you need to enter the inner cat body.
Finally, the yellow key acts as the ultimate gatekeeper for the core of the board. By leaving the interior peach and white tiles for the middle and late stages of your run, you ensure that you never summon ants for tiles that are still trapped behind outer layers. Once the yellow key unlocks the remaining tray blocks and the connected red block finishes its final tile, your waiting slots expand from three slots back to five, giving you effortless control over the final cleanup.
Final Thoughts
Patience and strict slot awareness are your greatest assets when tackling Colony Flow Level 120. By allowing the outer red border and yellow background to lead you directly to the keys, you unlock your tray steadily without ever risking a slot jam. If you find yourself unsure about ant travel paths or want a closer look at how the ants navigate past the locks, take a moment to watch the video above the article to see every move executed in real time.
Comments