
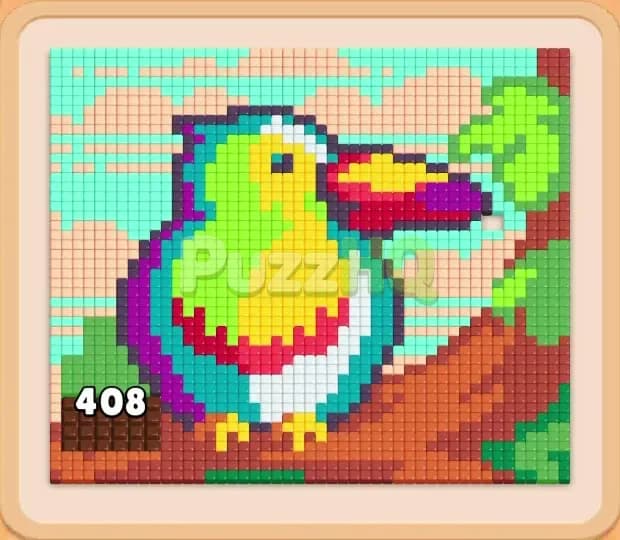
Colony Flow Level 114 brings a vibrant tropical toucan to life across more than four hundred colorful food tiles. Your primary challenge in this stage centers around balancing heavy color demands while maneuvering around stubborn obstacles across the tree branch. Clearing every piece of food requires a strict picking sequence so your ant trails continue marching without clogging the bench.
Colony Flow Level 114 Board Breakdown
Starting Colors and Blocks
The mosaic showcases a majestic toucan resting peacefully on a thick wooden branch. A pale checkered sky surrounds the upper half of the board, setting a light backdrop for the bird. The toucan features lime green plumage covering the crown of its head, bordered by deep purple feathers that establish the outline. Its oversized beak combines a bright red stripe, deep maroon accents, a sunny yellow streak, and a dark tip. A radiant yellow belly commands the center of the figure, paired with a white chest and bright teal wing highlights. The sturdy wooden branch beneath the bird consists of warm brown tones.
At the bottom of the screen, the tray holds rows of numbered blocks waiting for selection. Visible initial blocks include teal 45, red 15, maroon 32, purple 14, and red 26 connected to a brown block. Stored underneath are more color supplies such as brown 15, lime 15, red 12, green 21, and white 57. Beneath the picture frame sits the underground nest, where ants pour out and march along clear corridors to reach matching food tiles.
Paths, Obstacles, and Limited Space
You must manage the five waiting slots located directly above the block tray. Whenever you pick a block from the lower stacks, it moves into one of these five slots while ants emerge from the nest to consume matching food tiles. If all five waiting slots fill up and no active block can find accessible food tiles, your colony halts and the level ends immediately.
Several special elements complicate your progress on this stage. Connected Boxes appear in the tray, linking two distinct colored blocks by a pipe. When you select a connected unit, both linked blocks move forward, demanding two open waiting slots and immediate food availability for both colors. Hidden Boxes marked with question marks obscure their colors until you clear away surrounding blocks in the tray. On the board itself, a slab of Chocolate covers sixty two branch tiles, preventing direct access to the underlying wood until your brown ants chew through the chocolate layer completely.
Colony Flow Level 114 Complete Solution
Step 1: Free the sky border and begin the beak
Select teal 45 along with peach 12 from the upper tray. Peach ants pour out from the subterranean nest and march up the outer edge of the frame to harvest the sky tiles. Meanwhile, select red 15 and maroon 19. Red and maroon ants advance toward the upper beak and the chest line, chipping away at the outer boundaries of the toucan. Removing these exterior boundary tiles broadens the marching corridors and ensures that subsequent waves of worker ants will reach the interior mosaic without getting trapped.
Step 2: Chew through the chocolate slab on the branch
Tap the connected pair featuring teal 14 linked to the brown block. Brown ants immediately rush across the lower platform toward the chocolate slab that covers sixty two food tiles on the perch. Because chocolate behaves like standard food, the brown ants chew through the sweet barrier and steadily reduce its count. At the same time, teal ants consume the sky tiles on the upper corners. As peach 12 and red 12 finish draining their numbers, two waiting slots open up, giving you breathing room to address the deeper layers of the tray.
Step 3: Strip the dark outline and crown plumage
Select dark purple 4 along with dark green 1, red 4, and peach 6. Dark purple ants travel along the outer perimeter of the toucan head and back, removing the dark structural pixels that frame the bird. Green ants target the crown of the head, stripping away the upper lime feathers above the eye. Peach ants continue sweeping up remaining background tiles. The removal of the dark purple border opens fresh path access directly into the toucan white chest and inner wing, allowing interior colors to become viable targets.
Step 4: Deploy high count colors to strip the white breast and branch
Select teal 63, brown 39, red 7, dark purple 16, and white 9. All five waiting slots become occupied during this sequence, creating a high tension moment where steady ant flow is mandatory. Brown ants flood the wooden branch, demolishing the remaining wood now that the chocolate has vanished. White ants march into the newly exposed breast area, rapidly eating through the bright plumage. Teal ants chip away at the upper canopy while red ants consume the chest trim. As red 7 and white 9 clear completely, slots reopen just in time to avoid a stall.
Step 5: Unveil hidden boxes and trim the lime back feathers
Clear surrounding tray blocks to unveil the first batch of question mark boxes. These reveal essential colors including purple 12, grey 17, and lime 33. Move lime 4, lime 10, dark grey 5, and white 18 into play. Lime ants swarm the upper back of the toucan, eating through the plumage and creating wide pathways along the upper spine. White ants clear the final bits of chest feathers, while dark grey ants strip away boundary shadows. The rapid departure of these smaller blocks maintains healthy slot turnover.
Step 6: Handle connected pairs and clear remaining beak colors
Select the connected pair containing white 2 and green 1, followed by the linked white and green 4 blocks. Because you cleared the chest and crown earlier, both white and green paths remain completely unobstructed, allowing both connected pairs to drain without delaying each other. Ants clear the last traces of white from the chest and finish the crown plumage. Tap purple 12 to dispatch purple ants toward the beak tip and small body accents, opening up direct line of sight to the yellow belly.
Step 7: Clear the teal wing section and lower branch pixels
Select teal 2, red 2, teal 75, and dark grey 25. Large swarms of teal worker ants stream into the lower wing area, chewing through the thick patch of blue and teal feathers. Red ants finish off the remaining scarlet flecks on the bird chest. Dark grey ants clean up the final accent points around the tail and lower branch. Brown 12 and peach 27 step forward in the tray, ready to clear the remaining background crumbs and wooden knots.
Step 8: Consume the yellow belly to complete the level
With the perimeter, beak, wing, and branch completely eliminated, the massive yellow belly sits fully exposed in the center of the board. Select brown 3 to remove the final branch pixel, followed by the yellow blocks that drop into the active queue. A massive flood of yellow ants pours out of the nest, marching directly into the core of the toucan. The yellow belly tiles dissolve into the nest within moments, leaving a pristine empty canvas and securing victory.
Key Moments in Colony Flow Level 114
The Move That Opens Up the Board
The critical breakthrough occurs during the second step when you target the sixty two chocolate tiles covering the branch. Until that chocolate is cleared, the entire lower wooden structure remains off limits. Brown ants cannot reach the underlying branch tiles, and the tight spacing near the bottom leaves zero room for error. Triggering the connected teal and brown block allows brown ants to devour the chocolate barrier while teal ants strip perimeter tiles. Once that chocolate layer crumbles, worker ants enjoy open access across the entire lower half of the screen, eliminating the primary bottleneck of the puzzle.
Finishing the Remaining Food
The endgame sequence succeeds because of your discipline in preserving the yellow belly until the final stage. The yellow belly represents one of the largest single color concentrations in the entire mosaic. However, it sits entirely enclosed by dark purple outlines, white chest feathers, and teal wings. Attempting to pull yellow blocks into your waiting row early in the stage would completely clog your slots, because yellow ants would find zero open entry points. By patiently removing the perimeter plumage, stripping the beak, and breaking the branch first, you leave the yellow belly exposed on all sides. When the yellow blocks finally enter your tray, the ants swallow the remaining food in one swift motion.
How to Avoid Getting Stuck on Level 114
The biggest danger on Colony Flow Level 114 comes from mismanaging the connected boxes in the tray. Linked pairs consume two waiting slots at the exact same moment. If you pull a connected pair when only one of the two colors has accessible tiles on the board, the second block sits completely inert in your waiting area. Having an inert block occupying one of your five precious slots cuts your working room by twenty percent. Always verify that both linked colors have clear walking routes to open food before you touch a connected block.
Another common hazard is grabbing high value blocks too early. Blocks with counts above sixty require extended time to drain. If you load multiple high count blocks into your waiting slots simultaneously, your bench stays congested for minutes. During that window, if an unexpected color requirement emerges or a hidden box reveals an unhelpful shade, you risk completely running out of open slots. Alternate high count selections with smaller numbers such as four, five, or seven so your waiting queue continuously cycles and frees up space.
Finally, pay close attention to the question mark boxes tucked inside the lower tiers. Do not rush to expose hidden boxes if your waiting row is already carrying three or four active colors. Clear the visible blocks that match currently exposed board tiles first. This keeps your ant lines flowing smoothly and ensures that when a hidden box finally reveals its identity, you possess enough open slots and accessible food paths to absorb whatever color appears.
Final Thoughts
Patience and strict color discipline are the keys to conquering Colony Flow Level 114. By breaking down the chocolate on the branch early, peeling away the dark border feathers, and saving the massive yellow belly for the finish, you maintain full control of your waiting slots from start to finish. If any specific block transition in this guide feels tricky to visualize during your run, watch the video above the article to see every move executed in real time.
Comments