
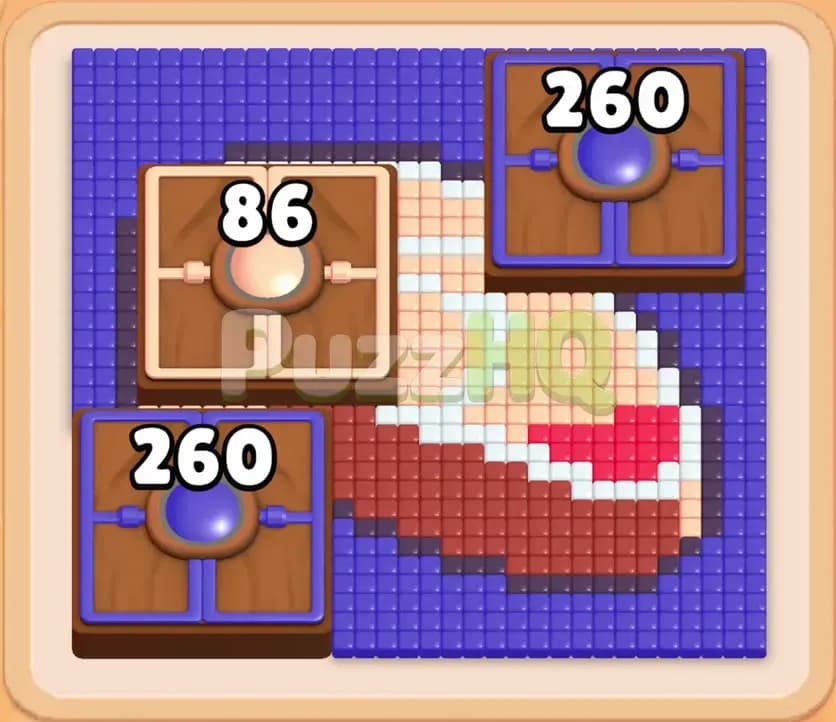
Colony Flow Level 127 presents players with an intricate pixel art puzzle shaped like a hearty marbled steak set against a dense blue background. Your main goal is to guide ants across the board to devour all the colored food pieces without letting your five waiting slots get clogged. The real brilliance of the solution lies in how you systematically unlock the inner paths to trigger the massive linked boxes before clearing out the outer border.
Colony Flow Level 127 Starting Setup
Reading the Board
When you inspect the board at the beginning of the level, you will see a massive cut of meat outlined in white, peach, and vibrant red tones. Surrounding this meat silhouette is an extensive border of dark blue food tiles that wraps around the entire upper and outer margins. The ant nest is positioned at the lower center of the screen, providing immediate direct access only to the bottom edge of the food formation.
Several large wooden obstacles dominate the playing area. In the upper left corner sits a wooden box displaying a starting counter of 86. More prominently, two massive Connected Boxes occupy the upper right and lower left quadrants. Both Connected Boxes display an identical counter of 260. Because they are linked together, any work your ants do against one box will reduce the counter on both. Below the playfield, your tray holds rows of colored blocks displaying distinct numbers, while five empty waiting slots sit ready to receive your selections.
What You Need to Watch Out For
The primary danger on this board is the limited access to the blue food tiles early in the game. With two huge Connected Boxes demanding 260 blue points each, selecting blue blocks too early will cause those blocks to sit idly in your waiting slots. Because you only have five slots available, placing inactive blocks there will quickly leave you with no room to maneuver.
Another critical hazard is opening too many colors at once. If your ants cannot reach a path leading to matching food, the chosen block stalls in a waiting slot until a passage opens. You must carefully eat away the lower red and pink meat section first. Only after you expose the marrow and marbling can your ants travel deeper into the layout to reach the upper sections and the heavy blue perimeter.
Colony Flow Level 127 Step by Step Walkthrough
Step 1: Carve into the Bottom Edge of the Meat
Your opening move requires you to activate the food directly facing the nest exit. Tap the red 25 block and the black 25 block from the visible tray. Red ants immediately surge out of the nest and begin chewing into the bottom boundary of the red meat cutlet.
As those initial tiles vanish, clear space emerges directly above the nest hole. This initial bite creates the necessary clearance for adjacent colors. You can now tap the white 45 block and the peach 26 block to begin attacking the lighter fatty sections along the lower right flank. Watch your slots as these initial blocks count down and empty out, ensuring that you maintain at least three open slots at all times.
Step 2: Clear the Deep Red Meat Center
With the lower threshold broken, the deep red food cluster becomes completely accessible to your colony. Select the red 31 block and follow it with another red block from the lower tray. The red ants will stream rapidly through the opened gap, stripping away the central red cluster of the steak design.
As the red core disappears, it opens wide corridors extending into the peach and white sections above. Notice that clearing this red section exposes the edges of the peach pathways that lead directly toward the upper left wooden box. By keeping your attention focused strictly on the red food, you cleanly empty your red blocks from the waiting slots, freeing up space for the next phase.
Step 3: Attack the Peach and White Marbling
Now that the central core is hollowed out, shift your focus to the peach and white tiles that form the upper marbling. Tap the peach 23 block and the white 47 block. Ants of both colors will march straight through the newly opened central tunnel.
As the peach ants chew through the food on the left side, look closely at the wooden box in the upper left corner. Its counter drops noticeably from 86 down to 81, and then continues downward as more matching food is removed. At the same time, white ants eliminate the white bone structure in the upper right quadrant. This coordinated clearance broadens the paths significantly, exposing the interior blue edges that connect to the bottom left Connected Box.
Step 4: Reduce the Upper Left Numbered Box
Continue directing your ants into the upper left region of the meat cutlet. Select the remaining peach blocks and any available low number white blocks, such as the white 25 block. Your ants will systematically chew away the remaining light colored tiles surrounding the upper left structure.
During this sequence, the counter on the upper left box drops sharply from 81 down to 24, and then finally down to just 4. Because you have kept the waiting slots clear of stray blue blocks, your peach and white blocks process rapidly without causing any bottlenecks. The entire inner layout of the steak is now almost completely devoured, leaving only thin borders of food and exposing the massive blue structures.
Step 5: Begin Feeding the Connected Boxes
With the inner paths fully carved open, your ants finally have direct physical contact with the blue sections and the Connected Boxes. This is the exact moment to bring blue blocks into play. Tap the blue 36 block and the blue 30 block from your tray.
Blue ants emerge in huge lines, splitting their attention between the exposed blue border tiles and the two Connected Boxes. Watch the counters on both boxes carefully. As the ants strike the lower left box and adjacent blue tiles, the number on both the lower left and upper right Connected Boxes drops simultaneously from 260 down to 194, and then further down to 176. Because the boxes are linked, progress on one immediately counts for the other.
Step 6: Shatter the Connected Boxes Completely
The upper left box with 4 points now clears completely as your last peach ants finish their path, vanishing from the board and freeing the entire upper left territory. Now you can focus entirely on destroying the Connected Boxes. Tap the remaining blue blocks, including the blue 34 and blue 28 blocks.
A relentless stream of blue ants enters the board, marching along both the left and right pathways. The twin counters on the Connected Boxes plunge rapidly from 176 down to 128, and finally all the way to 0. Both wooden structures break apart simultaneously, leaving behind wide open spaces and uncovering the dense blue perimeter tiles that were previously cut off behind them.
Step 7: Clear the Final Perimeter and Stray Food
Now that the major wooden obstacles are gone, only outer blue tiles and a tiny handful of peach and white crumbs remain along the edges. Select the blue 18 and blue 12 blocks, along with the white 8 block to finish off the remaining fragments.
Your ants will travel along the outer perimeter walls, sweeping from the top left corner, across the top ceiling, and down the far right edge. Because every path is entirely open, the ants move at top speed. The final blue blocks in your waiting slots count down to zero, the remaining crumbs disappear into the nest, and the board clears completely for the win.
Colony Flow Level 127 Winning Strategy
The Most Important Moves
The absolute foundation of this Colony Flow Level 127 solution is delaying your blue block selections until the middle of the game. It is tempting to grab blue blocks early because they are visible in your tray and the Connected Boxes show huge numbers. Doing that too early is a fatal mistake because the paths to the blue food are physically blocked by the steak artwork.
The true breakthrough occurs when you hollow out the red center and clear the light marbling. That path creation allows your ants to reach both sides of the board simultaneously. Once your blue ants have an unobstructed route to the lower left Connected Box, both Connected Boxes crumble at double speed. Prioritizing the internal food before touching the perimeter is what guarantees victory.
Keeping the Ants Moving
To prevent your five waiting slots from overflowing, you must match your block choices to currently accessible food. In the early stages, only red and peach food tiles have direct lines of sight to the nest. Selecting blocks of those colors guarantees that the ants will start eating immediately, which rapidly frees up the waiting slots.
Whenever you notice three or more slots occupied, stop picking new colors. Instead, pick blocks that share a color with an already active swarm. This ensures that every block entering the waiting rack starts counting down right away rather than sitting motionless. Maintaining a continuous flow through the five slots keeps your colony productive from your first move to your last.
Colony Flow Level 127 Final Tips
When you attempt this level yourself, pay close attention to how the upper left box responds to your moves. That box is tied directly to the clearance of the adjacent marbling tiles. If you neglect those peach and white tiles, you will find yourself blocked from accessing the upper boundary of the board later on. Carving out that corner early simplifies the late stage cleanup dramatically.
Be equally disciplined with the Connected Boxes. Because their numbers are linked, you do not need to stress about clearing paths to both boxes at the same time. Focusing your blue ants on whichever Connected Box has the easiest and shortest path will automatically drain the score on the other one. Keep your waiting slots clean, follow the color progression from the inside out, and you will easily clear the stage.
If you find yourself stuck on any specific tile transition or want to see the exact ant movements in real time, take a moment to watch the complete video walkthrough above this article to verify each step.
Comments