
Colony Flow Level 157 puts your spatial awareness to the test with an intricate pixel art puppy that hides tricky surprises behind a thick wall of perimeter food. You face dense color groupings along with mystery crates and linked pieces that will clog your tray in seconds if you tap without a plan. Clearing this board requires strict control over your five waiting slots and a constant focus on keeping pathways open for your marching colony.
Colony Flow Level 157 Overview
What You Are Working With
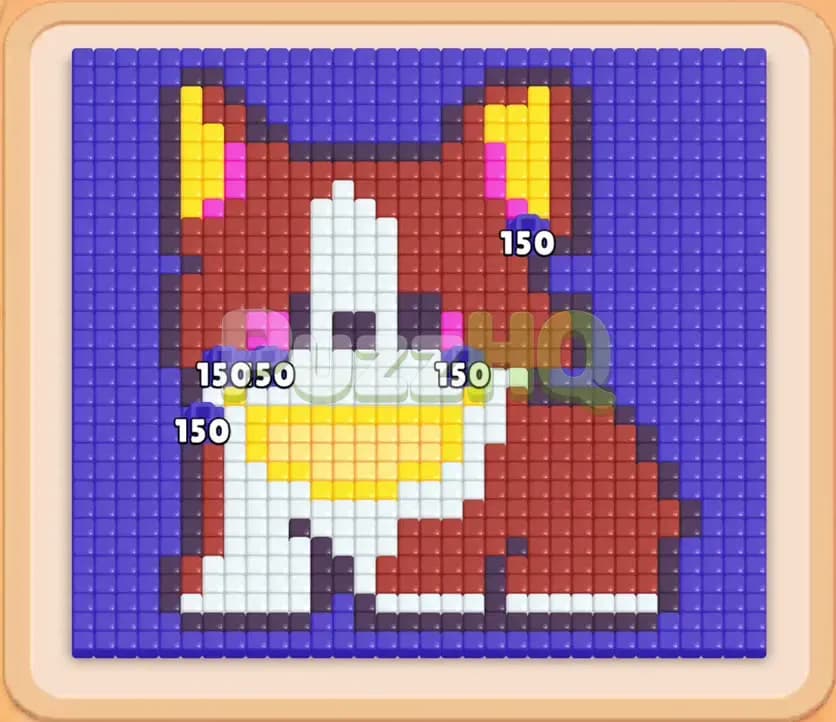
When you load into the stage, the top display presents a charming pixel art dog surrounded by a wide border of dark purple background tiles. The dog itself features warm brown fur across the head, ears, and body, bright white fur running down the facial blaze, muzzle, and paws, vibrant yellow patches inside the ears, a broad yellow bib across the chest, and small pink accents on the cheeks. A dark outline defines the paws, nose, and body contour.
Look closely at the board tiles and you will notice that certain color clusters carry countdown values like one hundred fifty on the brown ears and body, fifty on the forehead, and one hundred fifty on the yellow bib. These numbers mean your ants need dozens of trips to fully erode those high density food zones.
At the bottom of your screen sits the block tray arranged in vertical columns. Each block shows a specific color and a starting number that ticks downward as your ants consume the matching food tiles on the board.
Two special board mechanics appear on this specific layout. First, you will encounter the Hidden Box. A Hidden Box looks like a plain grey mystery block with a number on it while waiting behind other pieces in the tray. It refuses to reveal its true color until you clear the piece in front of it and open a valid forward path. Second, you will face Connected Boxes. These are linked blocks physically joined by a connecting bar across neighboring tray columns. When you manipulate Connected Boxes, both ends take up room in your waiting slots as a unified pair, meaning you must have sufficient space and valid food targets ready before pulling them.
Between your tray and the pixel art board sit exactly five waiting slots. Whenever you tap a block from an open tray column, it immediately jumps into an available waiting slot. Ants then stream outward from the central nest hole toward the board to deliver matching bites until the block count drains to zero.
What It Takes to Clear Level 157 Board
Clearing the board on Colony Flow Level 157 is all about peeling layers from the outside inward while defending your five waiting slots from a fatal gridlock. The ant colony streams out of the nest hole in the dirt floor below the picture frame. When the level begins, those ants can only reach the outer edges of the image because the inner tiles are physically blocked by neighboring pixels.
The core lose rule in Colony Flow is unforgiving. If your five waiting slots fill with blocks and your ants cannot reach matching food on the board, you deadlock immediately and lose the attempt. A single careless tap on a color that has no accessible target will park that block uselessly in a waiting slot. Do that five times, or leave four slots occupied while pulling a linked pair that cannot fit, and your run ends on the spot.
To win this level, you must first break through the dense purple border. Once the purple outer barrier falls away, your ants gain open marching paths to the brown ears, the white chest, the pink cheeks, and the yellow bib. You must also time your pulls so that the Hidden Box on the left reveals its color safely, and handle the Connected Boxes only when your waiting slots have plenty of breathing room. By systematically draining the block counts and carving pathways toward the dog center, you clear every pixel and guide the colony to victory.
Colony Flow Level 157 Step by Step Solution
Step 1: Drain the front blue blocks to dismantle the outer purple frame
Your opening move must focus on clearing the perimeter tiles so the ants can actually reach the dog inside. Tap the front blue seventy block from the tray to move it into your first waiting slot. Blue ants immediately rush out of the nest hole and begin chewing away at the bottom edge of the purple background. Follow up by tapping the second blue seventy block to double your blue ant stream. The numbers on these blue blocks rapidly drop as the ants strip away the lower purple perimeter. Keep your remaining three waiting slots empty for now so you maintain total board flexibility while the blue ants carve open the bottom access routes.
Step 2: Introduce brown and yellow blocks to chew into the dog exterior
With the bottom and side borders thinning out, pull the brown sixty eight block and the yellow ten block into your waiting slots. Brown ants march toward the exposed brown coat on the lower right flank of the dog, while yellow ants head toward the outer tip of the dog ear. The large health counter on the brown body drops from one hundred fifty down toward fifty six as the ants steadily chip away at the fur. Because you still have one open waiting slot, you run zero risk of jamming. Allow the yellow ten block to fully deplete and vanish from the waiting slots before you touch any other piece.
Step 3: Uncover the hidden box on the left by removing the dark front block
Turn your attention to the left tray column where a dark thirty block blocks a grey mystery crate. Tap the dark thirty block into your empty waiting slot so dark ants can begin chewing on the dark outline tiles near the base of the dog paws. The moment that front block clears the column, the Hidden Box directly behind it wakes up and transforms from grey into a bright white fifty one block. Revealing this block early is essential because you now know you have plenty of white food support ready for the dog chest and facial blaze.
Step 4: Deploy the white fifty one block to clear the paws and chest
Tap the newly revealed white fifty one block into an open waiting slot. A swarm of white ants streams out of the nest hole and heads straight into the white paws and lower chest tiles that were recently uncovered by your brown and dark ants. As the white count drains from fifty one downward, the white paws dissolve into clean board space, opening wider paths toward the center of the picture. Meanwhile, your dark thirty block finishes its countdown and leaves the waiting area, restoring an empty slot to your buffer.
Step 5: Pull the yellow connected boxes across your open slots
Look at the lower section of your tray where the Connected Boxes are waiting. These linked yellow units share a connector bar, which means pulling them demands two available waiting slots. Tap the yellow pair to draw it forward. The linked yellow boxes enter your waiting slots displaying their countdown values. Yellow ants instantly swarm toward the yellow bib on the chest and the remaining yellow patches in the dog ears. As the yellow bib shrinks and vanishes, the counter on the connected boxes drops steadily from twenty two down to single digits. Do not touch any other block until this connected pair clears, guaranteeing that your waiting row stays open.
Step 6: Clear the pink cheeks and break the core brown body patches
Now that the central bib is gone, the dog face is fully exposed. Tap the pink fourteen block into an available slot to summon pink ants. These pink ants target the small rosy patches on both cheeks, clearing them out in seconds. At the same time, bring in the brown sixty five and brown seventy blocks from the tray. Your brown ants surge upward to attack the high density brown ear tiles, driving their counts down from fifty six all the way to twenty and then zero. With the cheeks and main coat cleared away, the puppy head separates from the surrounding tiles, giving you unrestricted pathways across the entire upper board.
Step 7: Finish the dark outlines and consume the final white facial pixels
You have arrived at the home stretch where only the dark facial contours and the center white blaze remain. Tap the dark twenty four and dark twenty one blocks to send black ants after the eyes, nose, and head outline. Pull the remaining blue block to sweep away the final stray purple tiles in the upper corners. Lastly, tap the white thirty five block into your waiting row. White ants march directly up the center of the snout and forehead, eating every remaining pixel of the blaze. The waiting slots empty out one by one as the numbers hit zero, leaving a completely spotless board and completing the level.
Final Thought
Colony Flow Level 157 looks intimidating because of the massive food health numbers and the tight perimeter, but keeping your waiting slots clean turns this puzzle into a smooth, satisfying clear. Always give high priority to breaking open the outer border before you worry about the interior colors, and never pull Connected Boxes until you have empty slots waiting to receive them. If any specific tap or timing sequence feels tricky to execute in your own playthrough, take a moment to watch the video above this article to see the exact flow in motion.
Comments