
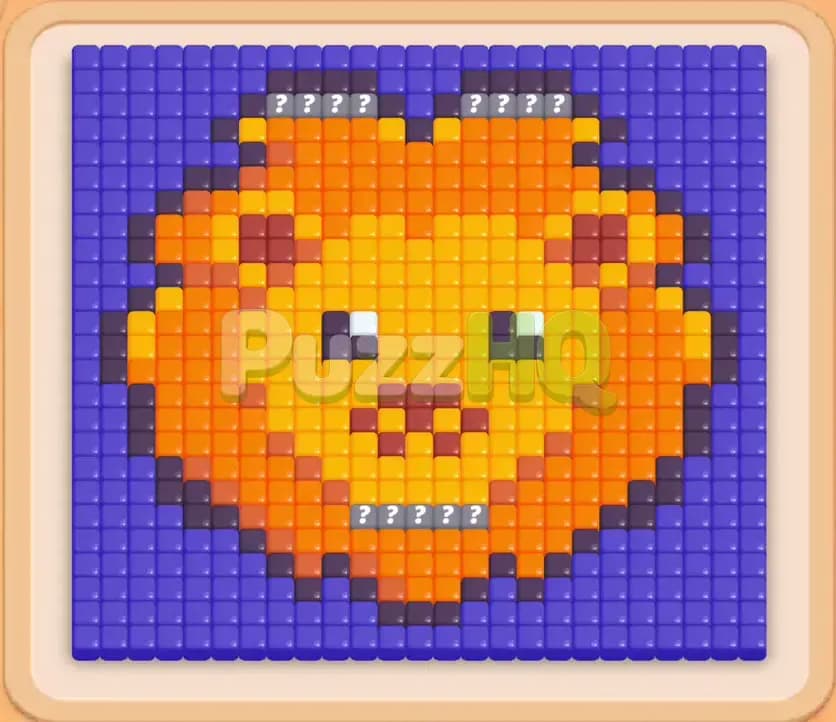
Colony Flow Level 117 presents a dense pixel art lion portrait wrapped inside a solid border, challenging your ability to open paths without overcrowding your tray. With five limited waiting slots and connected pairs of blocks to juggle, a single hasty tap can easily jam your board. By focusing on carving an entrance through the lower boundary before committing your interior colors, you can keep your ants flowing smoothly from start to finish.
Colony Flow Level 117 Walkthrough
Understanding the Starting Board
When the puzzle begins, your board displays a majestic lion face enclosed by a thick blue frame. The lion itself is built from several distinct layers. An outer mane of vibrant orange rings the head, while warm yellow fills the cheeks, forehead, and center face. Deep brown tiles form the facial details, marking the eyes, nose, and mouth.
At first glance, the nest at the bottom has zero access to the lion because a solid wall of blue tiles blocks the entire lower edge. In addition to this barrier, you will notice mystery elements positioned across the layout. Five Hidden Food tiles sit along the lower chin, marked with question marks until neighboring tiles are removed. Two additional groups of four Hidden Food tiles are embedded near the top edge of the frame, concealing their colors behind question marks.
Down in your block tray, you face another major mechanic in the form of Connected Boxes. Certain numbered blocks are physically linked by wooden rods, meaning that selecting or unlocking one directly ties into the adjacent piece. Your available tray contains a mix of blue, orange, yellow, and brown blocks in varying quantities, with numbers ranging from small single digit values up to large counts of forty and fifty. The core obstacle here is the restricted access to inner tiles. If you pull yellow or brown blocks into your five waiting slots before the blue border and orange mane are breached, those blocks will sit completely idle, taking up precious room and triggering an instant defeat.
The Key to Clearing Level 117
Success on Colony Flow Level 117 comes down to disciplined slot control and peeling the puzzle apart from the bottom upward. Because the ants emerge from the nest near the bottom edge, your very first objective must always be the lower blue boundary. Clearing that single strip instantly creates an active channel into the lion chin and gives your ants a direct line of sight to the interior colors.
Managing the five waiting slots requires you to balance large numbers against small, quick clears. You never want to have five large blocks occupying the slots simultaneously while ants slowly nibble away at distant tiles. Instead, you need to alternate between heavier blocks that clear main pathways and smaller blocks that deplete rapidly. When dealing with Connected Boxes, inspect both connected colors before tapping. If one color has an open path on the board but the other color is still buried deep inside the portrait, pulling that pair into your slots too early will strand one block indefinitely. By maintaining at least two open waiting slots throughout the middle portion of the stage, you give yourself the flexibility needed to absorb new blocks and react as Hidden Food tiles reveal their true shades.
How to Beat Colony Flow Level 117
Step 1: Break Through the Lower Blue Wall
Your opening move focuses entirely on the blue barrier separating your nest from the bottom of the lion portrait. Tap the visible blue blocks from the top layer of your tray, specifically utilizing the twenty five blue and forty blue options. The moment these blocks enter your waiting slots, blue ants swarm forward from the nest and begin devouring the horizontal blue line along the bottom floor. As these blue tiles vanish, the pathway opens upward, bringing your ants directly against the bottom edge of the orange mane and the mystery chin tiles. The count on your blue blocks ticks downward rapidly, creating your first genuine breach into the main structure while leaving plenty of room in your waiting slots for the next sequence.
Step 2: Uncover the Chin and Engage Connected Pairs
With the lower perimeter dismantled, the five Hidden Food tiles along the lion chin reveal themselves, showing a combination of orange mane borders and dark mouth tiles. Now is the right time to pull an orange block and your initial brown block into the active slots. You will also encounter your first pair of Connected Boxes, where a yellow forty block is linked to an orange twenty five block. Because both the orange chin tiles and the lower edges of the yellow face are now within reach of the opening you created, selecting this connected pair is completely safe. Orange ants rush in to dissolve the lower beard and mane, while brown ants head into the exposed mouth area. This coordinated push clears out the entire base of the chin, widening the central hallway and exposing the bottom row of yellow face tiles.
Step 3: Chew Inward Through the Yellow Cheeks and Brown Nose
Now that the mouth and lower cheeks are wide open, you need to clear room in your waiting slots by eliminating smaller feature colors. Tap the smaller brown blocks, including counts of nine and sixteen, alongside the active yellow blocks. Yellow ants flood into the center of the portrait, eating through the lower cheeks and spreading upward toward the nose and eyes. Meanwhile, brown ants target the facial features directly above the cleared mouth. Because the brown facial features consist of relatively few tiles, these brown blocks deplete quickly, reducing their numbers to zero and clearing out of your waiting slots. This rapid turnover is critical because it keeps your five slots fluid, allowing you to pull fresh blue and orange blocks from the tray without risking a bottleneck.
Step 4: Advance Along the Outer Mane and Flanking Blue Borders
With the central face hollowed out, the remaining yellow tiles retreat toward the forehead, and the outer structure of the lion becomes the primary focus. Select the thirty three blue block and follow up with orange blocks to address the thick mane columns flanking the left and right sides. Blue ants begin marching up both the left and right exterior borders, stripping away the outer casing of the portrait. Simultaneously, orange ants tear into the vertical columns of the mane. As these flanking columns shrink, the yellow face becomes almost completely detached from the outer frame, giving your ants multiple access angles from both the center and the sides. Your waiting slots will temporarily hold higher values here, such as thirty seven brown, seventeen blue, and thirty five yellow, but because every single one of these colors currently has active, reachable tiles on the board, ants continue moving without interruption.
Step 5: Hollow Out the Forehead and Reach the Upper Frame
Continue your push upward by selecting the remaining yellow blocks, including counts of twenty and thirty five, to wipe out the forehead and eyebrows. As the yellow ants finish off the very last face tiles, the entire center of the board becomes open space. At the same time, select the remaining blue blocks, including the forty eight blue and fifty blue, to drive your blue ants all the way to the top boundary. The blue ants work along the upper corners and roof of the frame, finally touching the edges of the two mystery clusters located near the top. As the adjacent blue tiles are eaten away, these Hidden Food tiles unlock and reveal their hidden identity as orange mane tiles. Watching these mystery tiles convert to orange confirms that no surprise colors remain, meaning you only need to manage orange and blue to wrap up the puzzle.
Step 6: Clear the Remaining Blue Frame and Finish the Mane
With the upper frame heavily damaged, bring in your final blue block to clean up the last few blue pixels across the roof. Blue ants swarm along the top edge, clearing every scrap of blue and causing the final blue block to hit zero and vanish from your tray. All that remains on the board is the top crest of the orange mane, including the newly revealed tiles from the mystery clusters. Tap the final orange blocks, including the thirty orange block waiting in the lower tray. A massive wave of orange ants pours from the nest, traveling through the vast open space of the hollowed out portrait and converging on the top crest. The counter on your final orange block ticks down smoothly to zero, the last orange pixel disappears, and bright victory stars burst across the screen to signal complete stage completion.
Why This Solution Works
The primary reason this strategy succeeds on Colony Flow Level 117 is the strict adherence to directional clearing. Mobile puzzle layouts featuring enclosed shapes often tempt players to select interior colors immediately because those colors appear central and plentiful. However, in this game, ants must physically walk along open paths from the nest to reach matching food. Tapping interior colors like yellow or brown at the start would instantly fill your waiting slots with unusable blocks, because the outer blue frame completely seals off the lion portrait. By sacrificing your initial moves entirely to the bottom blue border, you build a wide highway straight into the core of the puzzle.
Another vital element of this solution is the careful handling of Connected Boxes. Linked blocks force two different colors into your tray at the exact same moment. If you activate a connected pair when only one of those two colors has an open path, the second block simply sits in your waiting slots as dead weight. In this walkthrough, the connected yellow and orange blocks were only brought into play after the lower chin had been carved out, ensuring that both orange ants and yellow ants had immediate, unobstructed food targets. This kept both counters decreasing simultaneously, preventing either block from stalling your progress.
Finally, managing the timing around Hidden Food tiles protected the run from unexpected tray clogs. The lower chin mystery tiles were unlocked early while your slots were still relatively spacious, allowing you to absorb the revealed mouth colors without stress. Conversely, the upper mystery tiles remained safely untouched until the late stage, when the vast majority of the board had already been cleared out. When those top tiles finally revealed themselves as orange, your tray was clean, your slots were mostly empty, and you had plenty of capacity to field the final orange blocks needed to secure the win.
Final Thoughts
Patience and path awareness are the two qualities that turn Colony Flow Level 117 from a frustrating puzzle into a smooth, satisfying victory. By dismantling the bottom boundary first, respecting the restrictions of Connected Boxes, and keeping your five waiting slots breathing at all times, you prevent the ants from ever getting stuck. If you find yourself hesitating on a specific block selection or want to see the exact ant pathing in real time, take a moment to review the walkthrough video above to refine your timing.
Comments