
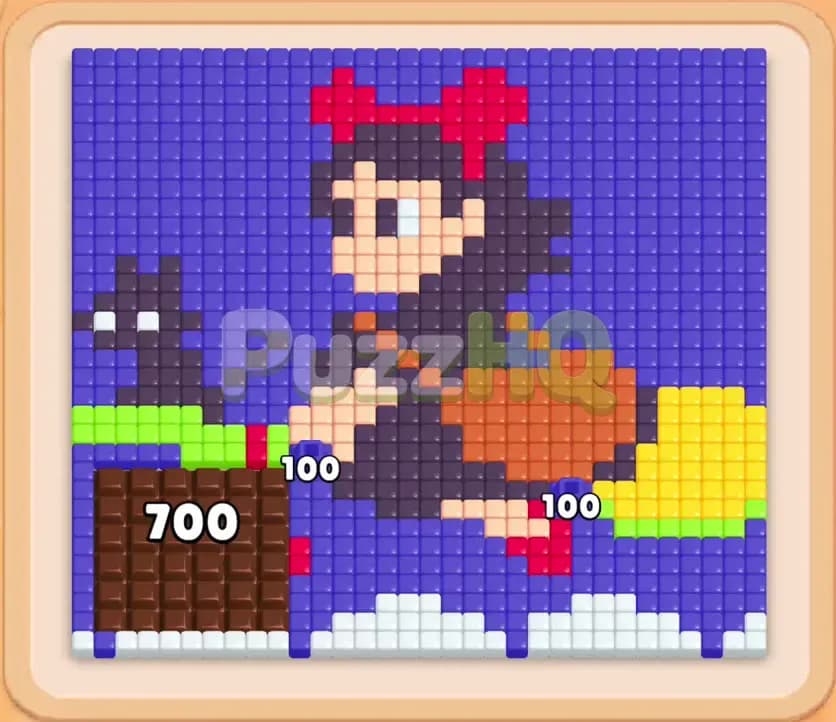
Colony Flow Level 200 presents a demanding test of patience and path routing that will challenge even experienced mobile puzzle players. This stage features a detailed pixel art portrait of a young witch flying on a broomstick accompanied by her black cat against a vast blue sky. Clearing this board requires you to carefully crack open a massive chocolate barrier, manage linked block trays, and navigate around a hungry door without choking your waiting slots. Understanding how to beat Colony Flow Level 200 comes down to releasing the right ant colors in exact harmony with the openings you carve across the board.
Colony Flow Level 200 Starting Setup
Reading the Board
When you open the board, you are greeted by an elaborate pixel art scene framed inside a wooden tray. A dark haired witch wearing a bright red bow sits atop a yellow broom, accompanied by a small black cat perched on the broom tail. She carries an orange travel bag, and her character is surrounded by a sprawling field of blue sky tiles with white puffy clouds resting along the lower perimeter.
The bottom left of the playfield is dominated by a giant slab of chocolate displaying a durability count of 700. This chocolate wall directly obstructs the ant paths leading into the lower left corner and shields the surrounding food tiles from being reached easily. Positioned horizontally near the center of the witch and her broom rests a green hungry door marked with a target counter of 43. This barrier will remain closed until you consume the required tiles, completely walling off the inner body section of the portrait. Down in the bottom selection tray, you have access to four columns of colored numbered blocks showing blue, white, black, red, yellow, and orange values. You also have five empty waiting slots sitting above the tray, which serve as your staging area.
What You Need to Watch Out For
The primary danger in this stage is slot congestion. With only five waiting slots available, you can easily cause a game over if you pull blocks whose matching food tiles are currently inaccessible behind the chocolate or locked behind the hungry door. When a block sits in a waiting slot and cannot find an open path to its corresponding color, it stays frozen in place, eating up precious capacity.
The chocolate barrier is particularly threatening because it starts with 700 health points. Ants must travel past and chew through this dense block over an extended period. If you pick colors that rely on paths blocked by that chocolate before it breaks down, your waiting slots will jam instantly. Connected boxes will also emerge later in the tray, forcing you to accept two linked blocks at once. You must deliberately plan every draw so that at least one slot remains open or continuously drains into the board.
Colony Flow Level 200 Step by Step Walkthrough
Step 1: Clear Outer Blue Sky and Chip the Chocolate Slab
Begin your run by selecting the outer blue blocks and white blocks from the top row of your tray. Tapping the blue 25 and white 25 sends your initial waves of ants marching along the outer perimeter of the playfield. The blue ants immediately begin stripping away the upper sky tiles above the character head, while white ants march along the bottom border toward the cloud formations.
As these ants march along the left boundary, they brush against the 700 point chocolate barrier. Every passing bite chips away at the chocolate health pool, driving the counter down from 700 to below 400 within the opening minute. Keep your focus on pulling accessible blue numbers like the blue 35 and blue 50 to maintain continuous ant movement. This steady pressure prevents the waiting slots from clogging while opening broader channels along the top and left edges.
Step 2: Deploy Yellow Ants to Clear the Flying Broom
With the outer sky beginning to clear, select the yellow block from your tray to send yellow ants swarming into the board. The yellow ants travel along the newly opened sky paths and strike directly at the horizontal yellow broomstick beneath the character. At the same time, place the red 43 block and black 9 block into the waiting slots.
The red block will temporarily pause because the large red bow on the witch head is not yet fully reachable, but the yellow ants will make fast work of the broom. As the broomstick tiles dissolve under the yellow swarm, the yellow block drains completely and frees up its waiting slot. Removing the yellow broom creates a large horizontal gap across the center of the screen, exposing fresh angles toward the lower half of the character.
Step 3: Grind the Chocolate Down and Whittle the Black Cat
Now that the broom is cleared, focus on reducing the chocolate slab further while dealing with the black cat perched on the left. Pull the navy blue 35 and black numbered blocks into the open waiting slots. The chocolate counter rapidly falls through 380, down to 338, and eventually past 242 as blue and black ants maintain constant movement.
Black ants march toward the cat silhouette and the outer fringes of the witch hair. The red block in your waiting slots begins trickling down from 43 to 37 and then 36 as paths to the edges of the red hair bow slowly unlock. Take advantage of the blue 22 and blue 19 blocks in your tray to clean up the dense clusters of blue sky remaining on the right side of the playfield. Keeping blue ants running ensures that your slots cycle smoothly without stalling.
Step 4: Pull White Blocks to Dismantle Lower Cloud Paths
With the chocolate counter now whittled down to roughly 138, shift your attention to the white cloud tiles lining the bottom and right edges of the frame. Draw the white 38 and white 25 blocks from your queue into the waiting area. White ants deploy instantly, chewing across the bottom white borders and dismantling the cloud shapes.
This action strips away the base layers of the portrait and leaves the remaining chocolate slab isolated. Your red block continues to tick downward to 35 while black ants finish stripping away the black cat completely. Keep an eye on your waiting slots during this sequence, making sure that at least one slot remains completely vacant so you do not risk a sudden overflow.
Step 5: Manage the Connected Boxes and Erase the Final Chocolate
As you clear the lower rows, connected boxes linked together by a metal bar will appear in your queue. When you draw this pair, both linked blocks enter the waiting slots side by side. Carefully place them while drawing the remaining white numbers to finish off the white clouds.
White ants tear through the final cloud pieces, reducing the connected white block counter to a tiny value of 2. Simultaneously, your persistent ants chew through the last remaining chunks of chocolate. The counter drops from 138 down to 10 and finally shatters entirely, vanishing from the bottom left corner. Clearing this chocolate opens up the entire lower quadrant of the board, allowing unrestricted ant traffic from the nest to all interior tiles.
Step 6: Breach the Hungry Door and Strip the Orange Bag
Now that the chocolate obstruction is gone, the green hungry door reaches its requirement of 43 cleared tiles and opens completely. This grants full access to the central section containing the orange travel bag and dress. Immediately pull the orange 45 block from the tray into an open waiting slot.
Orange ants stream outward in a steady column, invading the center of the portrait and consuming the orange clothing and bag tiles. Combine this with the blue 35 block to clear the remaining blue sky patches nestled along the outer edges of the character body. The waiting slots remain safe and manageable because the orange ants are actively devouring their target, draining the block counter down to zero in seconds.
Step 7: Sweep Remaining Hair and Face Tiles to Secure Victory
Only the character head, black hair, face tiles, and top blue sky border now remain on the board. Pull the remaining black 26, blue 27, and blue 20 blocks into your waiting slots. Swarms of black, cream, and blue ants cover the upper playfield in a massive coordinated sweep.
Black ants devour the voluminous hair while blue ants pick off the final row of sky tiles along the upper wooden border. The red bow finishes clearing out, followed immediately by the face and hair tiles. The block counters count down to zero, the waiting slots empty out completely, and golden celebration stars illuminate the clean board to confirm your victory.
Colony Flow Level 200 Winning Strategy
The Most Important Moves
The absolute turning point in the Colony Flow Level 200 solution is how you handle the 700 point chocolate slab. Trying to ignore the chocolate or attempting to work around it without consistent chipping will quickly back you into a corner. You must commit to keeping blue and white ants flowing along its perimeter from the very first move. Every point removed from that chocolate brings you closer to opening the bottleneck on the lower left.
The second critical decision is the timing of the yellow broom clear. Releasing yellow ants early destroys the horizontal divider across the middle of the board. This creates a bypass corridor that lets other ant colors travel smoothly even while the chocolate slab still occupies the lower left corner. Once the broom is gone, pathing options double, making slot management far less stressful.
Keeping the Ants Moving
Maintaining an active flow across your five waiting slots is what separates a win from a loss in this stage. When you are forced to store the red block early, you permanently sacrifice one of your five slots until paths to the bow open. You cannot afford to let other stagnant blocks sit next to it.
To keep the ants moving, always alternate between picking an essential progress block and picking a high volume clearing block like blue or white. Never draw the connected boxes until you are certain that the matching tiles on the board are unobstructed and ready to be eaten. By ensuring that at least two of your slots are constantly draining their numbers into active ant columns, you will maintain complete control of the board state from start to finish.
Colony Flow Level 200 Final Tips
Patience is your greatest asset on this stage. The chocolate slab has a massive amount of durability, and watching the counter slowly drop can tempt you into drawing new blocks prematurely. Resist that urge. Pulling blocks that cannot immediately path to their matching food will choke your waiting slots and end your run instantly. Keep your attention focused on the visible ant pathways and only draw blocks when you can see a direct line from the nest to the matching food colors.
Pay close attention to how the connected boxes enter your waiting area. Because linked boxes take up two adjacent slots simultaneously, you must ensure you have at least two empty spaces before tapping them. If you pull connected boxes when only one slot is open, you run the risk of locking the board. Clear out the white cloud border first so that when the connected white boxes land in your tray, they immediately begin draining and vanish before they can cause trouble.
If any part of the pathing order or block timing feels tricky to visualize during your own attempt, take a moment to watch the video walkthrough above this article. Seeing the exact rhythm of the ant marches and how the chocolate wears down makes executing the sequence much easier. Follow these exact block selections, respect your slot limits, and you will clear the board with confidence.
Comments