
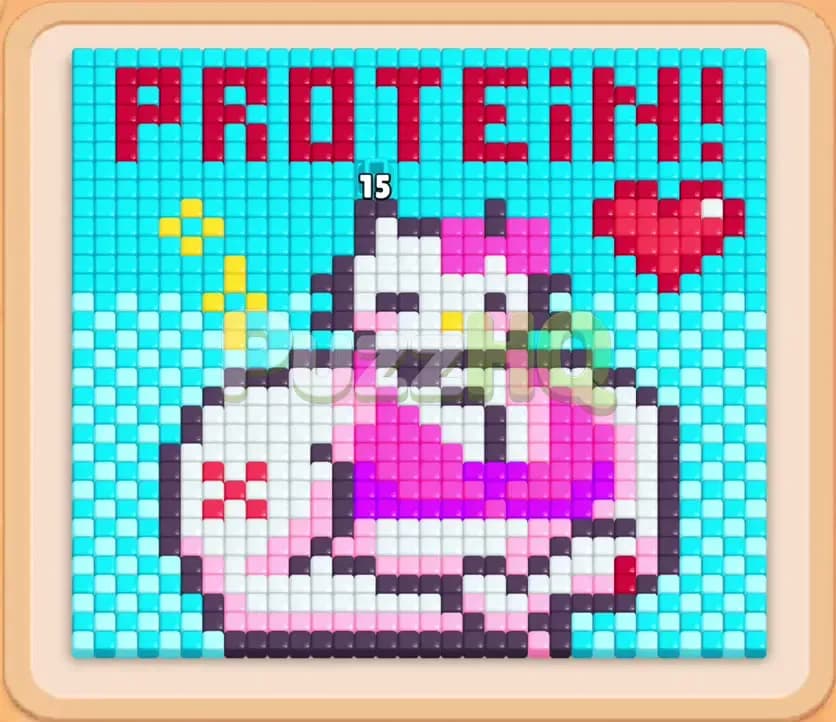
Colony Flow Level 207 presents one of the most entertaining and deceptively tricky visual puzzles in the game, featuring a bodybuilder kitten flexing massive biceps beneath bold red lettering. The real test here lies in balancing your five waiting slots against large tile counts and managing connected boxes that can rapidly clog your tray if selected carelessly. By planning which colors to dispatch first and opening paths straight through the central figure, you can keep your worker ants marching continuously until every single pixel is consumed.
Colony Flow Level 207 Starting Setup
Reading the Board
When you open this stage, you face a large pixel art canvas depicting a muscular white cat wearing a bright magenta athletic top, proudly flexing its arms under the word PROTEIN spelled out in red tiles. The background is dominated by a sea of cyan tiles, while the kitten features crisp black outlines, subtle pink muscle shading, and sparkling yellow accent blocks near the flexed arm. Right next to the head sits a solid red heart, mirroring the crimson shade used for the overhead text.
Down at the bottom, your ant nest sits directly below the central base of the artwork, meaning the very first paths available to your ants touch the lower cyan border and the bottom white curves of the kitten. Your tray below offers an intimidating mixture of high value numbers and linked pairs. Connected boxes are the primary special mechanic on this board, linking specific blocks together so that choosing one inevitably draws its partner into your queue. With only five waiting slots available at the top of your tray, careless taps will fill the bank before your active ants can finish carving access routes to the deeper colors.
What You Need to Watch Out For
The main hazard on this stage is queue gridlock caused by selecting colors that lack an open route from the nest. Even though the board is packed with vibrant red, black, and yellow tiles, your ants cannot physically reach the red lettering or Kitty facial features until outer barriers disappear. If you push red or black blocks into your five waiting slots while the way is still blocked, those blocks will sit completely idle.
Another major threat comes from connected boxes. When two blocks are tethered together, clearing the front block immediately forces you to account for the linked companion behind it. If you trigger a connected box without sufficient space or without an accessible path for its color, your waiting slots will fill instantly, resulting in an immediate failure. Your goal is to feed colors that constantly dismantle the outer edges and carve direct highways toward the heart, the muscular chest, and the text above.
Colony Flow Level 207 Step by Step Walkthrough
Step 1: Release White and Pink Blocks to Breach the Lower Body
Begin by inspecting the bottom row of your tray to locate White 20 alongside your starting pink and magenta blocks. Because the nest rests squarely underneath the kitten flexed forearms, white food tiles are immediately exposed and ready for consumption. Tapping White 20 sends a relentless line of white worker ants surging upward through the bottom entry point, chewing away the lower curves of the kitten muscular arm and body.
As the white ants carve into the lower body, you create an open pocket that exposes the pink shading and magenta tank top. Tap the available pink and magenta blocks to send reinforcement lines right behind the white brigade. These ants instantly latch onto the bottom hem of the workout top, freeing up room in your waiting slots as their numbers tick downward. Notice how connected boxes shift forward in the tray as these starting blocks vacate their positions. Keep at least two slots open during this opening exchange so incoming linked blocks do not choke your tray.
Step 2: Tap Red and Magenta Blocks to Target the Heart and Bow
With the bottom white foundation thinning out, a narrow side path opens along the right edge toward the crimson heart. Now is the right moment to bring in your low number red blocks, including Red 2 and Red 11. Red ants rush up the newly cleared right corridor, immediately swarming the red heart and removing its dense cluster of tiles.
Simultaneously, feed your Magenta 10 into an available waiting slot. These magenta ants march directly into the center of the chest and begin tearing through the kitten athletic tank top and the bow perched on the left ear. Because the heart and tank top are now both reachable, these blocks count down rapidly rather than idling in the waiting bay. Watch the numbers on your active blocks closely as they drain to zero, opening fresh spaces for the incoming cyan and black pieces waiting underneath.
Step 3: Feed the Massive Cyan Swarm to Strip the Border
The canvas contains dozens of cyan tiles that form the vast sky and outer border of the entire composition. Once the lower sections of the figure are partially cleared, tap your Cyan 55 block along with Cyan 16 to summon an enormous swarm of cyan workers. These ants travel around the perimeter, gnawing away the vast outer edges from bottom to top.
As the cyan perimeter crumbles, the entire top section containing the PROTEIN letters becomes accessible from the outer flanks. Cyan ants wrap entirely around the canvas, clearing space along the upper corners and releasing tension on the board. Because Cyan 55 carries such a high count, this block will remain active in your waiting bay for an extended period, so you must carefully operate with your remaining four slots while it slowly counts down.
Step 4: Break the Dark Outlines and Sparkle Accents
With the surrounding cyan border peeling away and the body opened up, the bold black outline tiles that frame the cat muscular physique become fully exposed. Tap Black 1 and Black 11 from your tray. Black ants rush straight into the core, chewing away the distinct outlines around the massive biceps, the torso, and the jawline.
This is also the moment to activate your yellow blocks, including Yellow 1. Bright yellow ants sprint toward the sparkling accent stars nestled against the cat flexing arm. Because the yellow tile count is tiny, these blocks deplete almost instantly, clearing out of your waiting slots within seconds. Removing the black outlines is critical because those dark borders act as physical barriers that previously blocked access to Kitty face and inner ear details.
Step 5: Clear the Red Protein Letters and Chest Details
Now that the upper sky is stripped bare, direct your attention to the top banner. Select your remaining red blocks, such as Red 15 and Red 4, to deploy a red swarm straight into the word PROTEIN. The red ants methodically tear apart the individual blocky letters, working from the outer edges inward until the overhead message completely dissolves.
While the red ants finish the banner, pull forward any remaining white and magenta blocks that were previously locked in connected pairs. White 26 and White 16 deploy ants into the massive upper arms, chest, and cheeks of the cat. Magenta ants finish the straps and upper portions of the tank top. With multiple color streams working simultaneously, tiles vanish across the entire upper half of the board, leaving only the central face and tiny scattered accents behind.
Step 6: Empty the Facial Features and Clear the Board
You enter the home stretch with only the delicate facial features and a handful of yellow and cyan remnants left on screen. Pull your final Black 6 block to direct black ants onto Kitty nose, whiskers, and expressive cartoon eyes. Follow up with your last White 2 and Pink 1 blocks to clear the remaining ear tips and chin tiles.
At this stage, you only have two or three active blocks running in your waiting slots, leaving plenty of breathing room. The ants quickly converge on the final white cluster in the center of the head, carrying away the last food pieces back to the nest. Once the very last tile disappears from the canvas, the stage completes with bright golden stars bursting across the empty board.
Colony Flow Level 207 Winning Strategy
The Most Important Moves
Success on this board hinges entirely on your patience during the opening thirty seconds. The most common mistake players make is tapping the large cyan and red blocks right at the start because they see those prominent colors everywhere across the artwork. However, doing that immediately traps those blocks in your waiting slots because the nest only has immediate physical access to the white base and adjacent lower tiles.
Your winning move is prioritizing the white and pink blocks that sit directly on top of the nest outlet. Clearing that lower wedge creates a highway straight up the center, granting your ants access to the magenta clothing and the right side corridor leading to the red heart. Once those interior channels exist, you can safely deploy red, cyan, and black blocks without fear of them stalling out.
Managing the connected boxes is the other make or break factor. Several blocks in the lower rows are linked by physical bands to blocks behind them. Whenever you select the leading block of a pair, anticipate the arrival of its partner. Never take a connected box when you only have one open slot left, because the forced arrival of the second box can jam your tray and end your run prematurely.
Keeping the Ants Moving
To prevent your five waiting slots from filling up, always operate with a rapid rotation mindset. Pair a long lasting block, such as Cyan 55, with rapid drain blocks like Yellow 1, Pink 1, or Black 1. Quick clearing blocks enter a slot, dump their ants onto nearby tiles, and disappear within seconds, constantly refreshing your available workspace.
Watch the physical trails your ants take as they march from the nest. Ants will always seek the nearest matching food tile along an unbroken path. If you notice a line of ants slowing down because they have to travel all the way around the outside border, look for an opportunity to clear a central tile that provides a shorter straight line. Shorter travel distances mean faster block depletion, which keeps your queue flowing smoothly.
Colony Flow Level 207 Final Tips
When you replay this level, keep your eyes on the tray depth rather than just the front visible row. Knowing which colors are waiting directly underneath your active choices lets you plan two or three moves in advance. If you see that clearing a white block will expose a much needed black or red block beneath it, you can time your selections so that the new color arrives exactly when its matching path opens up on the canvas.
Remember to treat the large Cyan 55 block with respect. Because it takes so long for the ants to chew through fifty five background tiles, that block will occupy one of your five slots for a significant portion of the midgame. Accept that you effectively have four usable slots while cyan does its job, and resist the temptation to pick other high count blocks until your short orders are completed.
If any path transition feels tricky or you find yourself unsure about the exact moment to pull connected boxes, scroll up and watch the solution video above this guide. Seeing the exact ant travel lines and queue timing in real time will help you replicate this clean clear on your very next attempt.
Comments