
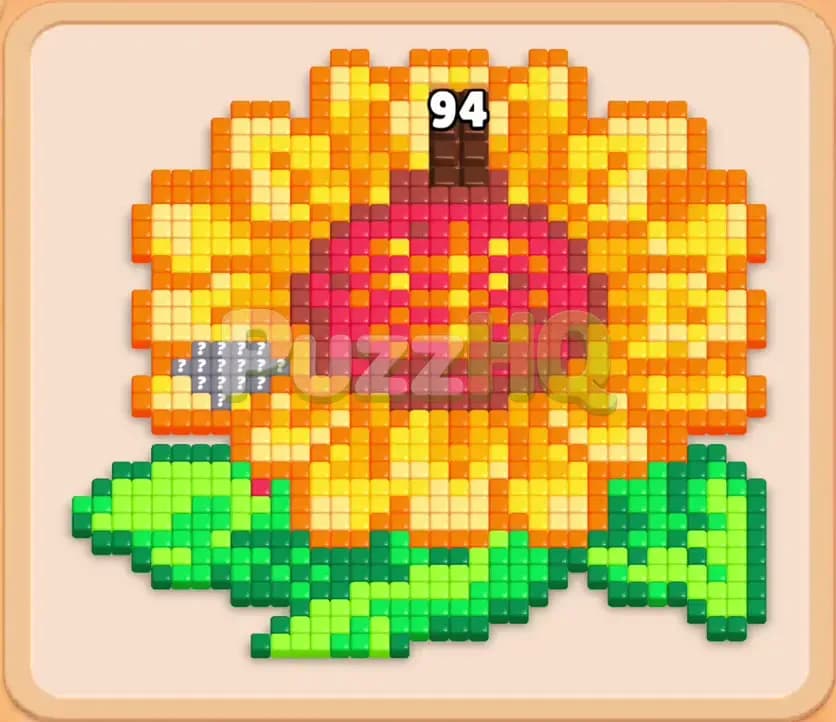
Colony Flow Level 213 presents a gorgeous sunflower pixel art puzzle that can easily catch you off guard if you rush your tray management. The combination of dense center seeds, spread out green leaves, and linked boxes in your reserve requires steady patience. You will need to carefully coordinate your moves so your queue never clogs while your ant lines work their way through the foliage.
Colony Flow Level 213 Overview
What You Are Working With
Your target on this board is an enormous sunflower made of bright yellow petals, rich orange highlights, deep red seeds in the center, and a wide bed of green leaves across the bottom. Right from the start, you will notice a Hungry Door sitting above the top petals displaying the number ninety four. This barrier demands a massive count of cleared food before it opens up the upper path. Over on the left petal cluster, you will also spot several Hidden Food tiles marked with question marks. These secret tiles remain locked until your ants chew away the neighboring normal food tiles to expose what lies underneath.
Down below the nest opening, your queue features five waiting slots and several deep columns of supply blocks. The colors in your supply include yellow, orange, dark red, bright red, and two distinct shades of green. You must also deal with Connected Boxes in the supply tray. These linked pairs are bound together by a sturdy bar, which means pulling one box automatically pulls its partner into your active waiting slots. Because you have only five waiting spaces, handling Connected Boxes without thinking ahead is the quickest way to cause a fatal traffic jam.
What It Takes to Clear Level 213 Board
To win this stage, your ant colony must consume every single food tile that makes up the sunflower blossom, its seed core, and the leaves underneath. You lose immediately if all five waiting slots fill up with blocks that have no valid food paths to match on the board. When your ants cannot find matching colored tiles on the open board edges, the entire colony halts and your run ends on the spot.
Victory demands that you balance the outer perimeter with the dense interior. You cannot simply pull random colors and hope for the best. You must direct your ants to chew open the outer petals to unlock the Hidden Food, feed the Hungry Door until it dissolves, and expose the massive red seed core in the center. By strictly managing your waiting slots and only drawing Connected Boxes when you have free capacity, you keep your ant lines moving smoothly until the very last crumb is gone.
Colony Flow Level 213 Step by Step Solution
Step 1: Open the lower leaves and bottom petals to create initial feeding lines
Begin by selecting the green block from the front of your tray along with an initial orange block to start paths on both the leaves and the lower flower petals. Your green ants will stream straight out of the nest toward the foliage at the bottom, chipping away at the stem and leaves while the number on your green block counts down to zero. At the same time, send orange ants up into the lower border of the flower head. Clearing these perimeter tiles is essential because it widens the walking routes around the nest and prevents incoming ants from colliding. Watch your five waiting slots closely during this opening sequence. Do not pull additional supply blocks until the first green block empties out and disappears from your queue.
Step 2: Peel back the left petal cluster to reveal the hidden food
With the base of the flower opened, tap the yellow block to target the outer left petals where the mystery tiles are stationed. As the yellow ants chew through the outer boundary, the adjacent Hidden Food tiles immediately wake up and reveal their true colors. This action serves two purposes because it gives your waiting ants direct access to new tiles while contributing valuable points toward the Hungry Door at the top. The counter on the ninety four barrier will drop rapidly as your ants gobble up these perimeter pieces. Keep your queue light by letting your yellow and orange blocks drain completely before you touch any linked blocks in the tray beneath.
Step 3: Trigger the first connected box pair while maintaining empty waiting slots
Now that the board has ample exposed color variety, pull the connected red and yellow pair from your supply tray. Both blocks will slide upward into your waiting slots simultaneously, taking up two of your available spaces. The yellow block immediately engages the remaining petal tips, while the red block sends red ants straight into the newly accessible sunflower center. Because your earlier moves opened up multiple surface angles, the red ants have an unobstructed route to begin whittling down the dense seed cluster. The counter on the Hungry Door above will finish ticking down and disappear entirely, granting full freedom to the upper petal rows. You still have three open waiting slots at this stage, giving you plenty of safety margin.
Step 4: Dismantle the red seed core and expand your working area
Direct your focus toward the center of the blossom by feeding in the next red blocks from the supply. The sunflower core holds a thick concentration of dark red and pinkish red tiles that will absorb several full block charges. Pull the red twelve and red nineteen blocks into your slots. Because the core has wide open access on all four sides now, your red ants will descend upon the center in massive swarms, dropping the block counters steadily. Avoid pulling any green blocks during this phase even if they sit exposed in the tray. Flooding your waiting slots with green blocks while the ants are busy in the center risks filling the fifth slot and causing a sudden game over.
Step 5: Activate the linked yellow and green boxes to trim the lower stem
Once the center red tiles begin to thin out, select the connected yellow and green pair resting in the middle column of your tray. This move drops two fresh blocks into your queue, which will safely occupy your open slots because your earlier red blocks have finished their counts and vanished. The yellow block directs ants to the upper petal crowns that were previously shielded by the Hungry Door, while the green block unleashes a fresh line of workers to strip away the thick green leaves on the bottom left and bottom right. Check that the paths between the nest hole and the leaves remain completely clear of wandering ants before you commit to another draw.
Step 6: Clear the upper petal fragments to isolate the final board sections
With the center nearly demolished and the leaves reduced to small patches, shift your supply draws to yellow and orange blocks. Pull the orange twenty and yellow eighteen to wipe out the remaining petals on the left and right wings of the flower. As your ants clear these tall petal formations, the picture begins to break apart into small, isolated clusters of tiles. This is the stage where many players make the mistake of pulling blocks too fast. Keep at least two waiting slots open at all times. Let the yellow ants clear away the petal edges so that only tiny fragments of green leaf and small remnants of the red center remain on your screen.
Step 7: Clean up the final leaf corners and center seeds for the stage clear
Look at the remaining food fragments and match them against your final supply blocks. Pull the last green block to wipe out the final leaf tips on the lower left, followed by the remaining red block to consume the very last dark seeds in the flower heart. Because you kept your queue clean throughout the run, your final blocks enter the waiting slots with immediate matching targets waiting on the board. The ants rapidly chew through the lingering tiles, the block numbers drop down to zero, and the board clears completely without ever risking a clogged queue.
Final Thought
Colony Flow Level 213 tests your ability to juggle Connected Boxes and special barriers without overcrowding your five precious queue spaces. If you ever feel stuck on the timing of a particular move or want to see the exact ant routes in motion, be sure to watch the video above this article for a complete visual walkthrough.
Comments