
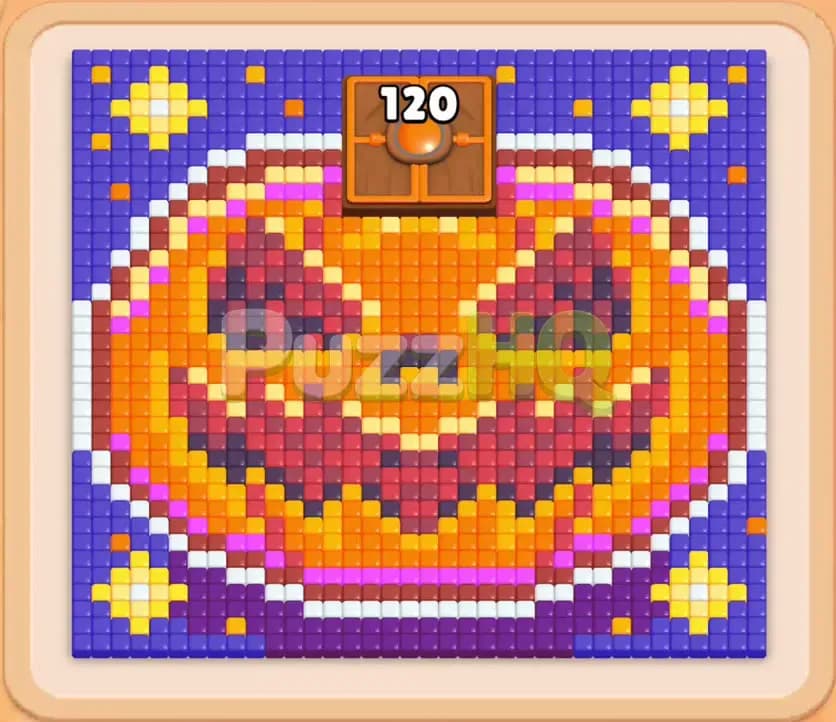
Colony Flow Level 1460 presents a massive Halloween pumpkin puzzle that tests your ability to clear barriers without clogging your waiting tray. The pumpkin layout combines dense outer shells, dark interior mouth tiles, and a stubborn Hungry Door perched right at the top. Keeping your five waiting slots open while managing connected boxes in the tray is the only way to carry your ant swarms through to the final clear.
Colony Flow Level 1460 Walkthrough
Understanding the Starting Board
The initial board depicts a large smiling pumpkin surrounded by a deep blue night sky sprinkled with yellow stars. Beneath the pumpkin sits a protective white border that seals off direct access to the interior orange and yellow meat of the fruit. Dark red tiles create the jagged eyes, nose, and sinister mouth across the front of the design. Right above the center of the pumpkin rests a prominent Hungry Door displaying a counter of 120. This door remains sealed until your ants chew through 120 total food tiles across the board. In the bottom tray, you start with five columns of numbered blocks, including red, dark red, orange, yellow, and purple options. Notice that several blocks deeper in the tray are connected boxes, linked together by colored connector cords. Because ants emerge from a single nest hole at the bottom center of the screen, they can only reach colors that have an open path directly connected to the floor. The white border and adjacent dark red areas are the immediate accessible targets, while the interior pumpkin flesh and upper blue background remain out of reach until you chew through the bottom layers.
The Key to Clearing Level 1460
The core challenge in Colony Flow Level 1460 lies in managing your five waiting slots while steadily satisfying the Hungry Door requirement. If you pull high count blocks of colors that your ants cannot reach, those blocks will sit idle in your waiting slots and trigger an instant game over. Your primary objective early on is breaching the white lower boundary to let ants flow into the dark red mouth and the surrounding orange pulp. Blue food lines the outer left and right flanks, making blue blocks safe secondary choices once your ants carve paths outward. As you clear blocks, keep a close watch on the connected boxes in your tray. Connected boxes pull down linked colors automatically, which can quickly crowd your five slots if you fail to plan ahead. By targeting white and dark red first, then opening blue pathways along the edges, you will rapidly drain the 120 requirement on the Hungry Door without ever stranding a useless block in your tray.
How to Beat Colony Flow Level 1460
Step 1: Break the bottom white border
Your first priority is granting your colony access into the main pumpkin structure. The bottom rim of the pumpkin is lined with white tiles that block direct movement toward the center. Select the Dark Red 5 and White 17 blocks from your tray to send initial swarms upward from the nest hole. The white ants immediately set to work chewing away the lower protective rim, while dark red ants latch onto the exposed teeth and lower jaw tiles. This combined assault carves open a clean channel right into the belly of the pumpkin. Keep one or two slots empty during this opening exchange so you do not risk getting jammed early. As the white tiles vanish, adjacent orange and yellow tiles become exposed, while the counter on the Hungry Door begins ticking downward from its starting value of 120.
Step 2: Carve through the lower mouth and expose outer blue tiles
With the bottom white barrier eliminated, your next target is expanding the interior cavity and starting on the blue background. Pick Dark Red 5 and the Yellow 28 block to feed ants into the mouth cavity. Red and yellow ants climb through the freshly opened bottom channel, gobbling up the jagged smile and opening wider routes toward the center of the pumpkin. At the same time, the outer edges of the board reveal large sections of dark blue background. Select the Blue 14 block to deploy blue ants around the bottom corners. These blue workers stream out toward the lower perimeter, chewing through dark blue sky tiles and significantly reducing the Hungry Door counter toward 85. Opening both sides ensures your ants have multiple avenues of approach, preventing traffic bottlenecks at the bottom entrance.
Step 3: Expand along the blue flanks to drop the door counter
Once the lower mouth has hollowed out, focus on stripping the massive blue walls on the left and right sides of the board. Pull the Blue 25 block and the Dark Red 13 block into your waiting slots. Blue ants fan out along both vertical borders, clearing tall columns of sky tiles and exposing the outer orange rind of the pumpkin. The dark red ants finish off the remaining lower facial details, clearing out the bottom jaw entirely. As these large groups of tiles disappear, the counter on the Hungry Door drops down from 85 to 50. Notice that clearing the blue flanks also frees up connected boxes in the tray. Prepare for the upcoming chained blocks by ensuring at least two waiting slots remain completely empty before you make your next selection.
Step 4: Hollow out the upper cheeks and inner pumpkin pulp
Now that the lower half of the board is almost completely empty, your ants need to work their way upward into the pumpkin cheeks and eye sockets. Select the Orange 30 and Dark Red 9 blocks to direct your swarm into the upper pulp. The orange ants swarm the thick middle sections of the pumpkin, biting through the dense orange flesh on either side of the nose. Dark red ants consume the upper eye cutouts, severing the pumpkin face into two separate curved arches. Keep an eye on your remaining tray colors. A White 20 and a small Dark Red 1 block should be cycled through now to eliminate any stray pixels lingering along the lower curves. With the eyes and cheeks cleared, the top structure grows thinner, and the Hungry Door counter reaches zero.
Step 5: Breach the Hungry Door and absorb the central orange surge
When the counter hits zero, the Hungry Door at the top center bursts open, unlocking the dense cluster of food tiles directly beneath it. This release drops a heavy mass of orange tiles right into the upper middle cavity. To handle this sudden influx, tap the Orange 35 block along with the Red 26 and White 25 blocks that have moved forward in your tray. Orange ants immediately charge into the newly opened central chamber, devouring the freshly revealed food before it can cause an obstacle. Meanwhile, red and white ants eliminate the decorative highlights framing the upper forehead. This move triggers several connected boxes in your tray, pulling linked purple and yellow blocks into view. Because you maintained open slots during the previous step, these new blocks slide into position without causing a tray lock.
Step 6: Dismantle the connected boxes and clear remaining side arches
With the central door cleared, your tray presents linked connected boxes consisting of Purple 22, Orange 34, and Yellow 32. Select the Purple 22 block first, which pulls the connected Orange 34 block forward into an active position. Your purple ants sprint up the side borders to eat away the lingering purple tiles near the top corners. Follow up immediately by assigning the Orange 34 block, sending a powerful wave of orange ants to finish dismantling the upper pumpkin arches. The linked Yellow 32 block now becomes accessible, allowing yellow ants to consume the bright stars and eye highlights remaining at the top of the board. By cycling through these connected boxes in strict sequence, you prevent them from occupying waiting slots simultaneously.
Step 7: Clear the top beam and finish the final sky tiles
The final phase leaves only small remnants along the top horizontal beam and scattered stars across the upper sky. Pull the remaining Yellow 2, White 2, and Blue 18 blocks into your waiting slots. Blue ants swarm the top edge to wipe out the last dark blue sky tiles, while yellow and white ants mop up the few lingering highlight pixels. Every ant moves unimpeded across the wide open board, rapidly reducing the remaining tile count to zero. Once the final blue tile is consumed, the level completes successfully.
Why This Solution Works
This winning strategy succeeds because it respects the physical geography of the board and the mechanical dependencies of your tray. In the beginning, the pumpkin artwork acts as a solid shield. The white boundary at the bottom prevents access to the hundreds of orange and yellow tiles sitting inside the fruit. If you had pulled large orange blocks at the start, those blocks would have sat completely frozen in your waiting slots because no ant could reach an exposed orange tile. By methodically using white and dark red to peel back the lower layers, you create wide open corridors that let your colony flow naturally into the interior.
Managing the blue background alongside the central pumpkin is another crucial reason this walkthrough holds up. The dark blue sky wraps around both vertical sides of the puzzle, containing a massive quantity of reachable tiles. Routing blue ants along those exterior borders allows you to chip away at the Hungry Door counter without crowding the central path. This dual pronged assault guarantees that the 120 requirement drops quickly, preventing you from stalling out while waiting for interior tiles to become accessible.
Finally, the sequence neutralizes the danger posed by the connected boxes in the lower tray. Chained blocks create automatic shifts in your tray, pulling subsequent colors forward the moment an earlier block clears. If your five waiting slots are already full when a connected box activates, you lose all flexibility and face a sudden defeat. Clearing space before activating the purple, orange, and yellow chains ensures that each block has a vacant slot ready to receive it, allowing your swarms to finish the board smoothly.
Final Thoughts
Beating Colony Flow Level 1460 comes down to opening the bottom white barrier before touching the inner orange flesh, while keeping enough room in your tray for connected boxes. Watch your slot counts carefully as the Hungry Door unlocks so the sudden burst of central tiles does not overwhelm your planning. If you get confused by any specific ant path or block transition while playing through this puzzle, take a look at the video walkthrough above the article to see every move executed in real time.
Comments