
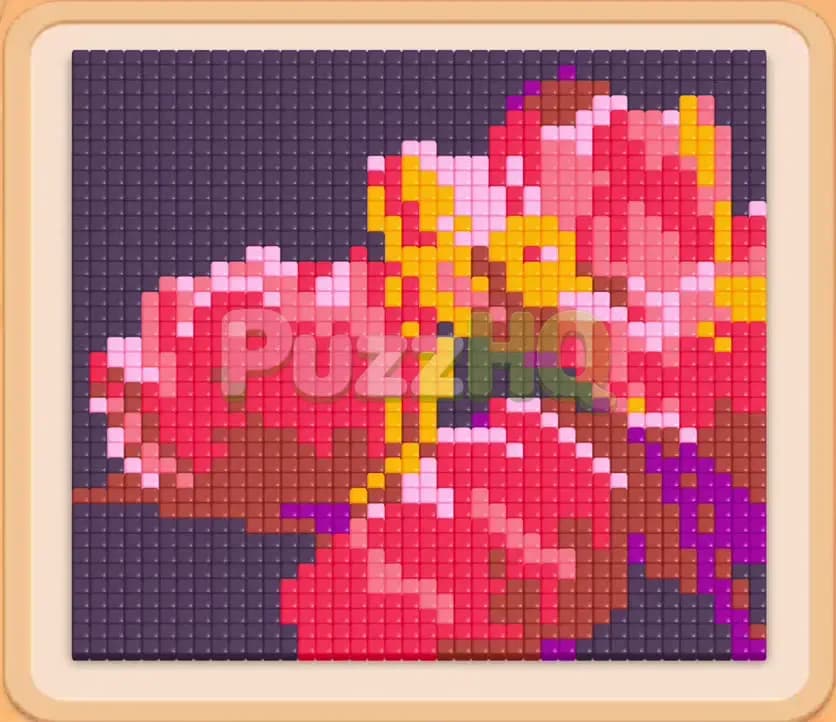
Colony Flow Level 1440 presents a dense and colorful puzzle that demands sharp path planning right from the start. You must guide your ant colony through a massive pixel art layout depicting vibrant strawberries wrapped in a bright yellow ribbon, all set against a deep purple background. With several colors layered tightly together and only five waiting slots available, one careless block choice can easily bring your entire run to a sudden halt.
Colony Flow Level 1440 Board Breakdown
Starting Colors and Blocks
When you begin Colony Flow Level 1440, the board displays an elaborate image composed of distinct color zones. The dominant structure features two large strawberries rendered in rich crimson and soft pink tiles. Slicing right through the middle of the fruit is a decorative ribbon built from bright yellow tiles, accented by smaller touches of orange and peach. Surrounding the upper portion and framing the entire picture is an expansive field of dark purple background tiles, while earthy brown tiles anchor the bottom stems and lower details.
Beneath the board sits your active workspace, featuring five open waiting slots at the top and multiple stacked rows of colored numbered blocks below. In the first exposed row, you can see Light Pink 20, Crimson 20, Yellow 15, Orange 20, and Light Pink 25. Directly beneath these blocks rest further reserves, including Brown 20, Crimson 25, Brown 10, Orange 20, and Peach 22, with even larger values like Purple 37 and Black 40 buried deeper in the tray. Every single number on a block indicates the exact quantity of matching tiles your ants need to consume before that block vacates its waiting slot.
Paths, Obstacles, and Limited Space
The central challenge in this level stems from how tightly the colors interlock. Your ants emerge from a single nest situated near the bottom center of the board. To reach their designated meal, they require an open, unbroken route from the nest to matching food tiles. If you select a block whose color is entirely walled off behind other tiles, those ants cannot feed, leaving that block stranded in one of your five waiting slots.
Because you only have five slots to work with, keeping them clear is your absolute priority. Selecting multiple high count blocks that cannot make rapid progress will clog your tray instantly. The dark purple background tiles form a solid perimeter wall, while the yellow ribbon acts as an internal barricade dividing the fruit. You must dismantle the foreground layers systematically, opening up wide highways across the board so subsequent colors can flow freely toward the outer edges.
Colony Flow Level 1440 Complete Solution
Step 1: Clear the Lower Red and Pink Tiles
Begin by tapping the Crimson 20 block located in your front row. Because crimson tiles sit right above the central nest, your red ants immediately surge out and begin devouring the base of the lower fruit. Follow this move by selecting the Light Pink 20 block on the left side of your tray. This allows pink ants to march up along the right flank where light pink highlights line the fruit edge.
As these initial crimson and pink tiles disappear, a clear central channel opens up toward the middle of the board. The numbers on both blocks tick down rapidly, ensuring neither block lingers too long in your waiting slots. This opening sequence establishes your primary traffic lane and exposes the lower edge of the yellow ribbon.
Step 2: Cut Through the Central Yellow Ribbon
With the bottom section of the fruit partially cleared, the yellow ribbon is now exposed to incoming paths. Tap the Yellow 15 block from the front row of your tray. Yellow ants instantly pour through the newly carved central channel and latch onto the ribbon tiles, driving the block count down toward single digits.
Taking out these yellow ribbon tiles is crucial because the ribbon effectively splits the strawberry illustration in half. As the ribbon tiles vanish, you bridge the gap between the lower stems and the upper fruit bulk. Keep an eye on your waiting slots during this stage, allowing the yellow block to deplete significantly before you bring any new colors into play.
Step 3: Send Purple and Brown Along the Lower Perimeter
Now that the lower area has opened up, you can safely address the darker borders. Tap the Brown 20 block that shifted into reach, followed by an early Purple block. Brown ants move into the lower stem sections, quickly stripping away the dark base tiles.
Meanwhile, your purple ants begin working on the dark purple background tiles situated along the bottom corners. As these edge tiles clear, your ants gain access to the outer boundary lines of the board. This creates essential lateral pathways running along the bottom and sides, which will later allow ants to bypass the central fruit mass entirely.
Step 4: Dismantle the Right Fruit Section with Crimson and Orange
Turn your attention back to the fruit body by selecting Crimson 25 and the available Orange block. Red ants stream back into the center, chewing into the right strawberry. Orange ants follow close behind, consuming the warm highlight tiles clustered around the former ribbon knot.
During this push, the right side of the board clears dramatically. The strawberry structure on the right breaks apart, leaving wide open floor space. With this entire quadrant cleared, your waiting slots cycle smoothly as both the crimson and orange counts rapidly drop to zero, uncovering deeper blocks in your bottom tray.
Step 5: Break Apart the Bulk of the Left Strawberry
With the right side cleared, shift your focus to the left strawberry, which still contains a thick cluster of crimson and pink tiles. Select the next Crimson block along with the Peach and Pink blocks that have advanced into your active tray.
Ants flood into the left side of the board. Because you have already cleared wide avenues around the bottom and center, your ants travel at maximum speed without bottlenecking. Watch the large pink and red mass crumble into small, disconnected groups. As these primary blocks exhaust their counts, you expose the final set of high value purple blocks buried beneath them.
Step 6: Direct High Count Purple Blocks to the Upper Background
Now that the fruit no longer blocks access to the top of the board, select the large Purple 37 block. A massive swarm of dark purple ants emerges from the nest, utilizing the cleared side paths to travel all the way up to the top left and top right corners.
These purple ants begin systematically eating away the thick background canopy. Because the distance from the nest to the top wall is fairly long, the ants form continuous marching lines along the outer borders. Be patient during this phase and avoid loading your remaining slots with colors that cannot reach their targets. Let the purple block do its work until the upper border is heavily reduced.
Step 7: Finish the Final Scattered Fragments
With the background almost entirely consumed, only tiny islands of food remain on the board. You will see a few stray light pink tiles in the upper center, some isolated brown spots, and the remaining rim of dark purple tiles at the very top.
Tap the remaining low count blocks from your tray, including Pink 7, Black 10, and Purple 9. Pink ants clear the lingering center tiles while the final purple and black ants march the full perimeter to wipe out the remaining background edges. Every waiting slot empties out cleanly as the last food tile vanishes from the board.
Key Moments in Colony Flow Level 1440
The Move That Opens Up the Board
The critical turning point in Colony Flow Level 1440 occurs when you deploy Yellow 15 to cut through the central ribbon. At the start, the fruit art acts as a massive wall that completely shields the upper half of the board. Many players make the mistake of pulling large purple or pink blocks too early, only to find that those tiles are trapped behind the ribbon.
By prioritizing the yellow ribbon right after clearing the initial crimson base, you sever the barrier running horizontally through the artwork. This single move connects the lower nest directly to the upper half of the board. Once the yellow tiles disappear, your ants can branch out in multiple directions, transforming what was once a cramped board into an open field with plenty of routing options.
Finishing the Remaining Food
The endgame on this level requires careful management of your perimeter lanes. By the time you reach the final blocks, the center of the board is almost entirely empty, but the remaining purple and black tiles sit along the extreme upper boundary.
Because the nest is located at the very bottom, your ants must run the entire height of the board along the outer walls to reach those final tiles. The winning play is to deploy your high count purple blocks while keeping at least two waiting slots completely empty. This buffer allows you to cycle through small pink and brown cleanup blocks without ever risking a tray lockout while the long distance purple ants finish their journey.
How to Avoid Getting Stuck on Level 1440
The primary hazard on Colony Flow Level 1440 is selecting background colors before the foreground is sufficiently dismantled. The dark purple tiles represent a huge percentage of the total tile count, making it tempting to tap large purple blocks early in the run. However, the upper purple tiles are physically unreachable until you carve a path through the center fruit. If you place a Purple 37 in your waiting slots too soon, it will sit there completely idle, consuming valuable tray space while you struggle to clear the foreground with fewer available slots.
Another frequent pitfall involves mismanaging the five waiting slots during the mid stage transition. When multiple blocks become selectable in your bottom tray, it is easy to tap three or four different colors in rapid succession. If any of those colors run out of accessible tiles before their counter reaches zero, they become permanent obstacles in your tray.
To stay completely safe, always follow the natural progression of the artwork. Clear the frontmost crimson tiles, dissolve the central yellow ribbon, and only then unleash the purple and brown blocks to tackle the outer frame. Keep at least one or two waiting slots open whenever possible so you always have room to adapt as new block layers reveal themselves.
Final Thoughts
Patience and strict path discipline are the keys to conquering Colony Flow Level 1440. By clearing the foreground fruit and cutting the yellow ribbon before committing to the massive purple background, you maintain total control over your waiting slots and ensure your ant colony never stops marching. If any specific transition feels tricky, be sure to watch the complete video walkthrough above this guide to see the exact timing and routing in action.
Comments