
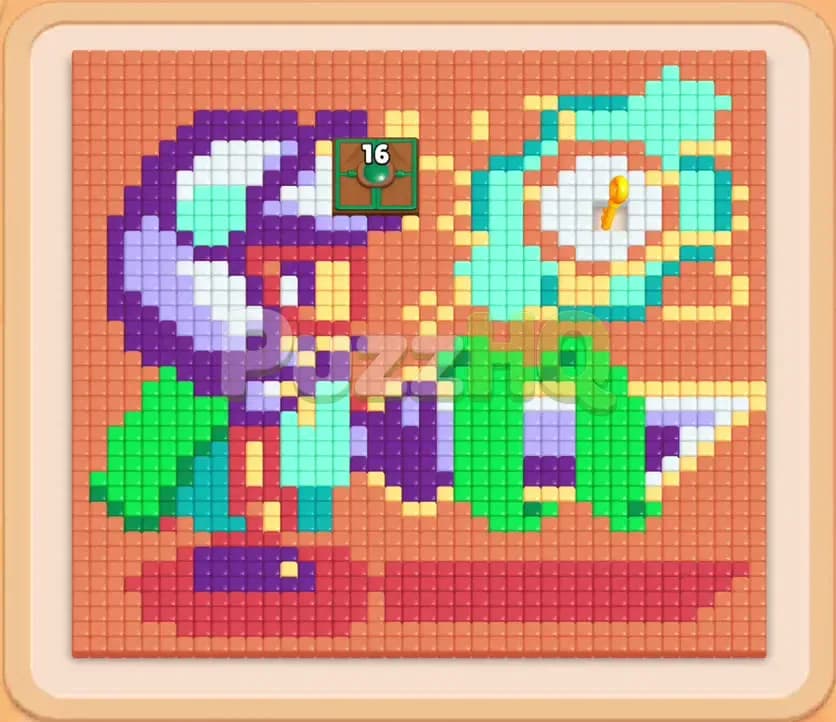
Colony Flow Level 1550 presents a dense pixel art board packed with intricate color layers and demanding path restrictions. You must manage a crowded bottom tray while navigating tight pathways across the central drill structure and the upper shield area. Success depends on pacing your block selections so that your five waiting slots never overflow while opening access to critical targets.
Colony Flow Level 1550 Walkthrough
Understanding the Starting Board
The board depicts a robotic or armored figure on the left holding a substantial green and purple tool, balanced on a wide red foundation tile row along the bottom. Above the tool on the right sits a round teal and white clock shield enclosing a bright golden key. Between the figure and the shield, high up on the center wall, rests a green Hungry Door with an initial requirement counter of sixteen.
Your bottom tray features five active columns of colored blocks including red, orange, teal, green, purple, and lavender. Deep inside the fourth column sits a yellow block sealed behind a padlock icon, tied directly to the golden key sitting on the board. Below several standard blocks in the tray, you will also encounter connected boxes that must be pulled together into adjacent waiting slots when exposed. Because the central green drill blocks direct access to upper tiles and the red platform borders the lower screen, path clearance must happen systematically from the outer edges toward the center.
The Key to Clearing Level 1550
The single most important objective in this stage is feeding the green Hungry Door without clogging your waiting slots. The door requires sixteen green tiles to vanish, and those green tiles are primarily located on the large central blaster. However, reaching all those green tiles requires stripping away surrounding colors like red along the base, purple on the handle, and orange on the outer borders.
Managing your five waiting slots is equally critical when the connected red blocks appear in the tray. Connected boxes take up two waiting slots at the same time, leaving you with very little room for error if other slots are already occupied by inactive blocks. You must ensure that at least two slots are completely empty before drawing connected blocks, while constantly timing your picks so that ants finish one color before you commit to another.
How to Beat Colony Flow Level 1550
Step 1: Open the lower perimeter with red and orange
Begin by picking the initial red block and the orange block from the top row of your tray. The red ants stream out toward the wide bottom platform, eating through the long base line that anchors the entire structure. Simultaneously, orange ants target the exposed outer edge tiles on the lower right and around the feet of the figure. Clearing these perimeter tiles creates open runway space along the floor and outer border, which allows future swarms to travel smoothly around the central machinery rather than colliding with blocked corners.
Step 2: Chip the central drill and start feeding the Hungry Door
With the bottom platform trimmed down, select the available purple block followed by the first green block. Purple ants move in on the inner joints of the tool and the legs, removing tiles that pin down the green drill housing. As soon as the green block enters your waiting slots, green ants march directly onto the exposed green tool pieces. Every green tile consumed immediately ticks down the counter on the green Hungry Door above, dropping it from sixteen down to nine. This initial drop proves that your pathing to the central green mass is working properly.
Step 3: Clear white and lavender to expose the upper shield
Select the white block and the lavender block from your freshly revealed tray options. The white ants head toward the face of the armored character and the outer circle of the right hand clock shield, while the lavender ants clean up the soft purple shades along the character helmet. Removing these softer tones opens direct lines into the upper half of the board. Watch your waiting slots carefully here because the green block is still partially working down its total. Keeping white and lavender moving rapidly ensures your slots clear before you pull deeper colors.
Step 4: Advance green consumption to reduce the door counter
Tap the next green block along with the dark purple block. The dark purple ants eliminate the heavy dark shading across the headgear and the blaster core, removing the remaining buffers around the green tool tiles. Your green ants now consume another wave of green food, pushing the Hungry Door counter down from nine to six. At this point, the core drill is substantially eroded, leaving open pathways leading straight into the upper center corridor.
Step 5: Route yellow and teal ants toward the key
Bring in the yellow block and the teal block into your open waiting slots. Yellow ants immediately begin stripping the warm outer rim surrounding the circular shield on the upper right, while teal ants tackle the bulk of the shield body. This sequence is vital because it strips away the defensive layers protecting the golden key resting inside the white circular core. As tiles vanish around the shield, paths widen along the right wall, giving your ants a direct route toward the key tile.
Step 6: Unlock the padlocked tray block by claiming the golden key
Continue clearing the white and teal tiles around the center of the shield until your ants reach the golden key. The moment an ant consumes the key tile, the lock mechanism triggers and removes the padlock icon from the yellow block waiting in your bottom tray. Do not rush to select that yellow block right away if your slots are full. Make sure your active teal and yellow blocks complete their counts, freeing up your waiting slots so you can safely handle the newly unlocked tray options without risking a complete slot freeze.
Step 7: Push the Hungry Door down to its final count
Select another green block alongside the pending orange block to wipe out the remaining green fragments from the central weapon. The green ants devour the final structural green tiles, driving the Hungry Door counter down from six to three and finally down to zero. The green door disappears from the board entirely, opening a wide channel into the upper reaches of the character helmet and the remaining backdrop tiles. This breakthrough eliminates the primary bottleneck that restricted ant traffic since the opening move.
Step 8: Deploy the connected red blocks into clear waiting slots
Now that the Hungry Door is gone and multiple colors have fully vacated your waiting slots, retrieve the connected red blocks from the tray. Because these two blocks are linked together, they occupy two adjacent waiting slots simultaneously. The red ants rush across the newly cleared middle corridors to consume the red tiles on the upper character collar and remaining boots. Having cleared the lower board earlier gives the red ants an unobstructed travel path, allowing both linked blocks to tick down rapidly without holding up your tray progression.
Step 9: Clean up the remaining purple and yellow helmet tiles
Select the dark purple block and the unlocked yellow block to clean up the upper left quarter of the board. Ants sweep through the purple crest of the helmet and the yellow visor accents. Because the green barrier no longer divides the board, these ants move in straight lines from the nest hole right into the top corner, finishing their counts in record time and vanishing from your waiting slots almost simultaneously.
Step 10: Finish the remaining teal and orange fragments
Use your final teal and orange blocks to clear the lingering tiles scattered on the upper right shield remnant and the back rim of the wall. Your ants disperse quickly across the empty board, snapping up the last few colored pixels. Once the final teal tile disappears into the nest, the victory screen appears, completing the stage cleanly.
Why This Solution Works
The success of this walkthrough rests on respecting the dependency chain between the central green tool, the Hungry Door, and the upper shield. Trying to clear the shield before opening up the bottom and center leaves your ants wandering long, winding routes that waste time and clog slots with slow moving blocks. By tackling the wide red platform and outer orange border first, you create a broad highway along the lower screen that speeds up every subsequent swarm.
Feeding the Hungry Door is the central puzzle requirement that dictates your block choices. The door only responds to green tiles, and those tiles are concentrated in the heavy drill across the middle of the board. Stripping away the surrounding purple, red, and orange layers allows you to access those green tiles consistently, steadily whittling down the door requirement from sixteen to zero. Once the door dissolves, ant paths between the left and right halves of the screen become short and direct.
Slot management during the middle and late phases prevents the fatal jam that catches many players. The presence of the padlocked yellow block in the tray and the later arrival of linked red blocks creates severe space pressure. Unlocking the padlock by targeting the key inside the shield must be timed so that your slots have room to accept the freed block. Similarly, pulling connected boxes requires two open waiting slots at once. By completely finishing single color tasks before drawing double blocks, you maintain enough headroom to absorb multi slot demands safely.
Final Thoughts
Patience and careful route creation turn this crowded pixel layout into a smooth, manageable puzzle. Keep your focus on reducing the Hungry Door counter while peeling back the shield layers to claim the golden key, and always preserve at least two open waiting slots before pulling connected blocks from the tray. If you want to check the exact ant marching routes or confirm how the board opens up between steps, take a moment to watch the video above the article for a full visual run through.
Comments