
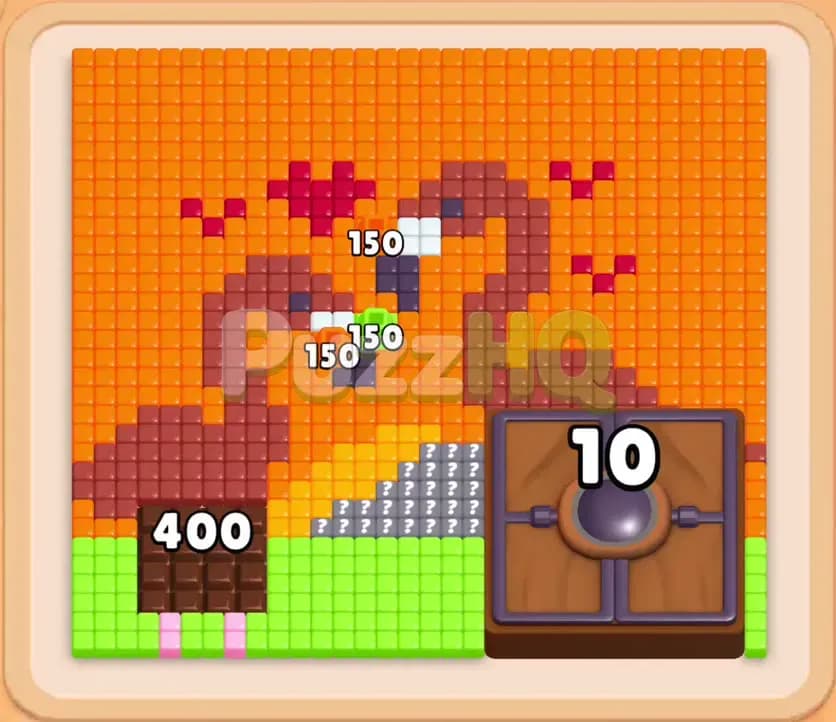
Colony Flow Level 570 presents a tricky puzzle where a massive image of two intertwined flamingos sits surrounded by dense orange food and locked territory. You must balance clearing outer barriers with managing connected blocks in the lower tray to prevent your five waiting slots from overflowing. Success comes down to unlocking the central key tiles at the right time so you can access the hidden food beneath the heavy lock.
Colony Flow Level 570 Walkthrough
Understanding the Starting Board
The board showcases a charming pixel art image of two flamingos facing each other with floating pink and red hearts between their necks. A massive field of orange food tiles forms the sky and backdrop around them. Below the flamingos, the terrain becomes much more dangerous. A thick horizontal wall of green food tiles totaling four hundred pieces blocks movement on the bottom left, directly above the ant nest. On the bottom right sits a heavy wooden vault locked tight with the number ten displayed across its face. Clustered right next to this locked vault is a patch of hidden food tiles covered in question marks.
Your tray underneath holds multiple columns of colored blocks, several of which are connected boxes tied together with vertical linking lines. When you clear a top block that shares a connection, its partner below activates or becomes accessible. Because you only have five waiting slots, randomly tapping blocks will immediately clog your tray. The flamingos themselves are made of dark brown and red tiles with delicate white accents marking their beaks and eyes. These white tiles hold the keys needed to open the vault. Your primary obstacle is path availability because the green wall and the locked vault completely seal off access to the interior and right side of the board.
The Key to Clearing Level 570
Winning this stage requires strict discipline regarding color order and slot control. You cannot afford to pull colors into your five waiting slots if the ants have no open line of travel to reach them. The green wall must be dismantled first so the ants can march out of the nest and enter the lower sections of the flamingo artwork. At the same time, you need to chip away at the orange border to create side pathways.
Another crucial factor is managing the connected boxes in your tray. Pulling a top box commits you to dealing with whatever color is chained directly beneath it. You must deliberately work toward freeing the white blocks because white ants must harvest ten keys from the flamingo heads to open the vault. Do not rush to fill your slots with pink or light green blocks until the vault opens and the hidden food reveals its true colors. Keeping at least one or two waiting slots open gives you the breathing room needed to cycle through the tray without triggering a game over.
How to Beat Colony Flow Level 570
Step 1: Open paths through the bottom green wall
Start by selecting the accessible green block and an orange block from your tray. The green ants immediately swarm the massive four hundred tile green barrier on the bottom left, chewing away the dense wall that blocks travel upward from the nest. Simultaneously, orange ants travel along the outer edge to clear portions of the orange sky. As the green wall crumbles, the number on your green block rapidly decreases toward zero. Clearing this lower green fortification is mandatory because it opens the first genuine corridor into the bottom of the flamingo bodies. Keep an eye on your waiting slots and ensure you only draft blocks that have direct, unobstructed access to exposed food tiles.
Step 2: Clear outer orange food and expose the flamingos
With the lower left path opened, select another orange block along with a brown block to begin targeting the flamingo silhouettes. The orange ants peel away layers of the surrounding backdrop, broadening the corridors on the left and top edges. Meanwhile, brown ants move through the gap left by the vanished green tiles and begin eating into the lower curves of the left flamingo. You will see the brown tile count on the board drop steadily from thirty nine as the ants feast. Removing these outer orange layers is vital because it relieves pressure on your tray and exposes deeper sections of the birds, allowing you to reach higher tile clusters without clogging your waiting slots.
Step 3: Begin consuming the brown flamingo bodies and pink hearts
Now that the lower body of the left flamingo is hollowed out, pull in a pink block alongside another brown block from your tray. Pink ants travel through the newly established central channel to consume the pink and red heart tiles suspended between the flamingos. At the same time, brown ants climb higher along the intertwining necks. As these tiles disappear, the path toward the heads and faces becomes clearly defined. Pay close attention to the connected boxes in the tray. Clearing the top boxes in this phase will reveal the crucial white block underneath. Make sure your active slots are cycling down to zero so you do not run out of room before uncovering the white keys.
Step 4: Deploy the white block to collect keys
Select the white block as soon as it becomes available in your tray. White ants immediately stream up through the center of the board, heading directly for the white tiles located on the beaks and eyes of the flamingos. As the ants consume these tiles, the white block count drops from six down to four and eventually finishes completely. Each white tile eaten yields a key, and you will see the white ants carrying these glowing keys across the board down toward the wooden vault. Ten keys are required to pop the lock. While the white ants do their work, continue cycling small orange or brown blocks to keep your remaining ants productive without cluttering the waiting slots.
Step 5: Unlock the vault and reveal the hidden food
Once the tenth key reaches the vault, the heavy wooden doors vanish entirely, unlocking the territory on the bottom right. The removal of the vault immediately clears the obstruction next to the hidden food tiles marked with question marks. As the adjacent tiles clear, the hidden food unlocks and transforms into vivid pink and green tiles. The board opens up dramatically at this point. Paths that were completely severed for the first half of the level are now wide open, allowing ants from the nest to run straight into the lower right corner.
Step 6: Clear the revealed pink and green tiles
Now is the moment to select the pink and green blocks that were waiting in your tray. Pink ants swarm the newly uncovered pink food where the vault and question mark tiles once stood, while green ants digest the exposed green patch. Because you kept your waiting slots tidy throughout the earlier steps, you have plenty of room to hold these blocks while the ants chew through the fresh food. Watch the numbers count down rapidly as both colors get wiped from the lower half of the screen. This phase removes the final major cluster of mixed colors, leaving only the outer background remnants.
Step 7: Finish the remaining orange and green food
Select the final orange and green blocks sitting at the bottom of your tray. Green ants march across the thin remaining strips along the lower boundary, while orange ants sweep across the upper canopy and outer corners. With every barrier, lock, and hidden tile resolved, the ants travel without any interference. The numbers on your final orange blocks of forty and forty four steadily drop to zero as the last pixel art tiles vanish. Once the board is entirely clean, the level registers as complete.
Why This Solution Works
The success of this walkthrough rests on understanding path dependency and respecting the five slot limit. In this level, the board is split into two halves by physical barriers. The bottom left is choked by a massive green wall, while the bottom right is completely sealed by a ten key vault and hidden food. Attempting to clear the right side early is impossible because no ants can walk through a locked structure. By dedicating your first moves to the green wall and the outer orange frame, you establish reliable entry points that let ants reach the center.
Unlocking the vault represents the turning point of the entire puzzle. The white tiles on the flamingo beaks are located deep inside the art, meaning you must carve away the brown bodies and pink hearts before your white ants can even touch them. If you pull the white block too early while its path is blocked, it simply sits dead in one of your five waiting slots, stealing space you desperately need for cycling connected boxes. Waiting until the corridor is open guarantees that the white block drains quickly, dispatching keys to the vault without delay.
Finally, managing the connected boxes prevents catastrophic tray jams. Connected boxes force a rigid order on your choices because lower blocks remain trapped until their upper partners clear. By keeping active counts dropping and only introducing colors with open paths, you ensure that every block pulled into a waiting slot begins draining immediately. This steady turnover keeps two or three slots open at all times, making the final cleanup of the revealed pink, green, and orange tiles completely smooth.
Final Thoughts
Patience and path awareness are everything on Colony Flow Level 570. As long as you dismantle the green barrier first, guide your ants up to the white key tiles, and resist pulling colors before the vault pops open, your waiting slots will never overflow. If you find yourself unsure about any specific ant route or block timing, be sure to watch the walkthrough video above to see the winning path in real time.
Comments