
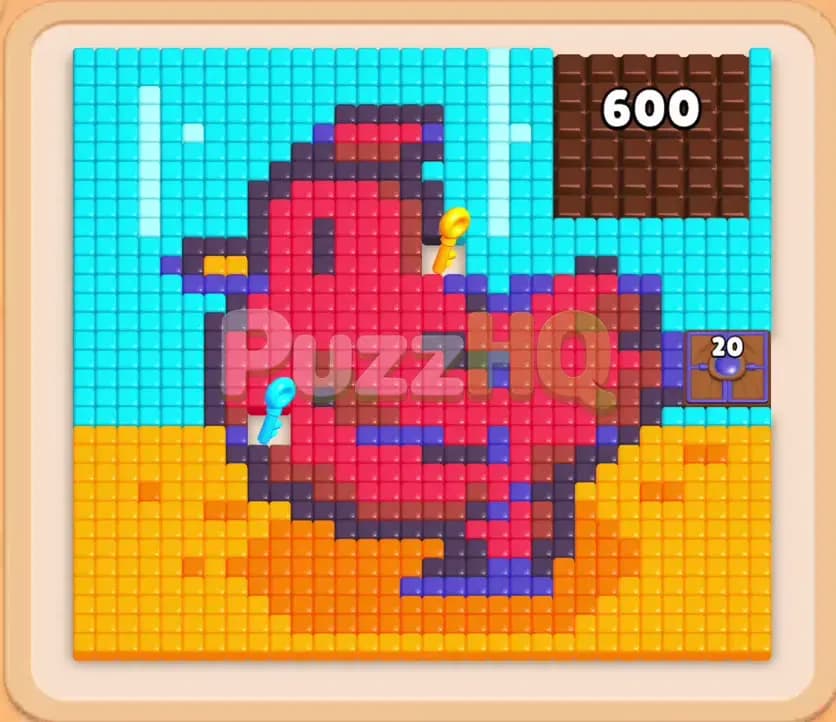
Colony Flow Level 107 tests your ability to handle crowded trays under tight space limits. You face a vibrant pixel art picture of a red bird perched on golden sand with a massive chocolate slab looming over the right sky. Clearing this stage demands careful coordination between your waiting slots and the colored ants marching across the board.
Colony Flow Level 107 Overview
What You Are Working With
Your puzzle board features a colorful red bird set against a pale blue sky and warm golden sand below. The bird has deep purple borders, dark feet, a sharp beak, and two distinct keys placed directly inside its body. A blue key rests on its lower belly, while a bright yellow key sits near its neck.
In the upper right corner, a heavy chocolate slab blocks a large portion of the sky, displaying a counter of six hundred. Chocolate covers and blocks the food tiles underneath until you whittle it completely down. Along the right side of the bird, you will also spot a hungry door marked with the number twenty and a purple icon. This hungry door blocks access to the right flank until your ants feed it twenty purple food tiles.
Down in your tray, you must manage multiple rows of colored numbered blocks. Several of these blocks appear as connected boxes, joined together in pairs by solid white bridge links. When you pull a connected box, both linked blocks slide toward your waiting slots as a unified pair. You will also spot locked blocks trapped behind keyholes that remain unusable until your ants grab the matching keys from the puzzle board. Because you only have five waiting slots, drawing connected pairs without active targets on the board will immediately clog your tray and cause an instant loss.
What It Takes to Clear Level 107 Board
Winning Colony Flow Level 107 requires you to clear every single tile from the picture above without letting your five waiting slots jam. The primary challenge stems from the locked blocks and the giant chocolate slab. You must open paths along the left flank and the bottom sand first, then direct purple ants toward the hungry door to open the right side of the bird.
Once the hungry door falls, your ants can tunnel through the bird body to retrieve the blue key and then the yellow key. Collecting these keys opens up the locked blocks in your tray, giving you the high value numbers needed to demolish the chocolate block. As the chocolate crumbles, it exposes the final patch of pale blue sky tiles underneath. The stage ends in victory the moment your last ant cleans up the final sky tile and your waiting slots sit clear.
Colony Flow Level 107 Step by Step Solution
Step 1: Pull the connected cyan blocks to carve open the outer sky and sand
Begin by pulling the connected cyan blocks sitting in the top row of your tray. These blocks pull into your waiting slots and immediately release streams of light blue ants toward the open sky along the left boundary. As those ants march across the outer border, pull the exposed golden sand blocks from the second row to start eating away at the desert floor underneath the bird. The cyan numbers drop steadily from forty down to single digits as the ants chew through the background sky. The golden ants quickly remove the bottom edge of the sand, widening the walking corridor between the nest hole and the main picture. Keeping your waiting slots limited to two active colors at this early stage guarantees that your ants never stall.
Step 2: Feed the purple outline tiles to satisfy the hungry door
With the outer left edge and lower sand clear, you can now reach the dark purple outline wrapping around the tail and lower belly of the bird. Pull the dark purple blocks from your tray into the open waiting slots. Your purple ants immediately rush toward the tail feathers and start devouring the outline. Several of these purple ants carry food directly into the hungry door on the right side. Watch the hungry door counter tumble from twenty down to zero. The door vanishes the moment the twentieth purple tile clears, unlocking the right wing of the bird and opening up a direct path toward the inner crimson feathers.
Step 3: Advance red ants into the lower torso to seize the blue key
Now that the hungry door no longer blocks the right wing, pull the crimson red blocks into your waiting slots. Streams of red ants burst from the nest hole and surge up the newly opened corridor straight into the lower belly of the bird. The red tiles begin popping off the board, driving your red block numbers down from thirty five into the twenties. As the red ants chew through the lower torso, they reach the blue key resting inside the belly. The moment an ant touches the blue key, it unlocks the matching blue lock on your tray blocks below. This opens up fresh tray space and unlocks high value blue blocks for later use without wasting any of your five waiting slots.
Step 4: Tunnel through the chest to claim the yellow key
Keep the red ant stream flowing by feeding in the next red block from your tray. Direct your ants upward through the chest of the bird toward the neck area. At the same time, draw a single purple block to let purple ants clean out the beak and inner shadow lines, preventing red ants from hitting awkward dead ends. The red ants quickly chew past the middle ribs of the bird and touch the yellow key. Collecting this yellow key triggers an instant unlock on the yellow lock box sitting in your tray. Unlocking these tray blocks releases pressure on your five waiting slots and reveals fresh numbers that you will need for the final push.
Step 5: Grind down the chocolate slab while clearing the remaining sand
With both keys safely collected, turn your attention to the massive chocolate block sitting at the upper right. Pull the unlocked high value blocks to send waves of ants chewing directly into the chocolate perimeter. The chocolate counter rapidly plummets from three hundred ninety four down into the double digits as your ants steadily chip away at the brown mass. While this heavy work takes place, feed your remaining golden sand blocks into the board. Your yellow ants scurry along the bottom floor, vacuuming up every remaining desert tile until the entire lower half of the frame stands completely bare. Keep at least two waiting slots open at all times by waiting for low count blocks to finish before pulling new pairs.
Step 6: Shatter the remaining chocolate crust to expose the upper sky
Draw your remaining purple and red blocks to strip away the bird head and neck feathers, reducing the chocolate block counter down past seventy six to zero. The brown chocolate layer shatters completely, revealing a large block of hidden pale blue sky tiles that were sealed underneath since the start of the level. Because you kept your waiting slots organized, you now have plenty of room to receive the final wave of cyan blocks. Clean up the final red crown tiles on top of the bird head so that not a single piece of the bird remains on the board.
Step 7: Deploy your final cyan blocks to sweep the upper board clean
Pull your remaining cyan blocks into the open waiting slots. You should have three solid cyan blocks with numbers around nineteen, thirty seven, and thirty one, along with two completely empty waiting slots. Swarms of bright cyan ants rush from the nest, scaling the left and right borders to reach the newly revealed sky tiles in the upper right. The numbers on your cyan blocks count down rapidly as the ants chew across the final blue grid. The last tile disappears, your tray empties, and you successfully clear the level without ever jamming your five waiting slots.
Final Thought
Colony Flow Level 107 demands strict patience with your tray management, especially when handling connected boxes around the chocolate barrier and the hungry door. If you ever feel stuck on block order or want to see the exact ant routes in real time, take a moment to watch the walkthrough video above this guide.
Comments