
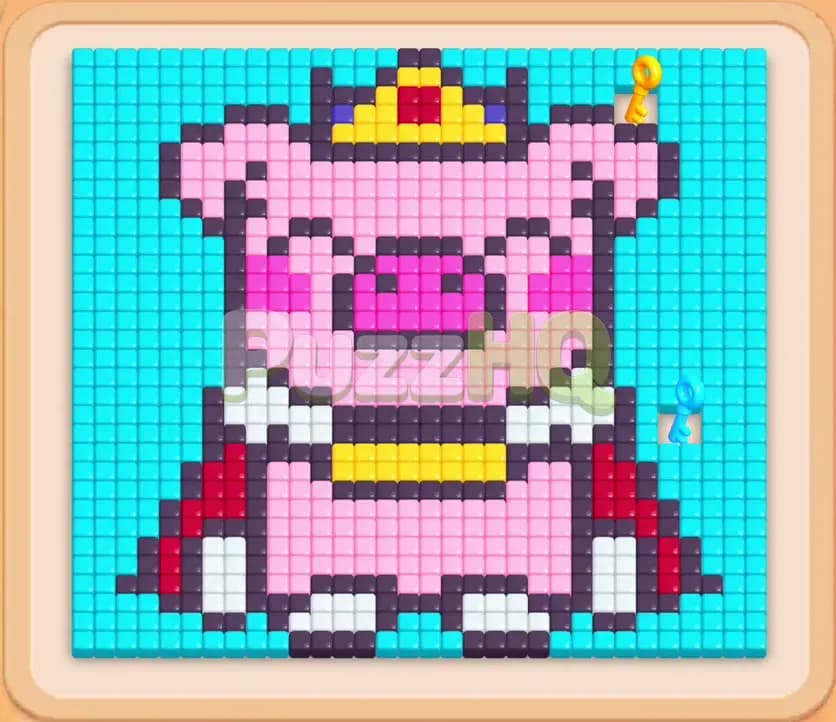
Colony Flow Level 225 presents a tricky puzzle shaped like a crowned pig king with a wide spread of colors and restricted starting paths. Your primary goal is to guide the ants through the bottom barrier while carefully balancing your tray selections to avoid running out of room. By targeting the lower outlines first and methodically opening access to the golden key in the upper corner, you can prevent your waiting slots from jamming and conquer the stage smoothly.
Colony Flow Level 225 Walkthrough
Understanding the Starting Board
When you start Colony Flow Level 225, you face a grand pixel art portrait of a pig king wearing a golden crown and a regal red cape. The entire scene rests against a solid cyan background that fills the perimeter and the upper canvas. The king himself consists of several distinct color layers. Light pink forms the expansive base of the face and body, while vivid magenta highlights the round snout, mouth, and rosy cheeks. Crisp black tiles outline the king, the cape folds, the facial details, and the outer edges of the board. Crisp white tiles appear as fluffy trim along the royal collar, the white hooves at the very bottom, and the sclera of the eyes. Deep red tiles make up the body of the cape, draping down both flanks. Bright yellow tiles form the crown at the top, a decorative royal belt across the waist, and a solitary golden key embedded inside the upper right region of the cyan sky.
Beneath the board sits your active tray containing four tall columns of numbered colored blocks, beneath five empty waiting slots. The primary hazard here is the density of overlapping colors and the locked block sitting deep inside the middle tray column. This locked block displays a golden padlock icon and cannot be cleared until your ants physically touch and collect the golden key located near the top right ear. The nest rests directly at the bottom center. Because the pig king hooves, lower cape hem, and thick black border completely wall off the interior portrait, ants cannot immediately reach the vast fields of light pink, magenta, or crown yellow. If you pull high value blocks from the tray that your ants cannot reach, those blocks will sit idle in your waiting slots. With only five slots available, a couple of premature picks will clog your queue and trigger an immediate loss.
The Key to Clearing Level 225
Success on Colony Flow Level 225 depends on executing a strict bottom up breach before expanding along the outer sky corridors. You must resist the temptation to tap brightly colored blocks that look abundant on the board until a physical path connects directly to them from the nest. The correct sequence requires you to eliminate the immediate bottom black outlines and the lower edges of the red cape first. This opening allows the ants to spill into the waistline, where they can chew away the yellow belt and white hooves.
Once the lower boundary collapses, the real challenge begins. You must manage your five waiting slots with extreme care. The golden key in the upper right sky is the central pivot point of the puzzle. Without that key, the locked yellow block in your tray remains frozen, keeping valuable blocks underneath it out of reach. To reach the key without clogging your slots, you must select cyan and black blocks that encourage the ants to chew upward along the outer vertical margins. Clearing the outer cyan background creates open highways around the sides of the king, letting you reach the golden key, release the tray lock, and sweep across the crown to finish the stage.
How to Beat Colony Flow Level 225
Step 1: Free the lower cape and bottom outline
Your opening move must create an entry point into the board. The nest sits at the bottom center, facing a solid barrier of black outline tiles flanked by the bottom folds of the dark red cape. Select the black block and the dark red block from the front of the tray. Ants immediately pour out of the nest, swarming the lowest black boundary tiles and devouring the bottom edges of the cape. As the black count drops and the red block clears completely, the lower border vanishes. This critical action exposes the white hooves, the yellow belt, and the base of the pig body without cluttering your waiting slots with unusable colors.
Step 2: Clear the yellow belt and hooves
With the entrance widened, tap the white block and the yellow block to target the newly exposed waistline. Ants charge through the central gap, stripping the white hooves and chewing through the golden belt spanning the pig middle. As the yellow tiles disappear, the inner belly of the pig becomes accessible. Now pick the first light pink block from the tray. Your pink ants stream upward into the lower torso, rapidly reducing the block counter. Because each of these three colors is actively being eaten simultaneously, blocks cycle out of your waiting slots quickly, leaving you with open slots to prepare for the outer edges.
Step 3: Open the side channels through the cyan border
Now that the bottom center is hollowed out, you must clear room along the flanks to establish upward mobility. Select the cyan block and another black block from the tray. The cyan ants bypass the center entirely, spreading outward along the left and right borders of the board to consume the lower sections of the cyan backdrop. Simultaneously, the black ants chew away the outer outline tiles running up the sides of the cape. Clearing these side segments establishes two clear paths that will soon let your colony push straight into the upper atmosphere toward the golden key.
Step 4: Dismantle the pig snout and lower face
Return your attention to the center by selecting the magenta block followed by another light pink block. The ants rush past the cleared belt into the core of the head, consuming the large magenta snout, the dark nostrils, and the smiling mouth. Pink ants branch outward to consume the lower cheeks and jawline. As the magenta tiles vanish from the canvas, that block empties from your waiting slots. This massive clearing action turns the pig face into an open thoroughfare, granting your ants effortless navigation across the entire central area of the board.
Step 5: Route along the right border to claim the golden key
With the central pathways fully clear, you must now secure the golden key sitting in the upper right corner of the board. Pick the cyan block from the tray, followed by a white block to take care of the collar remnants. The cyan ants march upward along the right flank, stripping away the thick blue background bordering the king right ear. As the cyan tiles around the top right corner crumble, the ants touch the golden key. The moment the key is gathered, the padlock icon on the locked block in your tray unlocks with a bright flash, opening access to the reserve blocks buried beneath it.
Step 6: Unlock the tray and clear the royal crown
Now that the lock is gone, tap the newly released yellow block along with the remaining black and dark red blocks. Yellow ants storm into the top of the board to devour the majestic crown, while dark red ants finish off the upper cape shoulders and jewels. Black ants pick off the remaining outlines framing the ears and forehead. Watching the crown disappear frees up valuable space across the upper third of the board. Because these blocks finish their counts in rapid succession, your waiting slots stay clean, easily preventing the gridlock that catches unprepared players.
Step 7: Clean up the remaining sky and finishing tiles
With only isolated fragments left on the canvas, select the remaining cyan, light pink, and magenta blocks from the tray. Ants spread across the uppermost rows, clearing the final cyan sky tiles at the top edge, the tips of the ears, and the last pink patches between the crown base. Every ant reaches its target without delay because no obstacles or walls remain. As the final cyan tile gets consumed, your remaining tray blocks drop to zero, clearing the board completely and securing victory.
Why This Solution Works
The primary reason this solution succeeds on Colony Flow Level 225 is its strict adherence to path dependency. The board is designed to deceive players by presenting huge, tempting clusters of light pink and magenta right in the center. However, those central tiles are completely boxed in by the black outline, the white hooves, and the red cape at the beginning. Tapping pink or magenta early fills your waiting slots with blocks whose matching tiles cannot be reached by ants emerging from the bottom nest. By clearing the black base and red cape first, you carve an open gateway that guarantees every subsequent block pick immediately finds an open path.
Another crucial factor is how this sequence handles the Lock and Key mechanic. The locked block in the tray traps several essential colors underneath it, meaning you cannot finish the puzzle without freeing that lock. Rushing blindly into the crown before grabbing the key is impossible because the yellow crown tiles require more yellow ant capacity than the tray initially offers. By prioritizing the cyan perimeter, you allow the ants to scale the outside edges directly to the upper right corner where the golden key rests. This unlocks the lower tray in time to supply the yellow and pink counts required for the endgame.
Finally, managing the five waiting slots dictates every single decision in this walkthrough. When you have five slots, you can never afford to have more than two slow draining blocks sitting idle. This solution pairs rapid clearing colors like the yellow belt and white hooves with ongoing perimeter colors like cyan and black. As the small clusters disappear, their slots clear instantly, creating breathing room for the heavier counts. This fluid rotation keeps your ant flow continuous and guarantees that your slots never jam up.
Final Thoughts
Mastering Colony Flow Level 225 comes down to opening the bottom gate early and clearing the side cyan corridors to grab that golden key. Once the key unlocks your bottom tray, cleaning up the royal crown and the remaining sky becomes simple and satisfying. If you get stuck on a specific ant split or want to verify the exact pathing around the upper corners, watch the video above the article to see every move executed in real time.
Comments