
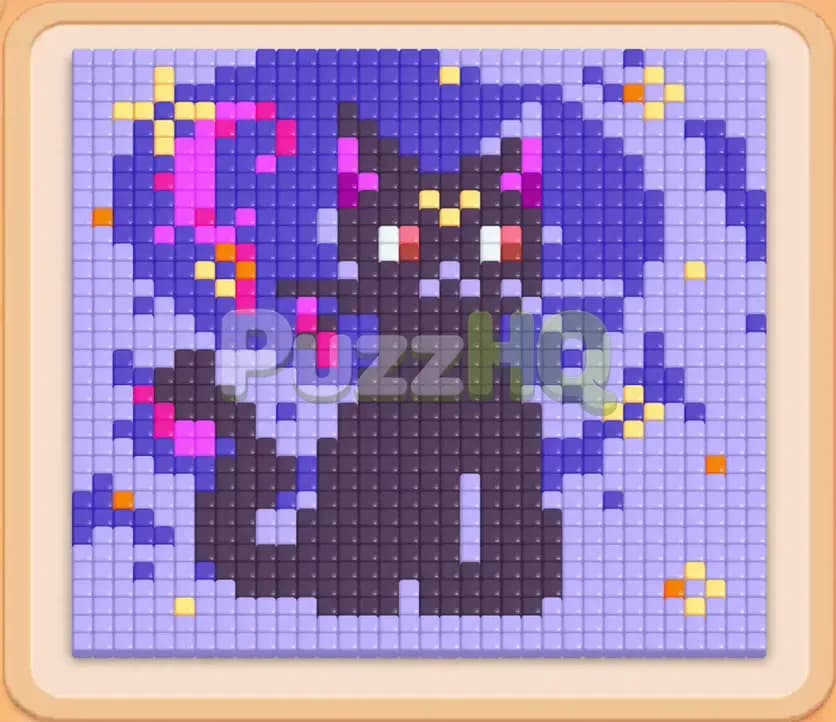
Colony Flow Level 220 presents a dense pixel art challenge featuring an elaborate dark cat framed by vibrant glowing wings and a sprawling lavender background. Your success on this board depends entirely on opening a clean pathway through the massive dark silhouette before your five waiting slots fill up. By choosing your colors carefully and respecting the connected box pairings in your tray, you can guide your ants smoothly to victory without stalling your line.
Colony Flow Level 220 Walkthrough
Understanding the Starting Board
When you begin the stage, the game board displays an intricate feline portrait surrounded by decorative background elements. The center of the layout is dominated by a heavy dark cat figure, while the upper wings and magical aura showcase deep purple, bright magenta, cyan, and golden yellow accents. The entire outer border and upper corners consist of pale lavender tiles. Because the nest sits directly beneath the cat at the bottom center of the screen, the cat body itself acts as a massive wall that seals off access to every colorful accent nestled higher up on the board.
Your block tray contains several rows of numbered color blocks, including a vital mechanic known as Connected Boxes. Connected Boxes are physically linked in pairs with solid bridge bars, meaning selecting the front block automatically drags its partner along into your active roster. In this stage, you will notice pairings like yellow linked to dark blue, lavender linked to white, and yellow linked to deep blue. Managing these connected blocks without overcrowding your five waiting slots is the central puzzle of the level. If you tap connected pairs prematurely when their colors lack reachable food, both blocks will sit idle and lock up your available space.
The Key to Clearing Level 220
The winning formula for this board requires a strict center outward progression. You must completely resist the temptation to pick bright accent colors or perimeter lavender blocks early in the run. Because the nest rests at the bottom, your ants cannot physically reach the wings, the eyes, or the outer sky until the central black cat silhouette is dismantled.
You must dedicate your initial waiting slots exclusively to black blocks. Once the black silhouette dissolves, paths open inward toward the white and yellow facial features, as well as outward toward the deep purple wings and the vast lavender border. As you transition into the mid game, prioritize clearing blocks that are tied to Connected Boxes so that linked pairs enter the queue only when their matching tiles are completely exposed to the ant stream. Maintaining at least two open waiting slots throughout the middle phase guarantees that incoming linked blocks will never trigger a game over.
How to Beat Colony Flow Level 220
Step 1: Carve through the cat silhouette with the first black block
Select the black 36 block sitting on the right side of the front tray row to begin the level. This block moves directly into your first waiting slot, prompting black ants to march upward from the nest straight into the cat paws and lower torso. Watch the counter on this block tick down from 36 toward single digits as the ants consume the dense black tiles forming the base and middle of the cat. This initial push clears away the lower barrier and creates a deep vertical corridor straight up into the head of the feline figure. By the time this first block drops to 1 and vanishes, the interior of the cat face begins to emerge, revealing hidden red and white details.
Step 2: Finish the cat body with the second black block
Tap the second black block showing a count of 32 to continue clearing the cat form. Your ants will rush through the newly carved central path to devour the remaining body tiles, the sweeping tail along the lower left, and the outer edges of the cat head. As the counter rapidly counts down, the black foundation completely disappears from the screen. This action is critical because it dismantles the primary roadblock of the stage. With the cat body gone, open pathways now branch across the entire board, granting your ants unobstructed entry into the upper wings, the glowing face accents, and the inner side of the surrounding lavender frame.
Step 3: Clear the exposed facial accents and small details
With the central cavity open, you can safely deploy smaller blocks for colors that were previously barricaded. Select the white block and the yellow block to eat away the facial details, the bright eyes, and the small sparkle tiles around the lower corners. Because the number values on these detail blocks are relatively low, the ants quickly eliminate the target tiles and clear the blocks out of your waiting slots within seconds. Removing these tiny clusters ensures that your tray slots remain spacious and ready to absorb the heavier multi color pushes required for the wings.
Step 4: Break into the lavender perimeter and dark blue wings
Tap the lavender 30 block along with the deep blue 28 block from the front row. Because the central space is wide open, your lavender ants can swarm across the inner perimeter to eat the light purple border tiles from the inside outward, while the blue ants travel upward into the lower edges of the large wings. As these ants make rapid progress, observe your waiting slots closely. You will have multiple active streams running concurrently, which reduces the numbers on your blocks in tandem. The lavender counter will drop toward 17, and the blue blocks will steadily decrease, preventing any threat of a bottleneck.
Step 5: Untangle the connected boxes and clear the magenta wings
Look at your tray to identify the Connected Boxes that have now become viable. Select the linked pair containing the lavender and white blocks, followed by the connected yellow and blue set. Because you previously cleared paths toward both the outer lavender frame and the inner wing accents, both halves of each connected pair can release ants immediately upon entering your waiting slots. At this stage, your queue may hold four blocks simultaneously, such as dark blue 8, lavender 17, yellow 4, and deep blue 11. Once the yellow and white counters reach zero and clear their slots, bring in the magenta 15 block to chew through the vibrant pink wing feathers on the left side of the screen.
Step 6: Consume the remaining wings and sweep the outer frame
Select the remaining deep blue 22 block, the pink 3 block, and the final lavender blocks to clean up the rest of the board. The ants quickly tear through the remaining wing structures on both sides, wiping out the bright magenta streaks and the deep blue backing. This leaves only a scattered handful of lavender tiles lingering along the very top edge and far corners. Deploy your final lavender block showing 27 to send a steady convoy of purple ants toward the top rim of the board. Watch the final tiles vanish one by one until the playfield is completely empty.
Why This Solution Works
The primary reason this solution succeeds is strict adherence to path geometry. In Colony Flow, ants must possess a continuous open route from the nest to the target color. The starting layout of this level creates a total perimeter lock because the cat silhouette physically seals off the center, while the outer lavender border hugs the edges. Tapping wing colors or perimeter colors early on would immediately stall your waiting slots because the ants have no open angle of approach. Committing your early moves to black blocks carves out the center, which serves as a grand central terminal from which ants can radiate in every direction.
Another core strength of this strategy lies in how it neutralizes the threat of Connected Boxes. Linked blocks are notorious for causing unexpected losses because bringing one desired block into the tray forcibly pulls an unwanted block along with it. If that second block lacks valid food tiles on the board, it becomes dead weight in your waiting slots. By clearing the central cat first and opening both the lavender border and the inner wing clusters, you ensure that whenever a linked pair is selected, both colors already have completely valid food paths waiting for them.
Finally, this sequence carefully balances high count blocks with rapid low count clears. You clear the high count black blocks when you have the luxury of empty waiting slots. Later, when you introduce linked blocks that consume multiple slots simultaneously, you pair them with small numbers like yellow 4, white 4, and pink 3. These smaller counts finish almost instantly, returning valuable breathing room to your queue and ensuring you never hit the fatal five slot threshold.
Final Thoughts
Clearing this level becomes straightforward once you treat the black cat as an entryway rather than just another piece of the picture. Focus entirely on opening the center first, monitor your linked tray blocks before tapping them, and keep your waiting slots flowing smoothly. If you want to see the exact ant routes and pacing in real time, be sure to watch the walkthrough video above this guide to master every move.
Comments