
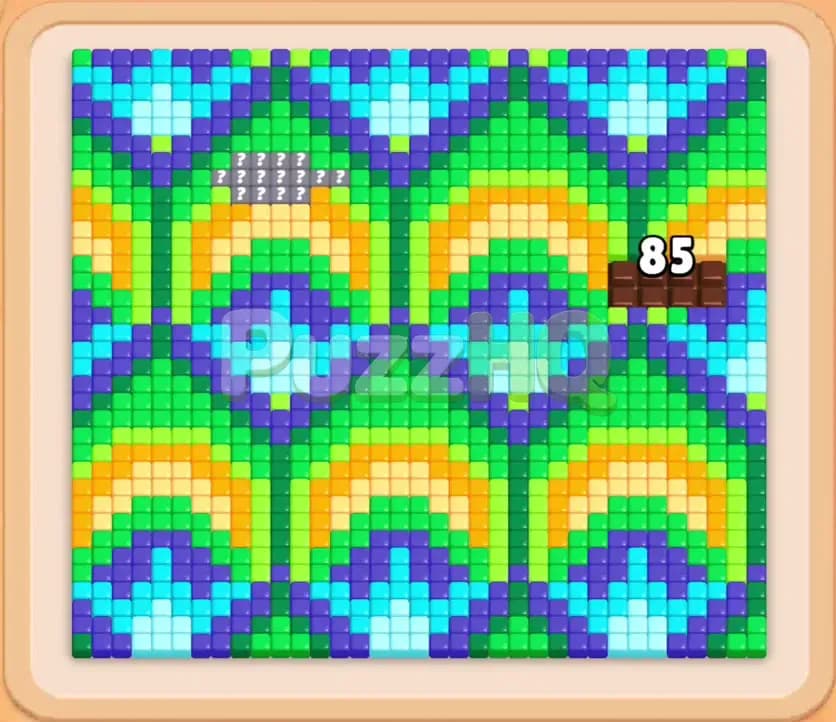
Colony Flow Level 216 brings a massive visual treat with an elaborate pixel art pattern resembling a grand peacock tail. The primary challenge here lies in working through tightly banded concentric arches while keeping your five waiting slots completely under control. To solve this puzzle without getting stuck, you must select the right blocks in a precise sequence that clears paths toward the upper wing sections.
Colony Flow Level 216 Walkthrough
Understanding the Starting Board
When you look at the starting layout, you will notice a magnificent fan of feathers composed of five distinct food colors. The design features rich layers of dark blue, light green, dark green, cyan, and vibrant yellow. Ants emerge from the single nest hole at the bottom and need clear routes along the perimeter to access the food tiles. At the start, the outer lower curves are directly accessible, but the inner layers remain tightly insulated by surrounding blocks of contrasting colors.
This stage introduces three critical mechanics that you must respect. On the upper right quadrant of the board, a wooden Hungry Door marked with the number eighty five blocks access to a dense cluster of feather tiles. On the upper left quadrant, several tiles are concealed as Hidden Food, marked with white question marks that will not reveal their colors until you clear adjacent tiles. Down in your block supply tray, you will also spot Connected Boxes, where a dark blue block and a cyan block are linked together by a rigid rod. These connected blocks must be handled thoughtfully because taking one pulls the other directly into your waiting slots.
The Key to Clearing Level 216
The secret to winning this stage is establishing a broad circular clearing at the bottom before attempting to penetrate the dense central fan. Because you only have five waiting slots, selecting high number blocks without active food paths will clog your tray instantly. If all five slots become occupied by blocks whose matching colors are buried behind other tiles, your ants will stop moving and you will lose the round.
Your overall game plan must focus on feeding the Hungry Door as quickly as possible. The door requires eighty five food tiles to be consumed before it swings open. By targeting the exposed bottom perimeter of green, dark blue, and yellow food, you will naturally satisfy that eighty five tile quota. Once the barrier drops and the Connected Boxes enter play, you can transition your focus upward into the center plume and unlock the Hidden Food tiles before finishing off the top wings.
How to Beat Colony Flow Level 216
Step 1: Open the lower perimeter using green and dark blue blocks
Begin by drawing from the front row of your supply tray. Tap the green twenty five block and the dark blue twenty block to send your first waves of ants out from the nest. The ants will split along the open pathways hugging the lower left and lower right edges of the board. The green ants immediately attack the outer rim of light green tiles, while the dark blue ants latch onto the bottom curves of the plumage. Within seconds, the numbers on these blocks begin ticking downward steadily. This initial move establishes clear space along the bottom wall and prevents an early tray jam by ensuring your active slots are immediately productive.
Step 2: Introduce yellow blocks to erode the bottom arches
With the outermost green tiles vanishing, select the yellow twenty block from the second tier of the tray alongside another green block. Yellow tiles form the base rings of the lower feather eyes. Releasing yellow ants now lets them strip away the bottom arches, breaking the insulation around the deeper layers. Keep a close watch on your five waiting slots as the numbers decrease. The first dark blue block will quickly run down to a count of two, and the green blocks will rapidly diminish as your swarm chews through the outer border. By opening these lower arches, you also direct a high volume of consumed tiles toward the eighty five tile requirement of the Hungry Door.
Step 3: Unlock the hungry door and advance the green swarm
Continue tapping the visible green and dark blue blocks as lower slots empty out. As your ants clear the remaining perimeter tiles, the counter on the Hungry Door hits zero, causing the wooden barrier on the upper right to dissolve completely. This exposes a large patch of green and blue tiles that were previously unreachable. Immediately bring in the dark green eighteen and light green fourteen blocks from the tray. Your ants can now travel up the right flank unhindered, dissolving the newly exposed food and giving your light green blocks immediate targets. This milestone prevents your waiting slots from stalling because it expands the active surface area of the board significantly.
Step 4: Manage the connected boxes and clear cyan clusters
As you work deeper into the tray, you will uncover the Connected Boxes linking a dark blue twenty two block to a cyan twenty block. Selecting this pair pulls both blocks into your waiting slots simultaneously, consuming two of your precious five spaces at once. Before making this selection, ensure you have at least two empty slots and that both dark blue and cyan tiles are actively reachable on the board. The lower midsection now has plenty of exposed cyan and dark blue patches. Tap the connected pair and watch as both colors deploy swarms of ants at the same time. The cyan ants quickly eliminate the inner highlights of the feather eyes, while the dark blue ants strip out the supporting arches.
Step 5: Hollow out the central plume while keeping slots free
Now that the lower half of the feather structure is largely dismantled, shift your attention to the dense central diamond. Select the dark green twenty block and another yellow block to tackle the core of the pattern. Ants will march up the central corridor that opened when the lower arches were cleared. As the yellow ants strip the middle eye of the feather, the dark green ants hollow out the thick stem of the plume. Make sure you let active blocks count down to completion before drawing replacement blocks. Maintaining at least one or two open waiting slots during this heavy clearing phase is vital to avoid sudden deadlocks.
Step 6: Expose and clear the hidden food on the upper left
With the central plume shrinking rapidly, your ants will carve paths reaching the upper left quadrant. The tiles directly adjacent to the question mark tiles will disappear, which instantly reveals the identity of the Hidden Food underneath. These tiles reveal themselves as matching shades of green and dark blue. Pick the remaining light green and dark blue blocks from your tray to clear out this pocket immediately. Because the surrounding pathways are wide open, your ants will swarm this newly uncovered cluster without any delay, wiping out the mystery section in just a few moments.
Step 7: Clear the top crest to finish the level
Only the high crest of the feather display remains across the top of the board. Bring in your final cyan and dark green blocks from the tray, followed by any small trailing numbers left in reserve. The remaining ants will stream straight up the central highway and across the top rim, picking off the isolated tips of the feathers. Watch the final numbers on your blocks drop to zero one after another. Once the last green and cyan tiles at the upper boundary disappear into the nest, the stage is complete.
Why This Solution Works
The primary reason this solution succeeds is that it systematically expands the usable board area before introducing multi slot burdens. The starting board is remarkably congested, with inner colors completely shielded behind exterior bands. By committing your first moves strictly to the exterior green, dark blue, and yellow bands, you create wide thoroughfares on both sides of the board. This prevents the ants from getting trapped in narrow bottlenecks and ensures that every block placed into a waiting slot can immediately send its ants to work.
Another crucial factor is the deliberate timing around the Hungry Door and the Connected Boxes. The Hungry Door naturally demands eighty five consumed tiles, which mirrors the quantity of food situated along the outer bottom rim. Timing your push so that the door unlocks right as your lower colors exhaust themselves opens a brand new zone of food just when you need fresh targets. Furthermore, by delaying the Connected Boxes until you have adequate open slots and reachable cyan tiles, you neutralize the risk of a double block tray jam.
Finally, solving the board from the bottom upward creates natural clearance around the Hidden Food on the upper left. If you tried to rush the top wings early, you would fill your waiting slots with blocks whose targets were blocked by the mystery tiles. Patiently working through the center diamond ensures that adjacent tiles vanish naturally, exposing the hidden colors exactly when you have the tray space and available colors to address them.
Final Thoughts
Patience and slot awareness are everything on Colony Flow Level 216. As long as you dismantle the outer arches first to open up the Hungry Door and prepare the board before pulling the Connected Boxes, you will keep your ants flowing smoothly to the very end. If you find yourself struggling with the pathfinding of your ants or want to see the exact marching lines in action, be sure to watch the video above the article to guide your next attempt.
Comments