
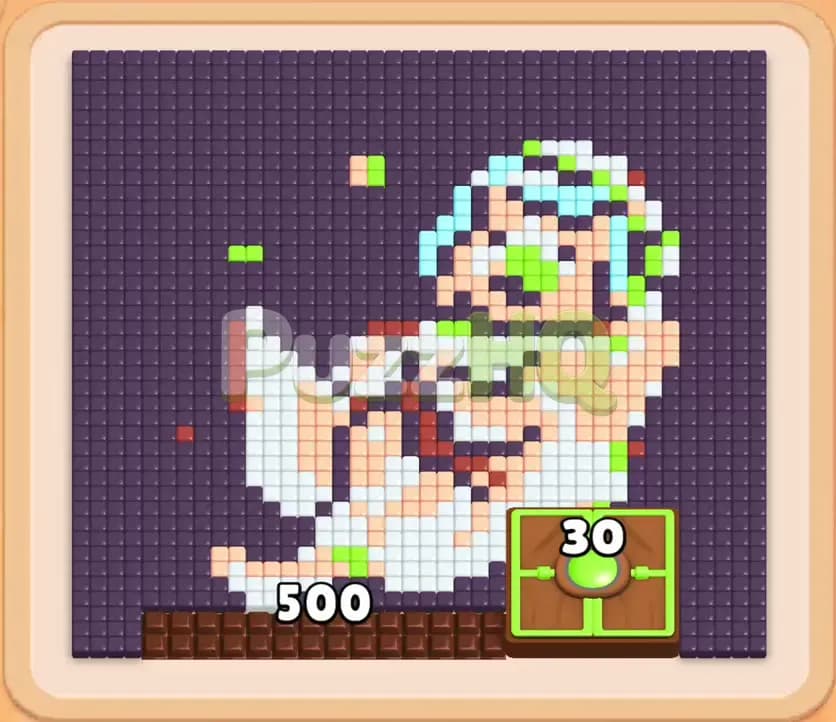
Colony Flow Level 470 presents a tricky puzzle where a massive chocolate barrier and a sturdy green Hungry Door block your progress across the board. Your primary challenge is managing five tight waiting slots while clearing the professor pixel art without causing a total traffic jam. Keeping your colors moving in harmony is the only way to guide your ants to total victory.
Colony Flow Level 470 Walkthrough
Understanding the Starting Board
When you open this stage, you see an eccentric scientist composed of distinct color clusters. The character features white hair and a white lab coat, peach skin on the face and hands, lime green goggles with matching laboratory accents, light blue glass lenses and shirt highlights, and reddish brown hair contours and mustache details. Surrounding the entire figure is a deep dark purple background.
Two major obstacles dominate the lower portion of the board. Stretching along the bottom left is a thick row of chocolate tiles marked with a counter of five hundred. This chocolate barrier completely blocks ant access to the character body from below. Sitting immediately to the right of this chocolate wall is a Hungry Door with a counter of thirty. This green door prevents ants from entering the right side of the board until you feed it the required thirty green food points.
Your bottom tray holds several rows of colored blocks. Right away, you have White forty three, Light Blue five, and a pair of Connected Boxes containing Dark Purple forty each. Beneath those sit Reddish Brown thirteen, Dark Purple forty, Lime Green thirty two, and Reddish Brown ten, followed by several rows of Dark Purple blocks and a Hidden Box displaying a question mark. Connected Boxes are a major tactical factor here because selecting them fills two waiting slots simultaneously. The main obstacle is the sheer volume of dark purple and chocolate tiles that restrict access to inner colors while threatening to overflow your five waiting slots.
The Key to Clearing Level 470
Success on this board depends entirely on how you pace the removal of the chocolate barrier and the white lab coat. Because the scientist clothing sits right on the edge of the open territory, white ants can march straight into the lab coat without needing any prior barriers broken. Simultaneously, dark purple ants must work continuously against the outer background and the five hundred point chocolate strip.
You only have five waiting slots above your tray. If you select blocks whose matching food tiles are buried behind other colors, those blocks will sit idle in your waiting area. Because the Connected Boxes consume two full slots on their own, you only have three flexible slots remaining while they are active. Therefore, you must never pick interior colors like lime green, peach, or reddish brown until white and dark purple clear a wide path to the character face and goggles. The winning approach balances heavy dark purple clearing with steady white progress, systematically knocking out the chocolate wall so the green Hungry Door can be fed.
How to Beat Colony Flow Level 470
Step 1: Place Light Blue in Reserve and Engage the Connected Boxes
Begin by selecting the Light Blue five block from your top tray row. Even though light blue tiles on the scientist goggles and collar are currently shielded by outer colors, moving this small block into your first waiting slot clears the way to the blocks underneath in your tray. Next, tap the Connected Boxes holding Dark Purple forty each. These linked boxes automatically occupy your second and third waiting slots. Dark purple ants immediately surge out of the nest toward the chocolate barrier and the dark purple outer frame. The chocolate counter immediately begins counting down from five hundred, initiating your primary clearing objective.
Step 2: Deploy White Forty Three to Clear the Lab Coat
With three of your five waiting slots occupied, tap the White forty three block on the left side of your tray. This leaves you with exactly one empty slot, giving you a safe margin while avoiding an immediate jam. White ants rush across the board directly into the scientist lab coat and hair. These white food tiles sit on an accessible outer boundary, so your white ants get straight to work. As the white block number counts down toward thirty six, chunks of the character clothing vanish, exposing the peach colored hand and parts of the torso.
Step 3: Add Dark Purple Thirty Two to Accelerate Chocolate Removal
Select a Dark Purple thirty two block from the available tray options to fill your fifth waiting slot. All five slots are now occupied, creating a temporary crunch where no further tray blocks can be chosen. This calculated risk is necessary to double the pace of your dark purple ants. Both the Connected Boxes and your standalone dark purple block now dispatch swarms of ants against the lower chocolate wall. The chocolate counter drops steadily from five hundred down past three hundred thirty nine, then down to one hundred ninety four. Meanwhile, your white ants completely finish consuming their assigned tiles, and White forty three leaves the waiting area to restore an open slot.
Step 4: Rotate White and Dark Purple Blocks to Destroy the Barrier
Tap another White block with twelve points alongside an additional Dark Purple block with twelve points as your slots free up. White ants clear the remaining bits of the scientist hair and coat on the left flank, while the dark purple ants apply maximum pressure to the final stretch of chocolate. The chocolate counter plunges from fifty eight down to zero. The entire row of chocolate tiles vanishes from the board, opening up the bottom path and leaving the green Hungry Door completely exposed.
Step 5: Feed the Hungry Door with Lime Green Ants
With the chocolate gone and the outer white layer cleared, tap the Lime Green thirty two block from the tray. Because the green Hungry Door is now directly reachable from the cleared lower path, lime green ants race straight into the door mechanism. The counter on the green door drops rapidly from thirty down to sixteen, and then down to four. This move drains thirty points of green food requirement, softening the door for its imminent opening while keeping your waiting slots clean.
Step 6: Clear the Peach Skin Tones and Reddish Brown Details
Now that the white lab coat and outer border are gone, the character face, hands, and facial features are fully accessible to ant paths. Select the Peach thirty block to send ants across the open space toward the scientist skin. Next, choose the Reddish Brown blocks to target the eyebrows, mustache, and glasses frames. These smaller color clusters clear very fast because their food numbers are low. Peach and reddish brown ants strip away the entire center of the portrait, exposing the cyan accents embedded inside the goggles.
Step 7: Unlock the Hungry Door and Reveal the Hidden Box
Feed the remaining four green points into the Hungry Door to open it completely. The green barrier dissolves, clearing the entire bottom right quadrant of the puzzle. At the same time, clearing surrounding tray blocks reveals the Hidden Box with the question mark, turning it into an active Dark Purple block. Bring in your remaining Dark Purple blocks to work on the thick upper boundary behind the scientist head. Your waiting slots remain spacious throughout this phase because blocks disappear almost as quickly as you select them.
Step 8: Activate Light Blue Five and Clear the Final Background
Your Light Blue five block, which waited in your first slot since the opening move, now springs into action. Cyan ants march directly through the cleared facial area to eat the light blue glints on the glasses and the shirt collar. Select the final Dark Purple blocks, including numbers thirty three and twenty five, to mop up the remaining top edges of the outer frame. With the light blue tiles gone and the last dark purple tiles consumed, the board is completely empty, and you achieve victory on Colony Flow Level 470.
Why This Solution Works
The primary reason this solution succeeds is the deliberate pacing of the chocolate demolition before attempting to tackle interior colors. The five hundred hit point chocolate barrier represents the biggest single food sink on the entire board. Trying to pick colors like lime green or peach while that chocolate wall stands will simply clog your waiting slots, because those ants cannot find a continuous path to their targets. Committing dark purple ants to the chocolate from the very first minute ensures that the barrier falls before you run out of playable tray options.
Another crucial factor is managing the Connected Boxes without panicking. Because Connected Boxes seize two waiting slots at the same time, player error usually happens when someone selects an unreachable color and suddenly finds four or five slots locked down. Stashing Light Blue five early was safe specifically because White forty three and Dark Purple thirty two had immediate, unblocked targets. The rapid clearance of the white lab coat functioned as a pressure release valve, opening up slot four just as the dark purple ants were chewing through the middle of the chocolate.
Finally, saving the green Hungry Door until the chocolate disappeared created a clean transition between the early stage and the endgame. Once the door took its thirty green points and vanished, every remaining color on the board had an open highway to the nest. The Hidden Box was uncovered right when dark purple reinforcements were needed most, allowing the final sweep of the upper corners to happen seamlessly.
Final Thoughts
Patience with the chocolate wall and strict discipline with your five waiting slots are the true secrets to beating Colony Flow Level 470. If you find yourself hesitating over a specific block order or ant pathing route, watch the video above the article to see the exact timing in real time. Keep your colors sequenced properly, avoid premature picks, and you will guide your colony through this challenging level with confidence.
Comments