
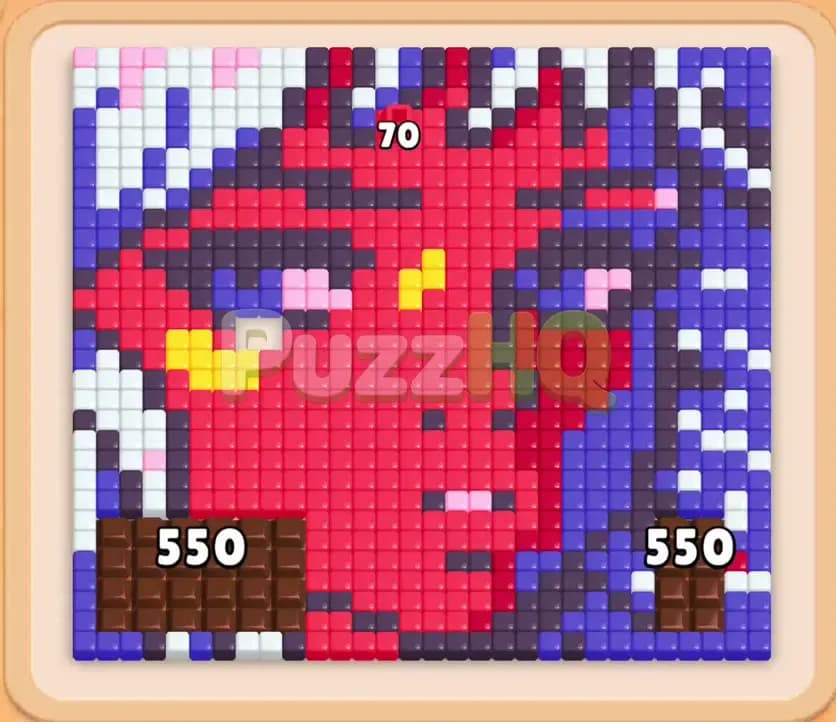
Colony Flow Level 520 features an intricate pixel art portrait dominated by a vibrant red face, purple and blue hair strands, and white edge accents. The real test of this stage lies in chewing through two massive chocolate blocks that guard the lower corners while juggling Connected Boxes and mysterious Hidden Boxes. If you want to clear the entire portrait cleanly without stalling your nest, you must plan your tray pulls to keep your waiting rack flowing smoothly.
Colony Flow Level 520 Starting Setup
Reading the Board
When you open the stage, you see a large portrait framed against a neutral background. The central face is built from solid red tiles, highlighted by yellow accents around the eyes and bridge of the nose. Dark purple and black tiles define the facial features, eyebrows, and shadow areas, while mixed shades of blue and purple fill out the voluminous hair surrounding the head. White tiles line the outer upper perimeter, forming a protective border around the main artwork.
At the bottom left and bottom right corners, two enormous chocolate blocks anchor the structure. Each chocolate block displays a count of 550, meaning your ants must perform extensive feeding runs before those corner sections break apart. Your ant nest rests in the lower center of the screen, just beneath the main image. Below the nest, you have five waiting slots ready to receive blocks from the queue. The tray presents multiple colored blocks including blue 30, red 20, red 25, and blue 50 in the immediate row, backed by deeper options like black 40, pink 20, and various Connected Boxes linked by physical couplings.
What You Need to Watch Out For
The primary hazard on this board is the overwhelming presence of the chocolate masses. Because both chocolate blocks start at 550, ants cannot travel through the lower corners directly upward into the cheeks. This forces early ant paths to detour along the outer white and purple borders, stretching your travel times and delaying block turnover.
Your five waiting slots can fill up fast if you pull blocks that lack open surface area on the board. You will encounter Hidden Boxes that conceal their colors until valid paths reach them, along with Connected Boxes that force you to claim two attached units at once. If you load your waiting rack with colors that have no reachable food tiles on the face, your slots will lock up and end your run immediately.
Colony Flow Level 520 Step by Step Walkthrough
Step 1: Establish Outer Circulation with Red and White Blocks
Your first goal is to create active routes around the outer boundary so ants can reach the upper portion of the portrait. Pull the red blocks and white blocks from the front of the tray to get initial workers marching from the nest. The red ants begin gnawing at the exposed lower chin and outer jawline, while white ants climb along the left and right exterior columns toward the top rim.
As the white perimeter tiles vanish, ants create wider channels that bypass the solid chocolate barriers. You will see your white block counters drop from the twenties down to zero, opening valuable room in your waiting slots. Keep at least one red block active continuously because the massive red field in the center of the face requires non stop attention.
Step 2: Erode the Lower Jaw and Chip the Chocolate
Once the outer white rim starts thinning, focus your attention on the dark purple and red tiles surrounding the facial contours. Deploy the purple and black numbers from the tray to target the eye sockets, hair boundaries, and mouth line. At the same time, keep feeding red blocks into open slots as earlier red numbers expire.
The ants traveling along the lower flanks will constantly brush against the chocolate blocks. With steady traffic moving across the bottom margins, the chocolate numbers drop rapidly from 550 down toward 363. The forehead counter also ticks down toward 21 as red workers chew their way into the upper brows. Keep your waiting rack balanced by pairing fast clearing dark tiles with your ongoing red commitments so that no more than three slots stay occupied at once.
Step 3: Handle the First Connected Boxes and Pink Highlights
With the lower jaw hollowed out, deeper options in your lower tray become accessible. Among these are Connected Boxes linked together, such as red pairings and blue combinations. Carefully draw these linked boxes into your waiting rack only when the corresponding colored paths on the board are wide open.
This phase also exposes delicate pink tiles nestled around the lips and eyes. Introduce the small pink blocks from your tray to clear those accent tiles immediately. Because the pink counts are low, usually sitting below ten, those blocks clear out in just a few seconds and vacate their slots. During this push, the chocolate numbers plummet further to around 177, proving that your side lanes are delivering heavy traffic. A Hidden Box may enter your rack around this time, so keep your remaining slots open until its true color is revealed.
Step 4: Shatter the Chocolate and Reveal the Yellow Accents
Continue driving red and dark purple ants into the midsection of the face. The hollowed cheeks now allow ants to swarm inward from both sides. Watch the chocolate blocks closely as their remaining counts drop into single digits, eventually reaching 8 before crumbling away completely.
Breaking both chocolate blocks completely changes the board dynamics. Ants no longer need to travel the long loop around the edges to reach the central artwork. They can now pour straight upward from the nest into the interior. This sudden surge strips away the remaining lower face tiles and fully exposes the bright yellow eye sections and nose bridge. Select the yellow 13 block from the tray to unleash bright yellow ants directly into the newly accessible center.
Step 5: Clean the Disconnected Corner Remnants
With the chocolate completely gone, isolated clusters of blue, purple, and white tiles linger in the bottom left and bottom right corners where the blockers once stood. These remnants form small L shaped structures and isolated single tiles. Do not let these small fragments distract you from keeping your main face excavation going.
Pull the smaller white and dark purple blocks that match these corner patches. Your ants will take brief detours into the bottom corners, clearing out the lingering blue and white fragments while your red ants finish dismantling the cheeks. By clearing these corners, you ensure that every remaining tile on the board belongs to the upper forehead or top hair tufts, narrowing the focus of your final push.
Step 6: Swarm the Forehead and Sweep the Final Hair Strips
The final phase leaves only the top brow, hair spikes, and the upper red crown of the head. Select your remaining high value red blocks, including the red 20 and red 26 units, alongside the last dark blue and purple blocks. Workers will surge upward in massive columns, flowing along the cleared central highway and wrapping around the upper perimeter.
Your waiting slots will show low single digit countdowns as the last tiles disappear. Watch the remaining red blocks tick down from 7 and 1 to zero, followed immediately by the final black and blue numbers. Once the very last purple hair tile is devoured, the board clears completely, earning you a clean victory.
Colony Flow Level 520 Winning Strategy
The Most Important Moves
The defining decision in this level is choosing when to take on the Connected Boxes in the tray. Pulling linked boxes prematurely fills two waiting slots instantly, leaving you with very little room to navigate around Hidden Boxes. You must hold off on drawing any connected pair until the board displays an abundance of exposed tiles matching both colors.
Equally critical is prioritizing the white and dark boundary tiles during the opening minutes. Many players make the mistake of dumping all their capacity into red blocks right away. While red makes up the bulk of the image, the chocolate blocks prevent your workers from reaching the center efficiently. Removing the exterior white tiles builds the highways your swarm needs to wrap around the obstacles and grind the chocolate down from the outside.
Keeping the Ants Moving
To prevent your five waiting slots from jamming, maintain a strict rhythm between high volume foundation blocks and quick turnover accent blocks. Red is your anchor color that stays active for most of the stage, but your other slots should rotate rapidly.
Whenever a Hidden Box enters your waiting rack, treat it with extreme caution. Never pull another slow clearing block while an unknown block sits in your queue. Instead, feed fast clearing pink or yellow blocks that resolve in seconds. Once the path opens and the Hidden Box reveals its color, you will have plenty of empty slots to adjust your strategy without risking a game over.
Colony Flow Level 520 Final Tips
Patience with the chocolate blocks is essential when attempting this level. It can feel like the 550 counts take forever to deplete, but you must resist the urge to fill your tray with unrelated colors hoping for a shortcut. Stick to the exposed perimeter tiles and let the natural overflow of your worker streams chip away at the blockers. Once those two corner squares shatter, the speed of the level increases dramatically.
Keep a close eye on your tray depth as well. Look one or two rows ahead to see where the Connected Boxes sit so you can prepare the board for their arrival. If you see an upcoming blue and black linked set, spend the preceding moves clearing the perimeter red tiles that block access to the blue hair. That way, the moment the linked pair lands in your rack, ants immediately rush toward active food tiles.
If any pathing movement or tray rotation feels tricky to visualize during your run, take a moment to watch the complete video walkthrough above this article to see the exact clearing rhythm in action.
Comments