
Colony Flow Level 540 presents a challenging board where large obstacles restrict your ants right from the start. You must dismantle hefty chocolate barriers and feed a demanding hungry door while carefully managing your five waiting slots. If you choose colors out of order, your tray slots will quickly jam and stop your colony in its tracks.
Colony Flow Level 540 Walkthrough
Understanding the Starting Board
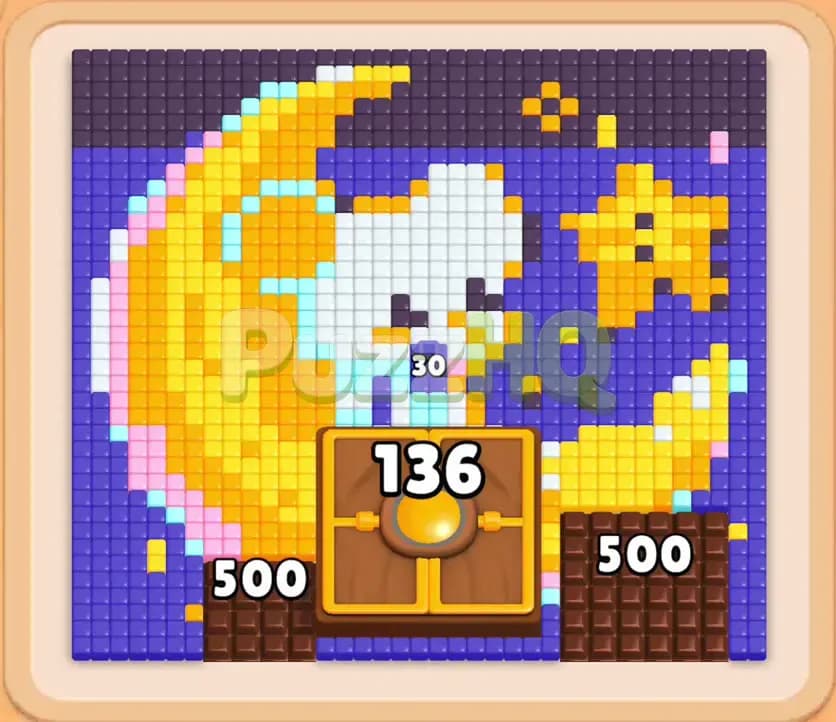
The food board displays an intricate bedtime illustration featuring a sleeping white bear resting on a bright yellow crescent moon, accompanied by a yellow star set against deep blue and black night sky tiles. Two massive chocolate blocks, each holding five hundred points of resistance, sit near the bottom edge and flank a central hungry door that requires one hundred and thirty six points to open. This door specifically demands thirty light blue tiles before it will unlock access to the inner sections. Because the chocolate and the central door dominate the lower field, the ants must travel along long paths around the outer perimeter to reach exposed food. Down in the tray, you have access to starting blocks in yellow, dark blue, light blue, pink, white, and orange. Several mystery boxes marked with question marks hide their true colors beneath the front row, while linked boxes connected by lines sit deeper in the reserve. The main obstacle is the limited surface area on the board, which makes it easy to fill the five waiting slots with blocks whose matching tiles cannot yet be reached by the ants.
The Key to Clearing Level 540
Success on this level requires peeling away outer layers in a strict sequence so your ants always have continuous lines of movement. You cannot attack the dark blue background all at once because the chocolate blocks and the hungry door seal off the center and bottom lanes. You must prioritize the light blue requirement on the hungry door while using yellow and pink blocks to erode the visible moon and facial accents. By picking colors that the ants can immediately touch, you drain numbers from the waiting slots and create space for upcoming tray choices. Managing the mystery boxes and connected boxes demands that you never load more than three active colors into the waiting slots unless you are certain every single one has an open food path. Once the chocolate wears down and the hungry door opens, the entire middle opens up, turning a restrictive puzzle into a smooth, fast cleanup.
How to Beat Colony Flow Level 540
Step 1: Deploy Yellow and Pink to Carve the Outer Horn
Begin by picking the front yellow block and the pink block from the bottom tray. The ants stream out from the lower nest and route around the left side, targeting the outer crescent of the moon and the small pink accents on the sleeping bear. Yellow food tiles are directly exposed along the left curve, allowing your ants to immediately chip away at the forty six count on your yellow block. At the same time, the pink block begins draining as ants grab the exposed blush tiles. Selecting these two active colors clears out the immediate left flank and begins uncovering the first layer of mystery boxes resting in the tray underneath.
Step 2: Feed the Hungry Door with Light Blue
With the left path moving, tap the light blue block to begin supplying tiles to the hungry door. The central door requires thirty light blue items to satisfy its initial condition, and the ants quickly locate the exposed light blue ribbon around the sleeping figure. As the light blue block counts down, the hungry door requirement drops from thirty toward twenty. Keeping this light blue block working alongside your yellow block ensures that two waiting slots are actively draining without causing a bottleneck. The yellow block finishes, opening a slot and exposing additional dark and white options in your reserve.
Step 3: Chip the Chocolate and Reveal Mystery Boxes
Select the next yellow block and introduce white to begin dismantling the face of the sleeping character. While your ants chew through white tiles, yellow workers continue grinding down the crescent moon and start chipping into the left chocolate block. The chocolate numbers drop steadily from five hundred down toward four hundred and two, creating slight path widenings along the lower flanks. Meanwhile, the light blue count reaches twenty on the hungry door, bringing the door overall total down to one hundred and thirty six. As the front blocks empty out, several question mark boxes flip over to reveal additional white, yellow, and blue reserves.
Step 4: Maintain Flow While Slots Fill Near Capacity
Now you must navigate the most dangerous phase of the board where all five waiting slots become occupied. Draw the thirty one blue, twenty six orange, twenty four dark, nineteen white, and thirty three yellow blocks into your tray. With five slots filled, you cannot afford any stalled ants. Fortunately, the exposed board now features open food for each of these colors. White ants consume the sleeping animal, yellow ants reduce the moon, blue ants chew the perimeter sky, and dark ants eat away the shadowy corners. The chocolate barriers drop to three hundred and ten and then continue tumbling down toward one hundred and twenty five, while the hungry door requirement falls to just nine light blue tiles.
Step 5: Collapse the Hungry Door and Shatter the Chocolate
Tap the remaining light blue tiles to deliver the final nine pieces to the hungry door, which officially pops open and clears the center lane. At the same time, the persistent assault on the chocolate blocks reduces them to zero, eliminating both brown barriers from the bottom of the board. With the center and bottom completely liberated, ants no longer need to walk the long loop around the perimeter. White and yellow tiles melt away rapidly, leaving the center of the board hollowed out. As the yellow thirty three and white nineteen blocks expire, two waiting slots open up, giving you breathing room to address the upper portions of the art.
Step 6: Trigger Connected Boxes and Dismantle the Upper Sky
With the lower field cleared, bring in the connected blue blocks that sit in the lower tray. These connected boxes clear together as your blue ants tackle the vast night sky tiles surrounding the yellow star. The ants swarm along the newly opened central avenues, chewing through indigo and navy tiles from the inside outward. At this stage, pick the orange block to dissolve the small orange star details and the final crescent tips. The remaining yellow tiles drop to a count of eighteen, while blue counts decrease steadily through the teens. Watch the board open up as the connected boxes discharge their values simultaneously, freeing up multiple waiting slots at once.
Step 7: Clear the Final Star and Deep Sky Tiles
Only the bright yellow star and a scattering of dark blue sky tiles in the top right corner remain on the board. Select the final yellow block and the last dark blue blocks to clean up the board. The yellow ants swiftly consume the five points of the star, while the dark blue ants finish the remaining square tiles along the upper border. Every waiting slot empties out completely as the final ants carry away the last food pieces, securing your victory on the level.
Why This Solution Works
This solution succeeds because it treats the board as an expanding perimeter puzzle rather than a direct frontal assault. In the early stages, the two massive chocolate blocks and the hungry door completely seal off the lower middle of the playfield. Attempting to clear inner colors too soon would leave blocks sitting frozen in your waiting slots with no valid path for the ants to reach them. By selecting yellow, pink, and light blue first, you target only the tiles that are physically exposed on the outer curves and the accessible front face of the hungry door.
Fulfilling the light blue requirement on the door is the central mechanical pivot of the puzzle. Once the light blue condition drops from thirty to zero and the door opens, the entire geometry of the ant trails shifts. Instead of crawling slowly along the far edges, the ants can march directly through the center to reach the bear, the star, and the upper sky. Coordinating this door opening with the destruction of the chocolate blocks ensures that your waiting slots never lock up, even during the middle phase when all five slots are occupied.
Finally, managing the connected boxes in the later stages prevents late game failure. Connected boxes require significant matching food to clear together. Waiting to activate them until the upper dark blue field is fully accessible allows all linked boxes to drain simultaneously. This approach keeps your waiting slots free of dead weight and guarantees a clean finish as the final star and night sky disappear.
Final Thoughts
Patience and careful attention to path availability are what make Colony Flow Level 540 fully manageable. By breaking down the outer moon, unlocking the hungry door with light blue, and melting the chocolate blocks before committing to the deep blue sky, you ensure your ants always have work to do. If you find yourself unsure about a specific color timing or ant pathing route, watching the video walkthrough above will help you master every step.
Comments