
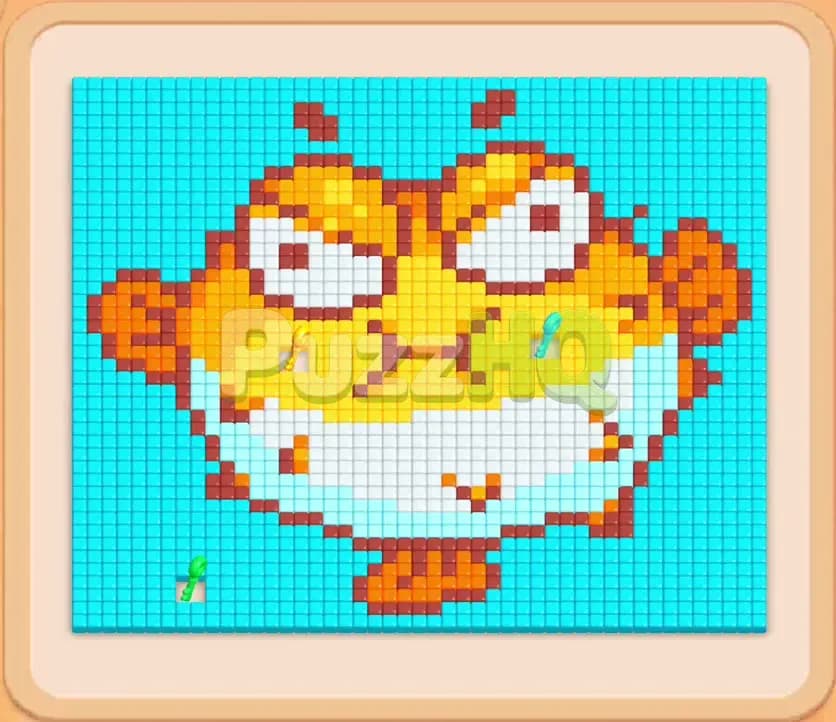
Colony Flow Level 547 puts your spatial planning to the test with a massive pufferfish floating in deep blue waters. You face tightly packed block stacks in your supply tray and strictly limited holding room. I found that the secret to winning here lies in pacing your pulls so your five waiting slots never fill with dormant colors while the ants search for open food paths.
Colony Flow Level 547 Overview
What You Are Working With
The main display shows an angry pufferfish made of colored food tiles. The artwork features bright cyan water tiles surrounding the fish, a wide white belly underneath, yellow skin covering the face, orange fins on the sides, and dark brown lines defining the mouth, spikes, and eyes.
Your ant nest sits directly below the canvas. Ants stream out from this hole and climb toward the picture along whatever corridors you open up. Beneath the nest, you have five waiting slots. These slots hold any blocks you pull from the bottom stacks until the colony finishes carrying their numbers away.
Below the waiting slots rests the supply yard. This puzzle features several special mechanics that dictate how you pull:
- Lock and Key tiles appear on the board and in your tray. A green key sits nestled along the bottom border of the food canvas. Certain high value blocks in your tray show silver keyholes. Those blocks stay firmly frozen until your ants reach the green key on the picture and carry it back.
- Connected Boxes appear inside the stacks. These pairs are joined as single units. Moving a connected pair pulls two colors together and takes up two waiting slots at the same time.
- Hidden Box tiles sit beneath several columns marked with question marks. You cannot see what color rests inside a hidden box until the tiles blocking its movement are pulled away and the box gets an open path to deploy.
What It Takes to Clear Level 547 Board
To clear the board, your colony must consume every single food tile from the picture above. Every time you drop a block into one of your five waiting slots, ants rush to that block, pick up its numbered value, and march to the matching color tiles on the canvas. As ants eat the matching food, the number printed on the waiting block ticks downward until it hits zero and vanishes.
Your main danger is filling all five waiting slots with blocks whose matching tiles cannot be reached by the ants. If all five slots are occupied and no ant can walk from the nest to a matching food tile, you lose instantly. Clearing this stage requires opening a wide gap through the bottom white belly first, grabbing the green key to unlock your frozen tray pieces, handling connected blocks only when you have multiple empty slots, and carving steady access routes through the yellow core of the fish.
Colony Flow Level 547 Step by Step Solution
Step 1: Open the lower path by pulling white and cyan blocks
Begin by targeting the bottom center of the board where the pufferfish belly rests closest to the nest. Pull the White 48 block from your top supply row directly into your first waiting slot. White ants will immediately burst out of the nest hole and run straight up into the white belly, eating away the bottom layers of the fish. Next, drop the Cyan 40 block into the second waiting slot so cyan ants can clear the bottom rim of water tiles. This double pull creates an open gateway directly into the underside of the picture. Watch the White 48 number drop rapidly as the belly thins out, leaving plenty of breathing room in your waiting row.
Step 2: Grab the green key and clear the lower border
With the bottom rim partially cleared, you can see the green key sitting exposed near the lower left corner of the canvas. Pull the White 35 block and an exposed Cyan 20 block into your waiting slots. The white ants finish gutting the center belly while the cyan ants peel away the blue water along the left edge. A small squad of ants sweeps through the open clearing and picks up the green key. The moment the key is gathered, the padlock icon on the lower Cyan 40 block in your tray snaps open. You now have full access to your locked supply without worrying about frozen tiles jamming your lower stacks.
Step 3: Route brown and orange ants into the pufferfish mouth
Now that the white belly has receded, the brown outline of the lower jaw and the orange cheek spikes are exposed to the ant stream. Pull the Brown 35 block and the Orange 14 block into two open waiting slots. Brown ants march directly into the lips and bottom spikes, reducing the brown food count and opening side corridors toward the yellow cheeks. At the same time, your orange ants run up the newly opened channels to devour the lower orange spines. Keep at least two waiting slots completely empty during this phase so you do not choke your supply tray while these longer countdowns run their course.
Step 4: Manage the connected box pair without choking the waiting slots
Take a close look at your supply stacks. You have a connected block unit showing cyan on the left and white on the right. Because this joined piece occupies two waiting slots simultaneously, you must never tap it while four slots are full. Wait until your Brown block drops under 10 and your earlier Orange block disappears completely. Once you have at least three empty slots, pull the connected Cyan and White unit into the tray. Ants immediately split into two streams. Cyan ants peel away the lower outer corners of the background, while white ants chew away the remaining white patches around the fish mouth and lower eye borders.
Step 5: Unleash yellow ants to eat the main body
The pufferfish mouth and belly are now completely hollowed out, leaving the massive yellow face wide open from beneath. Pull the Yellow 40 block into an open waiting slot, followed quickly by the Yellow 26 block. A massive swarm of bright yellow ants pours out of the nest and floods the central canvas. They chew through the snout, the forehead, and the cheeks, clearing dozens of yellow tiles in seconds. The numbers on both yellow blocks decrease in steady harmony. As the yellow face disappears, the inner borders of the eyes and the top dorsal fins become accessible from the middle of the board.
Step 6: Reveal the hidden boxes under the cleared supply stacks
Clearing those large yellow blocks uncovers two hidden boxes in your tray that were previously trapped beneath question mark covers. As soon as their paths clear, their true colors are revealed as Cyan 40 and Brown 40. Do not panic and pull them both at once. Check your waiting slots first. You should have one slot occupied by a lingering Yellow block counting down past 4 and another holding a low Orange block. Pull the revealed Brown 40 block into an empty slot. Brown ants quickly charge into the canvas to eat the dark outlines around the eyes, the upper dorsal spines, and the eyebrows.
Step 7: Clear the eyes and upper orange fin details
With the face almost bare, your ants can freely reach the upper side fins and the pufferfish eyes. Pull the White 26 block and the Orange 30 block into your open slots. White ants climb up the center passage to clear out the white eyeballs, while orange ants work along the left and right edges to dismantle the large pectoral fins. The canvas now looks like an open cavern with only the upper crest and outer water tiles remaining. Because your paths are completely clear from the nest straight to the top of the board, the ants run back and forth with maximum speed.
Step 8: Clean up the top cyan background to complete the picture
Only the dark brown crest spikes and the thick cyan water at the very top of the frame remain. Pull your remaining Brown block to wipe out the final spikes above the forehead. Next, move the last Cyan 40 and Cyan 38 blocks into your waiting slots. A huge wave of cyan ants wraps around the left and right outer corridors, marching all the way to the top corners of the screen. They strip away the final blue tiles from the sky and water background. The counter numbers hit zero, the last waiting slots clear out completely, and the level ends in total victory.
Final Thought
Colony Flow Level 547 looks intimidating because of the huge pufferfish belly and the locked blocks at the start, but staying patient with your five waiting slots keeps everything moving smoothly. As long as you clear the lower white belly to give your ants walking room, you will never dead end the board. If any of the block orders or connected pulls feel tricky to line up while you play, watch the video above this article to see the exact clearing path in real time.
Comments