
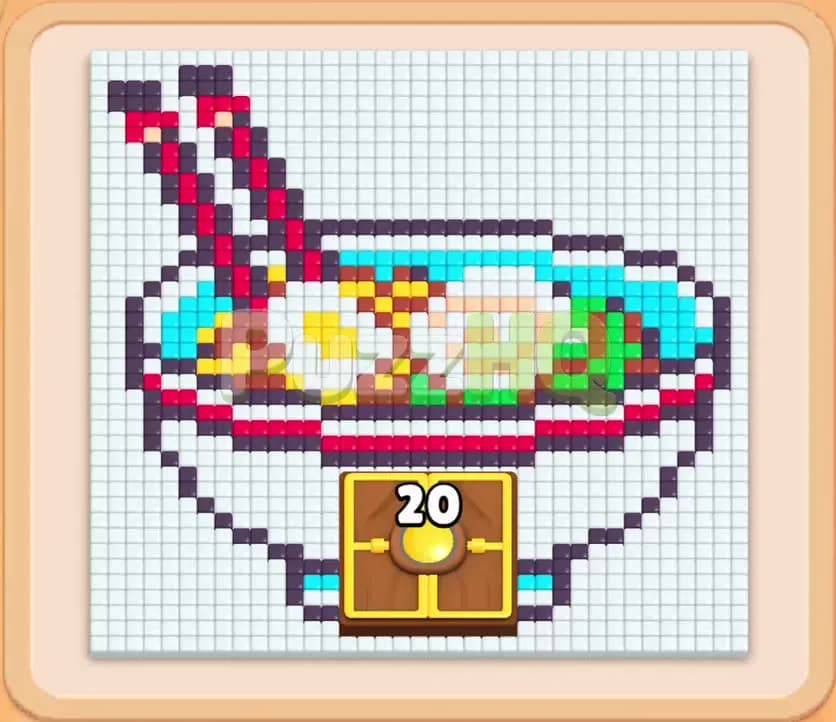
Colony Flow Level 230 presents an intricate ramen bowl puzzle that tests your spatial planning and queue discipline. The colorful food illustration features layers of noodles, broth, toppings, and chopsticks surrounding a central obstacle. You need to dismantle the outer ceramic bowl methodically without overloading your five waiting slots.
Colony Flow Level 230 Board Breakdown
Starting Colors and Blocks
When you begin the stage, the main board displays a steaming bowl of ramen rendered in vibrant pixel food tiles. Two chopsticks rest angled across the upper left corner of the bowl, colored with red and dark maroon sections. The rim of the bowl consists of a distinct red and maroon pattern, while the large outer bowl is constructed from dozens of white tiles bordered by dark outlines. Inside the bowl, you can spot golden egg yolks, white egg rings, yellow noodles, peach colored meat slices, bright cyan broth lines, and green scallion pieces.
At the bottom of your screen, the supply tray provides an initial selection of numbered blocks. You start with three white 35 blocks and a green 10 block visible in the active top layer. Below them sit a maroon 22 block, a red 30 block, a dark 32 block, and multiple mystery blocks marked with question marks. Because the majority of the outer perimeter consists of white food, your white blocks are your primary tools to open the initial pathways.
Paths, Obstacles, and Limited Space
The central challenge of this stage revolves around an obstacle positioned directly beneath the bowl. A Hungry Door shaped like a golden chest sits at the bottom base, displaying a counter of twenty. This barrier physically blocks direct ant movement into the center until you clear enough surrounding tiles to satisfy its requirements and count it down to zero.
Your available movement area is heavily restricted by the five waiting slots in the holding queue. Whenever you pick a block from the tray whose matching food cannot be reached immediately by your ants, that block occupies one of these five slots. If all five slots fill up with stalled blocks, your run ends immediately. Hidden Boxes also occupy positions in the lower tray layers. These mystery blocks conceal their true colors beneath question marks until you clear the blocks resting on top of them. You must carefully peel away the outer white ceramic frame so ants can flow freely without clogging your holding slots.
Colony Flow Level 230 Complete Solution
Step 1: Clear the outer white base to start the flow
Start by selecting the white 35 block from the upper tray. White ants immediately stream out from the lower entrance and begin eating away at the white tiles forming the lower left and lower right edges of the bowl. Since the outer bowl consists of large groups of white tiles, this block stays highly productive and starts counting down rapidly.
Selecting this initial white block also shifts the queue, freeing up space in the tray and exposing the secondary options below. As the white ants consume the bottom tiles, they create the very first clearances around the Hungry Door. Keep your eyes on the holding area and ensure you do not rush to tap other colors yet. Let the white ants carve out the bottom edge so you gain clear visibility of the inner colored layers.
Step 2: Deploy red and dark blocks to chip the lower rim
With the base tiles loosening up, tap the red 30 block and the dark 4 block to target the outer border of the bowl. Red ants rush toward the red trim along the lower curvature, while dark ants chew into the dark border tiles framing the white ceramic.
Because the path to these rim tiles is now open, both blocks begin counting down without stalling in your holding queue. As the red block drops down and the dark block finishes its small tally, the lower boundary of the bowl thins out significantly. This double action exposes a yellow 14 block and a white 23 block in the tray, while keeping at least two waiting slots open for safety.
Step 3: Introduce yellow and white blocks to clear the bottom contours
Pick the yellow 14 block along with another white block to maintain continuous eating pressure. Yellow ants navigate through the cleared gaps on the lower left and lower right, targeting the early yellow noodle segments that peek through the edge. At the same time, the white ants resume eating the white bowl surface, dropping the white block counter steadily toward zero.
At this stage, you will notice your waiting slots holding a red 4, a yellow 14, and a pair of white 20 blocks. While four slots are temporarily occupied, three of them are actively sending ants to reachable food. The outer shell continues to break apart, and the white ants reduce their numbers smoothly, preventing a dreaded gridlock.
Step 4: Whittle down the Hungry Door counter and deploy cyan
As the outer white tiles vanish, the Hungry Door counter begins to register progress. The number twenty drops down to fifteen as ants strip away the bordering food. Now is the right moment to tap the cyan 32 block and the small yellow 3 block.
Cyan ants march along the right and bottom pathways, eating into the vibrant broth lines that curve across the lower half of the soup. The yellow ants clean up the remaining accessible noodle corners. The tray refreshes to reveal a maroon 22, a white 35, and a red 31, while uncovering several Hidden Boxes that were previously locked underneath.
Step 5: Strip the lower bowl completely to drop the counter to six
Bring in the maroon 11 block and the red 24 block to strike the remaining red and maroon trim. As these ants devour the decorative bowl patterns, tap the cyan 28 block to keep chewing through the broth. The Hungry Door counter decreases rapidly from fifteen down to six.
Your waiting area now holds a cyan 28, a white 26, a red 24, and a maroon 11. While this looks crowded, every single one of these colors has direct, unobstructed access to open food tiles. Within moments, the maroon rim dissolves, freeing up several tiles and opening clean lines toward the inner egg white and meat toppings.
Step 6: Break through the Hungry Door and unlock inner toppings
Tap the white 33 block and the remaining red blocks to wipe out the last segments of the outer bowl. The Hungry Door counter drops from five to zero, causing the golden barrier to open and disappear from the board entirely.
With the central barrier removed, ants have direct access to the interior of the bowl. Green scallions, peach meat slices, and golden egg yolks are now completely vulnerable. Hidden Boxes in your tray reveal their true colors, uncovering a dark 36, a peach 17, and additional white blocks. Tap the green 10 and peach 17 blocks so your ants can swarm the middle ingredients.
Step 7: Clear the soup broth and egg toppings
Deploy the white 37, white 35, and cyan 30 blocks. White ants swarm the egg white sections floating in the middle of the soup, while cyan ants consume the remaining puddle of broth at the bottom of the bowl.
Because the central barrier no longer blocks movement, the ants move across short, direct paths. The egg yolks, meat slices, and noodles clear away in rapid succession. By the end of this sequence, the entire bottom half of the board is completely empty, leaving only the dark and red chopsticks floating in the upper left corner.
Step 8: Dismantle the chopsticks to clear the board
The final phase focuses entirely on the chopsticks. Your tray now provides the exact blocks needed, including red 8, red 6, dark 20, and several white support blocks. Tap the red blocks followed by the dark blocks.
Red ants march directly up the left side to devour the red segments of both chopsticks. Dark ants follow closely behind, chewing through the maroon and dark purple tips at the top and bottom of each stick. The numbers on your final blocks count down to zero, the last pixel tiles disappear, and the board clears completely.
Key Moments in Colony Flow Level 230
The Move That Opens Up the Board
The turning point occurs when you remove the Hungry Door located at the base of the ramen bowl. Before that door opens, your ants are forced to travel along narrow outer edges, which severely limits how many colors can work at the same time. Focusing your early white and red blocks on the perimeter tiles directly touching that central barrier accelerates its countdown. Once the counter reaches zero and the door vanishes, the entire center of the bowl unlocks, giving all colors a straight path to the remaining food.
Finishing the Remaining Food
After the bowl and soup are completely gone, you face the isolated tiles that make up the two chopsticks. The secret to finishing this section smoothly is holding back on dark blocks until the red chopstick segments are partially cleared. Because the red tiles wrap around parts of the dark sections, clearing the red blocks first ensures that the dark ants have immediate access when you release them. This clean sequence prevents the dark blocks from sitting idle in your waiting slots during the final seconds.
How to Avoid Getting Stuck on Level 230
The biggest danger in this level is choosing green or peach blocks during the opening moves. Even though green scallions and peach meat slices are clearly visible inside the ramen bowl from the start, they are entirely surrounded by white ceramic tiles and cyan broth. If you select a green 10 or peach 17 while those outer layers are still standing, those blocks will sit frozen in your waiting queue, stealing precious slots that you need for your active white and red blocks.
Another frequent trap involves the Hidden Boxes situated in the lower rows of the supply tray. It can be tempting to clear any available block just to reveal what lies under the question marks. However, tapping blocks recklessly without matching open paths can fill four or five waiting slots in an instant. Always make sure that at least two slots remain empty before you dig into a new tray column.
Finally, keep a close watch on the count of the white blocks. Because the bowl requires a massive amount of white food to be eaten, white blocks will cycle through your queue multiple times. Always prioritize white blocks whenever a path is open so that the perimeter continues shrinking. As long as you respect the five slot limit and wait for the central barrier to fall before touching the inner toppings, you will clear the board without trouble.
Final Thoughts
Patience and strict queue control are the keys to mastering Colony Flow Level 230. By dismantling the outer ceramic bowl first and unlocking the central barrier before targeting the inner toppings, you keep your waiting slots open and your ant lines moving efficiently. If you find yourself unsure about the exact timing for releasing the chopstick colors, be sure to watch the video above the article to see every move executed in real time.
Comments