
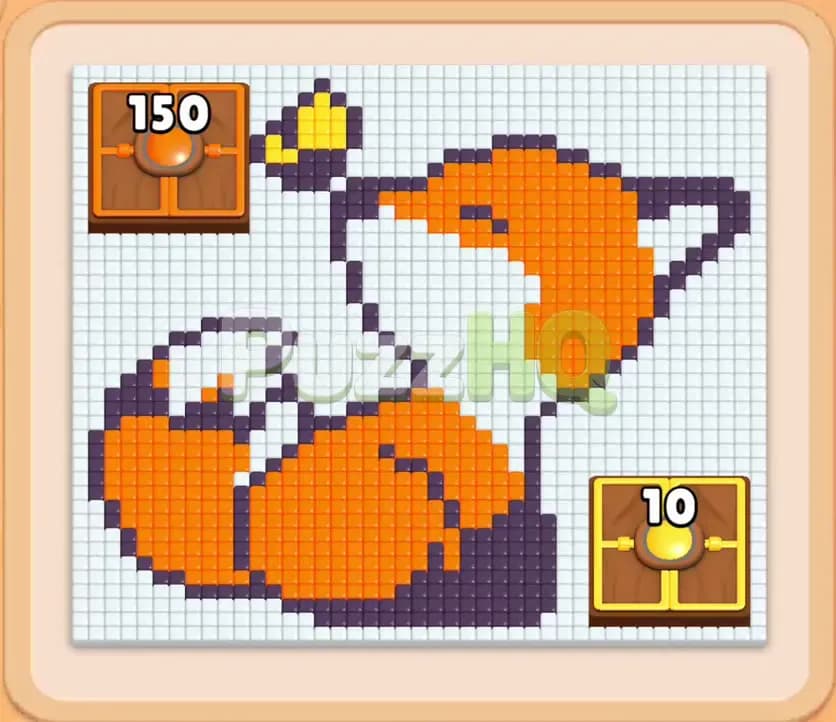
Colony Flow Level 245 presents a serious test of your board management skills with its sleeping fox pixel art and split objective paths. You must clear hundreds of colored tiles while balancing locked treasure boxes and tricky linked pieces in your reserve tray. Keeping your worker streams moving without filling all five waiting slots is the only way to carry your swarm to victory.
Colony Flow Level 245 Overview
What You Are Working With
The upper half of your screen displays a curled fox resting quietly on a light background. This picture consists of bright orange fur tiles, clean white belly and tail patches, and dark purple boundary tiles that define the shape of the animal. A tiny yellow cluster rests near the top left corner beside the ear, representing an accent point that ties into the board locks.
Two distinct special mechanics govern this puzzle board. First, you have the Lock and Key mechanic represented by two wooden treasure chests set directly into the grid. The chest resting in the top left corner begins with a heavy requirement of 150 points, while a secondary chest in the bottom right corner holds a smaller requirement of 10 points. These chests seal off adjacent food tiles and require your ants to collect matching values before they open. Second, the lower tray contains Connected Boxes. Several colored numbered blocks in the supply rows are bound together by visible energy links. When you draw a connected block into your five waiting slots, its attached twin tags along or depends directly on the clearance of its partner. You must account for both colors whenever you reach for a linked set.
Between the picture board and your lower block supply lies the ant nest hole and the five waiting slots. Ants pour out from this central hole, march through whichever blocks currently occupy your five waiting slots, and travel across the board perimeter to devour matching food tiles. If all five waiting slots fill up with blocks whose colors cannot find matching reachable tiles on the board, the entire line jams and your run ends immediately.
What It Takes to Clear Level 245 Board
Winning Level 245 requires constant attention to your waiting slots and steady erosion of the two chests. You cannot afford to drop heavy blocks into your slots unless your ants have an immediate, unobstructed path to matching food tiles on the fox. Early on, the white tail tip and the orange flanks offer wide open feeding grounds. Clearing these outer zones opens paths toward the interior purple lines.
The real hurdle is managing the high counter on the top left chest while manipulating Connected Boxes. You must systematically wear down the 150 counter on that upper chest by feeding matching colors into the upper boundary. Once the top chest shatters, you unlock yellow ant flow to target the upper accent pieces. From there, you route your remaining workers into the spine, pop the small 10 point chest in the lower corner, and consume the final white remnants. Keeping at least one waiting slot empty throughout the entire process guarantees you never hit a fatal stall.
Colony Flow Level 245 Step by Step Solution
Step 1: Pull starter white and orange blocks into the waiting slots to carve into the lower tail.
Begin your run by drawing an initial spread of loose blocks into your waiting slots. Select the white 20 block, the orange 27 block, and a dark 15 block from the available top row of your tray. Direct your white ants along the left edge toward the curved tip of the fox tail, while your orange ants rush into the lower belly. The white block counts down swiftly as workers strip away the tail tip, while the dark ants begin chewing on the bottom baseline border. Pull an extra white 25 and an orange 32 into your remaining open slots to maintain continuous pressure. Because the tail tiles are fully exposed, these blocks drain rapidly without lingering in your queue. As the white 20 and dark 15 empty out and vanish from the slots, you maintain two open buffer spaces, keeping your board completely safe from a premature jam.
Step 2: Route purple ants into the outer frame to reveal the inner fox body.
With the outer tip of the tail cleared, the dark purple outline around the rear paws becomes your primary access point. Pull a fresh dark block into an empty waiting slot so purple ants can stream along the lower perimeter. Watch the dark counter tick downward as the ants dismantle the border tiles, which simultaneously frees up adjacent orange tiles across the rear leg. Pull a white 39 into one of the refreshed slots to clean up the inner white lining of the tail. Notice how the large 150 chest in the top left corner reacts as your workers clear edge boundaries, ticking down to 146 as peripheral paths widen. Always verify that an orange or white food tile is directly exposed before you commit new high number blocks to the tray. By letting the low value white blocks finish completely, you keep your waiting queue fluctuating between two and three active blocks.
Step 3: Manage your first connected white pair while keeping open slots in reserve.
Your tray now presents a linked pair of white blocks that share an active link bar. Before touching this pair, ensure that you have at least three empty waiting slots ready to receive incoming material. Pull the white 35 block, which brings its connected partner into play. Send the first swarm of white ants toward the broad chest patch beneath the chin of the fox. At the same time, place an orange 32 into an open slot so orange ants continue stripping the midsection fur. The white counters drop rapidly in unison as the dense patch of belly fur provides plenty of food tiles for your workers. As these numbers decrease to single digits, the lower tray shifts upward, exposing deeper reserve blocks. You now have broad clearings on both the left and right sides of the fox, giving your colony wide open avenues to travel without bottlenecks.
Step 4: Focus dark and orange workers on the bulk fur to tick down the large chest.
Turn your attention to the top half of the fox where the upper spine and ears connect to the top left chest. Pull an orange 29, a dark 19, and a white 36 into your available waiting slots. Orange ants surge up the right flank, gnawing directly into the dense center of the body. Dark ants march up the central division line between the face and the paws, breaking apart the structural purple tiles. As these food tiles vanish from the canvas, the counter on the top left chest drops dramatically from 80 down to 29. Keep a light orange 3 block in reserve to quickly flush an open slot if space gets tight. The rapid countdown on the orange 29 ensures that your slots never stay full for more than a few seconds, preserving your flow state.
Step 5: Untangle the linked orange blocks to strip the upper spine and ears.
The lower tray now forces you to confront a pair of connected orange 35 blocks linked by a solid energy connector. Because you cleared the lower body earlier, the only orange tiles left sit on the upper back and the ears of the fox. Pull the orange pair into your slots. Immediately pair this action with a dark 5 block to clean up the final purple border behind the neck. Your orange ants stream in a dense line up the right side of the canvas, steadily devouring the fox back and chewing through the first connected block. As the first orange block exhausts its value and vanishes, pull a white 21 to target the inner ear fluff. The chest in the top left corner reaches zero, breaking apart and vanishing from the grid entirely. This major breakthrough clears the path to the previously locked upper tiles.
Step 6: Trigger the yellow block to gather keys and dissolve the final barrier.
With the top left chest removed, the yellow key cluster resting near the fox ear is now completely exposed and ripe for harvesting. Draw the yellow 7 block directly into your open waiting slot. Bright yellow ants burst from the nest hole and march straight toward the upper left corner, collecting the yellow key tiles. At the same time, drop an orange 14, a dark 10, and a white 15 into your other slots. The dark ants clear the final dark speckles near the snout, while the orange ants finish off the back edge. Watch your yellow block count down to zero and clear out of your waiting row. The entire upper region of the board is now stripped clean, leaving only a small cluster of white and orange tiles along the lower right near the final chest.
Step 7: Consume the remaining scattered crumbs and break open the bottom chest.
You are now in the home stretch with only the bottom right chest and a few scattered tiles remaining. Pull a white 35 and an orange 3 into your waiting slots. White ants rush into the remaining cluster near the bottom right, chewing through the surrounding food tiles and channeling key energy into the small 10 chest. The chest counter drops swiftly from 10 to zero, popping open and exposing the final food tiles underneath. A large white block drops into your tray to provide the final push. Your white ants sweep across the lower corner, gathering every stray crumb. As the final food tile disappears from the canvas, the picture clears completely, the ants celebrate, and you claim victory on the board.
Final Thought
Colony Flow Level 245 demands absolute precision when dealing with connected blocks and high value lock boxes. By prioritizing outer tiles, opening clear highways for your workers, and timing your tray pulls to prevent clogged slots, you can systematically dismantle this tricky board. If any specific block pull feels confusing in print, take a moment to review the walkthrough video above to see the exact ant routes in real time.
Comments