
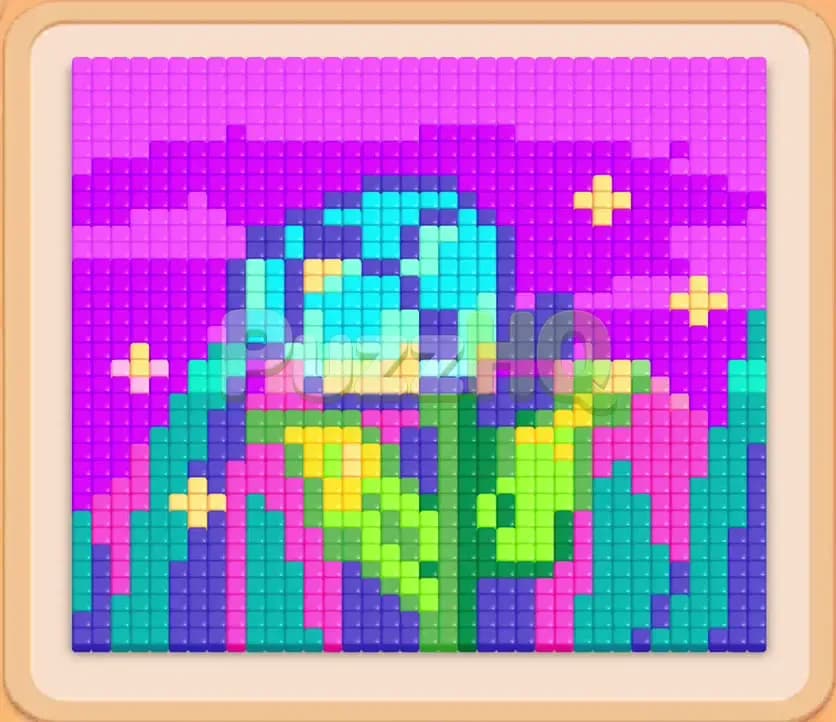
Colony Flow Level 277 presents a vibrant pixel art canvas featuring a blooming flower set beneath a starry twilight sky. Your main challenge is clearing out the dense lower vegetation and perimeter foliage to create direct ant highways into the vibrant flower core and the sprawling night sky above. Finding the proper sequence for your colored blocks prevents the waiting slots from filling up while keeping ant trails marching smoothly across the garden.
Colony Flow Level 277 Starting Setup
Reading the Board
The puzzle opens with an intricate floral scene constructed from several distinct color families. Right in the center rests a blooming blossom with light cyan petals, deep blue shadows, and a bright yellow core. Supporting the flower is a cluster of yellow and light green sepals that branch into broad green leaves and tall vertical teal stalks rising from the soil. Surrounding the upper portion of the garden is a massive purple and magenta sky studded with small cross shaped yellow stars.
At the very bottom of the play area sits your ant nest. From here, hungry ants will march upward into the mosaic whenever you assign matching colored blocks. Below the board, you have a tray filled with numbered tiles and five empty waiting slots across the top row. The initial visible tray blocks include Yellow 18, Light Green 4, Teal 28, Purple 60, and Cyan 53. Tucked under these front runners are deeper reserves like Pink 3, Green 44, Dark Blue 50, and massive century blocks waiting in the bottom rows.
What You Need to Watch Out For
Your primary hazard on this stage is physical path blockage coupled with slot management. The nest sits centrally at the bottom, but the immediate paths heading upward are choked by green foliage and vertical teal stems. Meanwhile, the giant magenta night sky holds the largest volume of tiles on the board, yet ants cannot reach the upper expanse without navigating around the exterior borders or carving through the central flower.
If you tap a block whose color cannot currently be reached by a valid path, that block will sit idle in one of your five waiting slots. Allowing unrouted blocks to accumulate quickly locks your tray and triggers an immediate defeat. You also need to stay alert for Connected Boxes that appear in the selection area as the stage progresses. These linked blocks must be accounted for together, meaning you need sufficient empty waiting slots and accessible tiles of both colors before you commit to drawing them.
Colony Flow Level 277 Step by Step Walkthrough
Step 1: Clear the Lower Leaves and Outer Foliage
Begin by targeting the outermost pathways to establish wide ant lanes around the sides of the garden. Select the front Purple 60 block alongside the low count Light Green 4 and nearby Green blocks. As soon as you tap them, purple ants pour from the nest and spread outward along the bottom rim, climbing up the left and right flanks to strip away the outer magenta foliage. At the same time, green ants chew through the low hanging leaves right above the nest entrance.
Clearing these peripheral green and purple tiles creates essential breathing room. As the purple count rolls down toward 55 and your green numbers drop off, you expose lower tier blocks in the tray including Pink 3 and Dark Blue 50. Notice how the perimeter lanes widen significantly, allowing ants to bypass the dense central stalks and reach higher ground without obstruction. Keep an eye on your waiting slots and ensure every active block has ants currently feeding before selecting another tile from the tray.
Step 2: Open Paths into the Flower and Stars
With the outer borders thinning out, turn your attention to the yellow stars and the structural base of the flower. Tap the Yellow 18 block and follow it up with Dark Blue. Yellow ants race up the newly opened side corridors and immediately begin nibbling away at the twinkling stars scattered across the magenta sky. They also target the bright yellow base nestled just beneath the cyan blossom.
At the same time, your dark blue ants latch onto the darker outline tiles framing the flower petals. This coordinated push accomplishes two vital goals. First, eating the stars punches gaps through the sky, weakening the upper wall of food tiles. Second, chipping away at the yellow and dark blue blossom base reveals the edges of the central cyan petal clusters. As these blocks reach zero, they vanish from your waiting slots, keeping your staging area down to just two or three active items and preventing an early logjam.
Step 3: Dismantle the Stems and Inner Petals
Now that the core of the blossom is partially exposed, you need to bring in Teal 28 and your middle cyan options. Select the teal block to send ants directly into the tall vertical stalks that divide the bottom half of the board. These vertical columns take time to dismantle, but consuming them connects the nest straight to the underbelly of the flower.
Follow the teal selection with light blue and cyan blocks such as Cyan 25 and Cyan 9. Light blue ants flood into the blossom, steadily stripping away the vibrant layers of petals. As the teal stalks crumble, green ants can also sweep up any remaining leafy patches near the center. Your waiting slots will briefly hover around four occupied spaces during this transition, but because both cyan and teal have large quantities of accessible food, their numbers count down rapidly and clear room for your next moves.
Step 4: Work Down the Connected Boxes and Center Petals
As the central artwork dissolves, your tray reveals Connected Boxes joined by a bridge across the selection slots. These paired boxes require careful timing. Verify that the board displays clear, open paths for both connected colors before you pull them into play. In this phase, you will handle connected cyan and green blocks while clearing residual petal fragments.
Select the connected pair and reinforce the assault with remaining single blocks like Green 11 and Pink 14. Ants swarm the remaining turquoise stem fragments and the interior heart of the blossom, completely hollowing out the middle of the board. The once crowded garden now looks like an open ring, with the lower area entirely clean and only the massive upper magenta canopy remaining intact. By clearing the connected elements while paths are wide open, you remove the trickiest tray hurdle without filling your slots.
Step 5: Consume the Remaining Sky and Finish the Art
With the garden bed and blossom fully devoured, you enter the cleanup phase where the massive purple night sky must be cleared. Tap your remaining magenta and purple heavy hitters, including Magenta 43 and Magenta 29, along with any lingering yellow or cyan cleanup blocks like Yellow 3 and Cyan 19.
A relentless sea of purple ants surges out of the nest, marching up both side highways and streaming directly up through the hollowed center of the board. They attack the great purple banner across the top from every possible angle. Because multiple entry routes are completely clear, the ants consume dozens of tiles every second. Watch the final block counters tick down to zero as the last pixels of the twilight sky disappear into the colony, leaving the board entirely empty and securing your victory.
Colony Flow Level 277 Winning Strategy
The Most Important Moves
The absolute turning point in this level is choosing to strip the outer perimeter before attacking the center. Many players make the mistake of digging straight into the green leaves and teal stalks at the very start. That approach leaves the outer magenta tiles intact and restricts your ants to a narrow bottleneck in the middle. By activating purple and yellow early, you open wide side avenues that let ants wrap around the whole structure.
Another critical decision involves how you treat the Connected Boxes. Because linked blocks occupy multiple waiting slots simultaneously, activating them while the board is congested can instantly end your run. Waiting until the center flower petals are halfway cleared guarantees that both colors find immediate food paths, allowing the connected numbers to drop in unison without stalling your tray.
Keeping the Ants Moving
Maintaining smooth ant traffic requires constant awareness of food accessibility. A block showing a count of forty is completely harmless as long as ants are actively marching and biting tiles. Danger only arises when you pull a block whose matching color is sealed behind an uncleared barrier. In this stage, cyan tiles are heavily shielded early on, while purple and green tiles sit openly exposed.
Always match your tray pulls to visible tile frontiers. Pull green and purple when the base and sides are thick, transition into yellow and dark blue once the flower outline is touched, and only deploy heavy cyan and teal blocks after the outer skin has been stripped away. Cycling your lower count blocks like Light Green 4 and Yellow 3 quickly empties waiting slots, providing safe buffers whenever larger blocks require extended feeding times.
Colony Flow Level 277 Final Tips
Patience with your waiting slots is the secret to repeating this win cleanly. Whenever you see three or four slots filled with counting blocks, resist the temptation to tap another tile from the tray simply because it looks tempting. Let the active ants finish their runs and clear out at least two slots before introducing fresh colors to the top bar.
Pay close attention to color shades on the board. The mosaic contains both dark blue accents on the petals and lighter cyan tones across the blossom interior, as well as distinct light green and forest green leaves. Selecting the wrong blue or green block when only the alternate shade is accessible will park that block dead in your waiting row. Double check that your target tiles share the exact hue of the tray block before tapping.
If you find yourself stuck on any specific ant path or want to double check the exact timing for pulling the connected blocks, take a moment to watch the walkthrough video above the article. Seeing the sequence unfold in real time makes it easy to keep your colony flowing smoothly from the first leaf to the final star.
Comments