
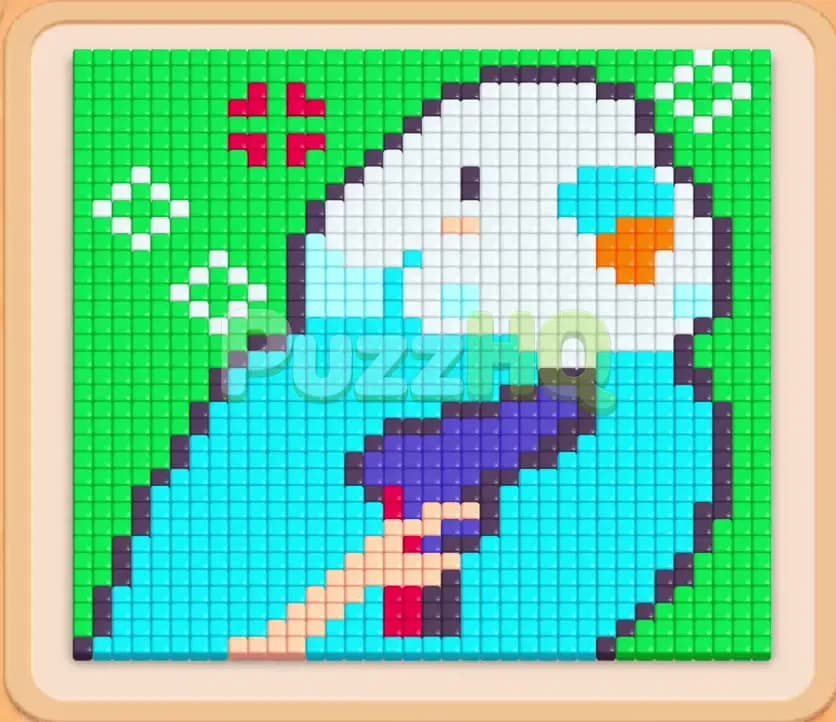
Colony Flow Level 375 presents a colorful pixel art puzzle featuring a bright blue parakeet resting on a perch against a lush green backdrop. Your main objective is to clear every food tile by sending ant lines through carefully opened pathways without overfilling your waiting area. Success on this stage relies on identifying accessible perimeter tiles early and managing special block pairs before your tray runs out of room.
Colony Flow Level 375 Starting Setup
Reading the Board
The puzzle board displays an elaborate bird illustration constructed from hundreds of square food tiles. The background is dominated by bright green tiles with small decorative white patterns in the upper corners. The bird itself consists of a large white head and chest, a vibrant cyan body, a dark blue wing tucked across its torso, an orange beak, and warm perch details near the bottom.
Beneath the main board sits the central ant nest, positioned directly above five empty waiting slots. Below these slots lies your block tray, which holds multiple rows of colored tiles marked with numbers. At the start, the front row gives you direct access to cyan, light blue, and a pair of connected orange blocks. Sitting behind the front row are several dark blue blocks, high count green blocks, and multiple hidden boxes marked with question marks. Because the nest releases ants upward, your troops must find immediate access along the bottom edge of the illustration before they can reach the deeper inner sections.
What You Need to Watch Out For
Your primary danger is running out of space in the five waiting slots. If you tap blocks whose matching colors are locked behind other food tiles, those blocks will sit idle in your waiting slots and take up vital space. With only five slots available, drawing just two or three stalled colors can instantly cause a defeat.
The bird design is compact and tightly packed. The dark blue wing and the orange beak are entirely sealed behind outer layers of white and cyan food. Furthermore, the connected orange blocks in your tray must be handled carefully because selecting connected boxes places multiple items into your active slots at the same time. You must avoid calling forward any color that lacks a broad, clear path from the nest.
Colony Flow Level 375 Step by Step Walkthrough
Step 1: Open the Lower Edge and Perch
Begin by targeting the food tiles right above the ant nest along the bottom border. Select the initial cyan and dark neutral blocks from the front of your tray to begin chewing through the base of the bird. Ants will immediately march out from the central hole and strike the lowest exposed tiles.
As these initial tiles vanish, select the light peach and white blocks to consume the feet and lower perch section. Clearing these bottom tiles creates an open gap into the lower body of the bird. Watch your waiting slots as these numbers tick down. You want each block to empty completely and leave its slot before you pull forward any fresh numbers from the tray below.
Step 2: Carve Into the Cyan Body and Lower Background
With the bottom gap established, tap the available cyan blocks to send large swarms directly into the belly of the bird. At the same time, select an accessible green block from your tray. The green ants will peel away from the central stream and travel along the bottom left boundary, eating into the large green field surrounding the bird.
During this stage, your white blocks can also get to work on the lower chest. The cyan ants carve a wide channel directly into the center of the bird, which begins exposing the bottom edge of the dark blue wing. Keep track of the numbers on your active blocks. Do not pull the dark blue blocks into your waiting slots until the dark blue tiles are completely free of covering cyan tiles.
Step 3: Release the Wing and Activate Connected Orange Blocks
Once the cyan belly has receded enough to leave the dark blue wing fully uncovered, bring your dark blue blocks into play. The ants will flood into the central wing area and rapidly drain the numbers on those blocks. As these tiles disappear, adjacent hidden boxes in your tray will uncover their true colors, revealing additional white, green, and cyan reserves.
Now that the head and face of the bird are opening up, the orange beak becomes accessible. Tap the connected orange blocks. Because these blocks are linked, they enter your waiting slots together and launch their ants toward the orange tiles on the beak and perch. Ensure you have at least two open waiting slots before tapping this connected pair so your queue does not jam.
Step 4: Dismantle the White Head and Outer Green Field
With the orange beak and dark blue wing disappearing, the upper portion of the board opens up dramatically. Deploy your white blocks to devour the rest of the head and the decorative white sparkles in the background. The white ants will swarm across the crown of the bird, rapidly stripping away the remaining light colored tiles.
While the head is being cleared, bring in your secondary green blocks. The green ants will follow wide pathways along both sides of the board, consuming large chunks of the surrounding background. Because the central bird is mostly gone by this point, your ants have unobstructed corridors to move anywhere on the board. Make sure you clear out the remaining white blocks before bringing in the last tray colors.
Step 5: Wipe Out the Remaining Perch and Background Fragments
Your board will now consist of only scattered clusters of cyan feathers, red perch blocks near the bottom, and lingering green background tiles in the top corners. Select the red block to send ants directly onto the vertical perch supports. These red tiles will vanish quickly under the focused swarm.
Finally, pull your remaining cyan and green blocks to clean up the last few floating pixels. Ants will sweep through the top left corner to finish off the green background while another line clears the small cyan horizontal strip in the middle. Once the last food tile is eaten, the level concludes successfully.
Colony Flow Level 375 Winning Strategy
The Most Important Moves
The defining turning point in this puzzle is holding off on the dark blue wing until the cyan belly is thoroughly hollowed out. Many players make the mistake of selecting dark blue blocks as soon as they appear in the front row of the tray. Doing that places a heavy block into a waiting slot where it sits motionless because the wing is still locked behind cyan tiles.
Another crucial decision involves the timing of the connected orange blocks. Connected boxes take up multiple waiting slots simultaneously, so you must treat them as a combined unit. Only pull them when the orange beak tiles are directly exposed to ant traffic. If you summon the orange pair while the white face still protects the beak, both slots will remain clogged and choke off your entire operation.
Keeping the Ants Moving
To prevent your five waiting slots from jamming, maintain a strict rhythm of one in and one out whenever possible. Always look at the physical board before tapping a block in your tray. Verify that you can trace an uninterrupted line of empty space from the nest to the matching color tiles.
When hidden boxes reveal themselves in the tray, evaluate their color before acting. If a revealed block matches a color that is already open on the board, you can use it to maintain momentum. If it reveals a color that is still buried behind other layers, leave it untouched in the tray and work on clearing the blocking tiles first.
Colony Flow Level 375 Final Tips
Patience with your block selections is the single greatest asset on this stage. Always count how many slots are currently occupied before you tap a new block. If you see four slots filled and the ants on those blocks are moving slowly, wait for at least two blocks to expire completely before introducing anything new.
Pay close attention to how green tiles surround the entire bird. The green background offers an easy outlet for excess moves because green tiles are accessible along almost the entire outer perimeter from the very start. If you ever need to cycle a green block to uncover a valuable hidden box beneath it, you can safely deploy green without worrying about blocked pathways.
If you find yourself stuck on any specific color transition or want to see the exact ant routes in motion, take a moment to watch the video above the article for a visual breakdown of the complete clear.
Comments