
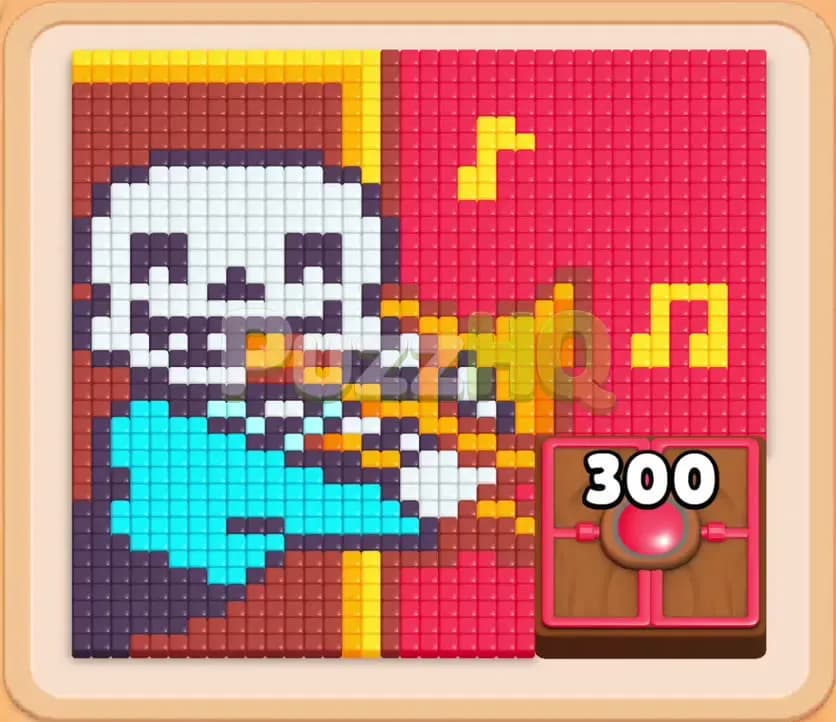
Colony Flow Level 400 throws a demanding puzzle layout at you that will punish careless block pulling within seconds. You face a wide pixel art board featuring a skeleton playing a brass horn against a heavy crimson backdrop, guarded by a hungry door and loaded with tricky connected boxes in the tray. I solved this stage after testing out multiple routing paths, and the secret lies in keeping your five waiting slots open while steadily breaking down that massive center barrier.
Colony Flow Level 400 Overview
What You Are Working With
Your target on the top half of the screen is an intricate musical pixel art scene. A skeleton with white bone and dark facial shading plays a bright yellow and orange horn, sending floating music notes up into the air against a solid red background. A large cyan patch anchors the bottom left corner, while a bulky hungry door sits directly on top of the red tiles on the lower right, displaying a starting counter of 300. The ant colony streams out of the single nest hole positioned right below the main playfield.
Down at the bottom, your block tray holds the resources you need to guide the colony. You have several standard color blocks, but you also have connected boxes linked by solid bars that force you to claim two blocks together. Beneath the visible upper rows sit hidden boxes colored plain grey that conceal their true shades and numbers until you clear the pieces above them. Above the tray sits the row of five waiting slots. This staging zone dictates the entire rhythm of the level because allowing all five slots to jam with inactive blocks causes an immediate defeat.
What It Takes to Clear Level 400 Board
Winning Colony Flow Level 400 requires constant flow and deliberate slot management. You cannot simply grab any block that looks appealing. Every single block you pull into the waiting slots must either find immediate food on the board or set up a clear follow up move that frees a slot right away. The ants can only travel to food tiles when an open path connects their nest hole to that specific color.
Clearing this board means carving paths through the accessible lower layers first, using those corridors to circulate ants toward the center, and constantly whittling down the hungry door. Once that door hits zero, the thick crimson field behind it unlocks, granting access to the remaining food tiles and letting you reveal the final hidden boxes in the tray.
Colony Flow Level 400 Step by Step Solution
Step 1: Deploy the first cyan block to clear the lower left corner
Your opening move focuses on the bright cyan cluster sitting directly above the left side of the nest hole. Pull the cyan 6 block from the front of the tray into your waiting slots. Cyan ants instantly surge out of the nest hole and run straight into the bottom left corner, devouring the cyan food tiles and reducing the block number to zero. This move opens critical physical space on the lower left board and empties the waiting slot immediately, leaving all five slots completely safe from an early choke.
Step 2: Bring out the first connected box pair while paths remain clear
Look at the tray and locate the connected boxes linking orange 18 with cyan 25. Pulling this unit places both colors into your waiting area at the same time, occupying two slots at once. The cyan ants continue their feeding frenzy on the remaining lower left tiles, reducing the cyan 25 block down toward zero. Meanwhile, orange ants find exposed horn tiles along the center path. Because the cyan block drains rapidly, you quickly regain your open slot, preventing a backup and exposing the deeper blocks waiting in the tray underneath.
Step 3: Use dark blocks to outline the skull and open the outer rim
With the cyan foundation cleared, pull the dark block with number 45 from the tray to target the deep shading around the skeleton face and jaw. Dark ants march up the left perimeter path and begin carving out the eye sockets, teeth, and forehead contour. Watch the block number tick down from 45 toward single digits as the perimeter corridor widens. Carving out these dark border tiles creates an essential loop around the top edge of the board, giving subsequent colors an uninterrupted path around the top left corner.
Step 4: Feed the skeleton face tiles using high value white blocks
Once the dark outline falls away, the white skull tiles become accessible to your colony. Pull the white 25 block into an open waiting slot. White ants stream upward through the left corridor and spread across the forehead, cheekbones, and nasal cavity of the skeleton. The white block number drops quickly as the skull dissolves. Clearing this bulky white section opens up direct access to the yellow horn mouthpiece and frees up more space in the lower rows of your block tray.
Step 5: Dismantle the horn and music notes with yellow and orange blocks
Shift your attention to the musical instruments and floating notes scattered across the upper center. Pull the yellow 30 and yellow 25 blocks from the tray, followed by the orange 18 block when an open slot appears. Yellow ants race through the cleared facial corridor and swarm the horn bell and floating music notes, while orange ants strip away the valves and tubing. The yellow counter winds down steadily as the bright instruments vanish from the board, stripping away the entire middle section of the picture.
Step 6: Attack the red food tiles to chip away at the hungry door
Now you must focus heavy pressure on the hungry door barrier that holds the counter at 300. Pull the crimson 35 and red 40 blocks into your waiting slots to direct red ants toward the exposed red field along the right wall. The red ants march along the cleared upper border and swarm the red tiles surrounding the door. As each red tile vanishes, the counter on the hungry door plunges from 300 down through 220, then to 185, and down to 110. You must keep pulling red blocks whenever a waiting slot empties to ensure the red flow never stops.
Step 7: Break the hungry door down to zero and open the back corner
Continue feeding the red flow with the remaining burgundy and red blocks from the tray. Watch the hungry door counter drop from 110 down to 50, and finally down to zero. The heavy door barrier vanishes completely from the board, exposing the deep cluster of red tiles that was previously locked away in the bottom right corner. Ants immediately pour into this freshly opened pocket. Because the door is gone, your ants now possess a straight run from the nest hole across the bottom right, eliminating any risk of blocked paths.
Step 8: Handle the remaining yellow connected pair and uncover the hidden boxes
Look at the lower section of your tray where the yellow connected pair sits alongside several grey hidden boxes. Pull the yellow connected block into your waiting slots. Yellow ants sprint across the open board to clean up the final lingering musical notes at the top edge. With the yellow pair removed from the tray, the grey hidden boxes in the bottom row activate, revealing their true colors and values. These hidden blocks turn out to be red and brown tiles needed to finish off the remaining background patches.
Step 9: Clear the final background patches to finish the board
Your waiting slots now hold the final brown and red blocks revealed from the hidden slots. Drop the brown 11 and crimson 18 blocks into the waiting area. The worker ants fan out across the far corners, eating the very last red border tiles along the right edge and the stray brown accents near the base. The numbers on your final blocks count down to zero, the waiting slots empty out completely, and the pixel art board clears away for a clean victory.
Final Thought
Colony Flow Level 400 looks intimidating because of the massive hungry door and linked tray blocks, but keeping your waiting slots clear guarantees success. Focus on clearing one color group at a time so your ants always have an unobstructed corridor to march through. If any block placement or path route feels difficult to visualize from the text alone, be sure to watch the walkthrough video above this article to see every ant stream and tray movement in real time.
Comments