
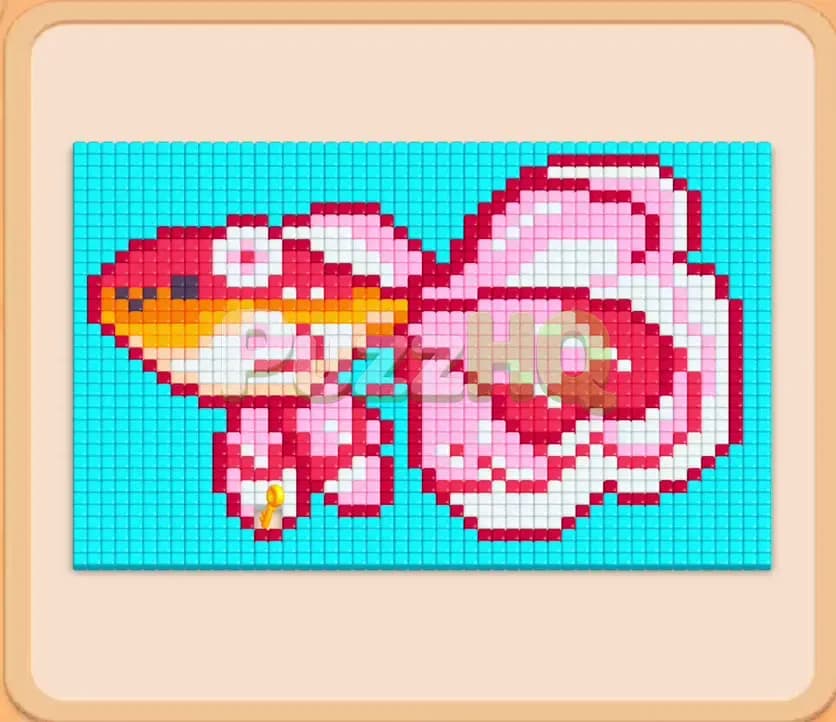
Colony Flow Level 97 presents a gorgeous pixel art goldfish swimming across the board surrounded by a thick border of cyan water tiles. The real challenge comes from balancing limited pathways with five tight waiting slots and two tricky special mechanics. By targeting accessible perimeter colors first and timing your tray selections carefully, you will clear every food tile without stalling your colony.
Colony Flow Level 97 Walkthrough
Understanding the Starting Board
When you inspect the starting layout, you see a majestic goldfish facing left with a massive flowing tail that dominates the right half of the board. The artwork consists of white scales, dark red stripes, a vibrant pink tail, golden yellow fins, and a tiny dark grey pupil inside the eye. A solid frame of cyan food tiles surrounds the fish on all four sides, separating the artwork from the open floor where your ant nest sits at the bottom center.
Your tray at the bottom holds a selection of colored number blocks that you tap to send ants into action. Look closely at the tray and the board to spot the two special mechanics present in this stage. Underneath the top row of blocks in the tray, you will find a yellow block marked with a keyhole. This represents the Lock and Key mechanic. You cannot use this yellow block until your ants reach and retrieve the golden key sitting on the lower fin near the belly of the fish. Further down the tray queue, you will encounter Connected Boxes, where a pink block and a dark red block are joined together by a flexible pink band. Choosing one pulls both into your waiting area, demanding that you have two empty slots ready.
The primary obstacle in this puzzle is path accessibility. The ants leave the nest at the bottom and can only reach food tiles that touch open floor space. The dark grey pupil consists of only seven food tiles, yet it sits deep inside the fish head behind layers of dark red, white, and pink food. If you pick the dark grey block too early without planning, it will sit in your waiting rack for several minutes, effectively shrinking your working space from five slots down to four.
The Key to Clearing Level 97
Success on this board requires a deliberate inside out breach through the lower border. You cannot attack the whole fish at once because the outer cyan water blocks barricade the upper sections. Instead, you must tunnel through the bottom edge directly above the ant nest by picking white and dark red blocks that have direct line of sight.
Clearing these lower white and dark red tiles creates two essential breakthroughs. First, it carves a path straight toward the golden key on the lower fin, enabling you to unlock the yellow block before the yellow food tiles become an urgent priority. Second, it exposes the lower base of the huge pink tail. Once pink food is accessible, you can cycle pink blocks rapidly through your tray.
Managing the five waiting slots is where most players fail. Because dark grey must be parked early to expose the blocks beneath it in the tray, you only have four flexible slots for the rest of the puzzle. When the Connected Boxes arrive, they occupy two slots at the exact same moment. If you already have three unfinished blocks sitting on your bench when you tap those connected boxes, your slots will jam completely and cause an instant defeat. You must always clear down your active blocks before touching linked boxes or pulling fresh colors.
How to Beat Colony Flow Level 97
Step 1: Open the Lower Perimeter with White and Dark Red Blocks
Begin the level by tapping the white thirty six block and the dark red twenty eight block from the top row of your tray. Your ants will surge out of the nest and immediately start chewing away the food tiles exposed along the lower edge of the fish body. As the dark red ants finish off the lower stripe and the white ants consume the bottom fin trim, an opening appears in the barrier. This exposes fresh white tiles higher up on the belly and reveals the edge of the golden key. Keep your eyes on the numbers counting down. The white block drops quickly toward single digits while dark red trims away the boundary. This initial breach provides the open floor space your colony needs to maneuver deeper into the artwork.
Step 2: Park the Dark Grey Block and Release Pink Ants into the Tail
With the lower border opened, the tray exposes a dark grey seven block. Tap this dark grey block immediately to clear it out of the tray queue, even though the fish pupil cannot be reached yet. The dark grey block will settle into the fifth waiting slot and stay there at number seven. Next, select the white thirty two block and tap the first available pink block. The white ants will continue devouring the belly scales, which finally grants your pink ants an open avenue into the lower loops of the massive tail. You will see streams of pink workers rushing into the fin, rapidly reducing the pink block number. Opening this tail corridor is crucial because pink makes up the largest volume of food on the entire board.
Step 3: Collect the Golden Key to Unlock the Yellow Tray Block
Direct your attention back to the lower fin where the golden key rests. Select the dark red twenty three block from your tray to clear the remaining crimson tiles guarding that fin. As the dark red ants clean out the surrounding area, pink and white ants reach the golden key and carry it down toward the nest. As soon as the key reaches the ant hole, the lock on the yellow block in your tray snaps open, transforming into a usable yellow twenty seven block. Do not tap this yellow block immediately. Leave it sitting in the tray for now, because the yellow belly tiles are still partly shielded and you need your current waiting slots clear for the heavy tail clearing phase.
Step 4: Deploy the Connected Pink and Dark Red Blocks into the Tail Core
Look at your waiting slots and verify that at least two slots are completely empty. In the tray, you will see a pink thirty eight block physically linked to a dark red twenty five block with a pink band. Tap this connected pair. Both blocks will leap into your waiting slots simultaneously, claiming two positions. Because the pink tail is now wide open and the dark red body stripes are accessible from below, two massive armies of ants will flood the board at the same time. Pink ants hollow out the grand dorsal fin and the sweeping tail feathers, while dark red ants eat away the middle torso of the fish. Watch the counters plummet from the thirties down to zero. Both blocks will finish around the same time, clearing two slots at once and giving you breathing room.
Step 5: Activate Cyan Ants to Strip Away the Outer Border
Now that the interior of the tail has thinned out, select the cyan fourteen block and the white sixteen block. The cyan ants will march up the right side and along the bottom edge, devouring the outer water tiles that frame the fish. Stripping away these cyan tiles accomplishes two massive tactical goals. It opens wide exterior highways around the top and right edges, allowing your ants to navigate without bumping into crowded interior bottlenecks. It also exposes the upper tips of the pink tail and the top edge of the fish head. As the cyan block clears, tap the next cyan block to keep the outer perimeter collapsing inward.
Step 6: Consume the Golden Yellow Belly and Central Fish Body
With the outer frame receding and the tail almost completely hollowed out, tap the unlocked yellow twenty seven block along with the remaining pink and white blocks. The yellow ants will swarm the lower fin and the underside of the fish belly, devouring the bright golden tiles that were previously locked away. Meanwhile, the pink ants finish off the delicate outer ribs of the tail fin, leaving only faint outlines. Notice that the ant pathing has now become completely fluid. Workers can freely cross through the fish body from multiple directions, which drastically speeds up tile consumption and prevents any ant traffic jams near the nest.
Step 7: Clear the Fish Head and Final Outer Border Tiles
Only the front of the fish and the remaining border tiles are left. Select the final dark red block to consume the forehead, cheeks, and mouth of the fish. As these dark red tiles vanish, the seven dark grey food tiles representing the pupil finally become completely exposed. The dark grey seven block that has been sitting patiently in your waiting slot since the early game will instantly spring to life. Dark grey ants charge up into the eye socket and devour every single pupil tile, clearing that slot once and for all. To wrap up the stage, tap the remaining cyan blocks and any leftover white cleanup blocks. Your ants will encircle the remaining perimeter border and strip the last water tiles from the top edge, clearing the board completely for the win.
Why This Solution Works
The fundamental strategy behind this walkthrough relies on controlling the rate at which colors enter your five waiting slots. Many players fail Colony Flow Level 97 because they treat the stage like a standard matching game, tapping colorful blocks simply because they look ready. Doing so fills the waiting slots with colors like yellow or dark grey before their corresponding food tiles have an open access path. By deliberately parking only the dark grey block and leaving the other four slots fluid, you maintain total control over your ant swarms.
Unlocking the yellow block via the key mechanic is another critical pivot point. The golden key is positioned low enough on the fish fin that it can be reached without having to clear the entire upper board. By prioritizing the white and dark red tiles on the bottom edge, you collect that key early in the run. This transforms a locked, useless tray slot into an active resource long before you actually need to call upon yellow ants.
Handling the Connected Boxes requires strict slot discipline. Connected blocks cannot be separated, so they demand two vacant slots the moment you tap them. If you attempt to bring them into play while your slots are cluttered with stalled cyan or yellow blocks, you trigger an unrecoverable bottleneck. Releasing the linked pink and dark red blocks only after the tail corridor is wide open guarantees that both ant colors have an enormous feast waiting for them. They clear out in record time, freeing up your tray for the final push through the fish head and outer border.
Final Thoughts
Patience and path awareness will carry you through Colony Flow Level 97 every single time. The biggest turning point is keeping your waiting slots clean so that the connected pair and the locked yellow block never stall your colony. If you ever feel unsure about the exact path the ants take through the lower fin or want to see the key pickup in real time, take a moment to review the walkthrough video above the article to perfect your timing.
Comments