
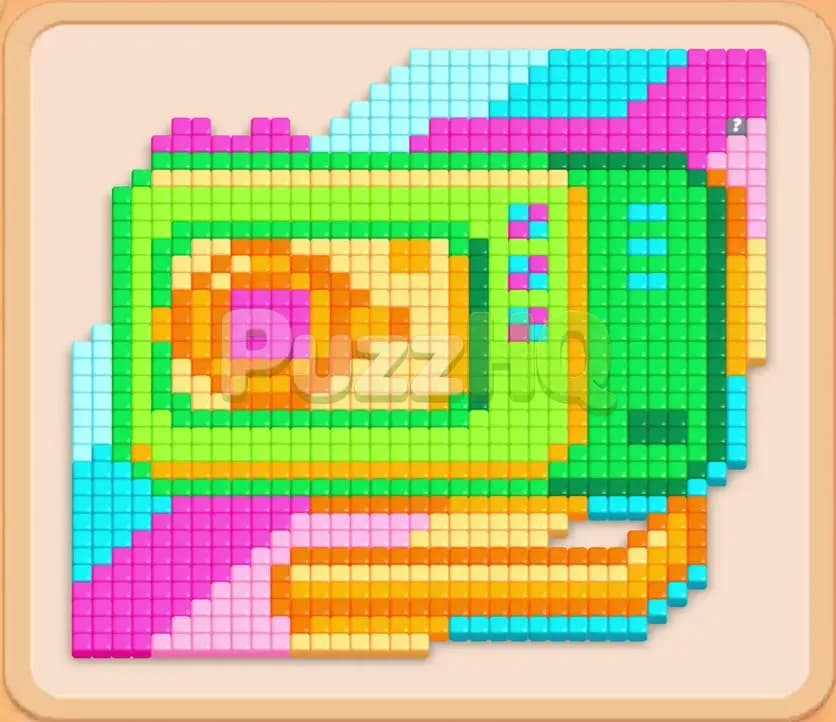
Colony Flow Level 90 presents a complex pixel art layout that resembles a retro cassette tape bordered by thick layers of green, pink, cyan, and orange food tiles. You must carefully coordinate your ant squads through tight corridors while keeping the five waiting slots completely under control. With limited starting routes and several tricky block formations in the tray, picking the right colors in the proper sequence is essential to secure a win.
Colony Flow Level 90 Board Breakdown
Starting Colors and Blocks
The puzzle board features a dense rectangular structure packed with a wide spectrum of colors. A heavy band of vibrant green forms the right and upper casing of the cassette, while hot pink covers the bottom left corner and top right edge. The core of the board contains concentric rings of bright yellow and deep orange, mimicking the tape spools and inner mechanisms of a vintage music cassette. Soft tan and cream tiles form horizontal tracks along the bottom edge, while cyan highlights line the central display buttons and top boundary.
Down in your block tray, the immediate lineup contains several high value options that demand immediate evaluation. You start with visible selections including Orange 32, Dark Green 48, Cyan 32, and Orange 36 resting across the top row. Just below these active blocks sit deeper reserves, including Bright Green 30, Yellow 45, Cyan 45, and Orange 20. Underneath those lie Tan 25, Tan 45, Pink 45, and Green 50. Because the numbers on these blocks are substantial, you cannot simply tap colors at random without having direct, accessible pathways on the board for the marching ants.
Paths, Obstacles, and Limited Space
Space management is your greatest test on this stage. The holding area at the top of your screen has only five waiting slots available. Whenever you pull a block from the tray that cannot immediately expend all its points on accessible food, that block occupies one of those five precious spaces. If all five slots fill up and your ants cannot reach matching food tiles, the run ends immediately.
This stage incorporates two specific mechanics that complicate your pathing. First, you will encounter Connected Boxes within the queue, where two green blocks are linked together by a physical stem. Selecting the front block inevitably impacts the rear block, forcing you to plan your green food digestion in paired stages rather than isolated bursts. Second, the lower layers of the tray hold Hidden Boxes marked with question marks. These mystery blocks keep their colors concealed until the tiles sitting directly above them are selected and deployed. Because you cannot see what color rests inside a Hidden Box until you dig down to it, maintaining empty buffer room in your waiting slots is vital.
Colony Flow Level 90 Complete Solution
Step 1: Clear the bottom perimeter using tan and lower orange blocks
Begin your run by targeting the exposed food tiles situated along the lower portion of the board. The tan horizontal track at the bottom right has direct entry paths leading straight from the central nest. Tap the visible tan blocks from the lower shelf to send worker ants streaming toward that bottom rail. The initial Tan 18 and Tan 4 blocks will rapidly chew away the outer strip, shaving down their counters and clearing out of the waiting area almost as fast as they enter.
Pair this opening surge with an orange selection such as the Orange 20 and Orange 8. The bottom edge of the cassette tape features an exposed orange runner that borders the tan track. As your orange ants march upward, they consume those lower boundary lines, carving out wider turning radiuses for adjacent colors. Watch the block counters tick down toward zero. By clearing these exposed bottom strips right away, you keep at least three waiting slots open while creating room to access the next layer of the tray.
Step 2: Strip the outer right edge with dark green and yellow squads
With the lower track partially opened, shift your focus toward the thick dark green wall running down the right flank of the pixel art. Select the Dark Green 48 block from the top row of the tray. Your green ants will exit the nest and travel along the right side of the board, carving through the vertical wall of green food tiles. Because the green wall contains dozens of matching squares, the Dark Green 48 block steadily decreases to Dark Green 23 and eventually vanishes.
As green tiles disappear from the right perimeter, yellow food tiles directly adjacent to the inner spool become reachable. Bring in the Yellow 32 block followed by smaller yellow support blocks like the Yellow 4. The yellow ants will work on the outer rim of the center cassette wheel, stripping away the yellow barrier that isolates the inner orange core. By alternating between dark green and yellow, you prevent any single color from choking the available paths. This sequence also allows your waiting slots to absorb brief pauses without overflowing.
Step 3: Breach the central tape spool with orange and yellow selections
Now that the perimeter walls are thinned, the center of the cassette is fully accessible from the bottom and right corridors. Select the Orange 36 block and deploy it toward the circular spool in the middle. The orange ants rush into the heart of the design, eating the outer circle of the spool and significantly reducing the orange tile density. At the same time, pull the Yellow 45 block to clear the remaining yellow brackets holding the spool in place.
During this exchange, keep an eye on your five waiting slots. You will temporarily hold an Orange 10 and a Dark Green 23 in the upper tray while the active ants finish their paths. Because the center opening is wide, the orange ants consume their target tiles quickly, dropping the Orange 10 to zero and freeing up that slot for your next strategic pull. This step breaks the core wide open, exposing the inner pink details and clearing a path toward the upper half of the board.
Step 4: Dismantle the pink sections and reveal the hidden boxes
With the center gutted, turn your attention to the hot pink tiles framing the bottom left corner and the top right boundary. Select the Pink 45 block from the tray. Your pink ants stream into the bottom left corner, eating away the bulky pink shelf that has blocked the left side of the screen since the start of the level. This clears significant screen space and allows unobstructed movement along the left board edge.
Select the Pink 44 block next to clean up the upper pink tiles. As these pink blocks empty from the tray, they expose the Hidden Box located in the lower tiers of your queue. The mystery box sits ready to reveal its color once you remove the surrounding blocks. Keep your waiting slots clean during this phase by allowing the pink ants to fully finish their workload before introducing new colors into the mix.
Step 5: Activate the connected green blocks along the main shell
Look down at the tray to locate the Connected Boxes where a Green 30 links directly to a Green 25 through a green stem. Select the leading green block to trigger the first wave of green ants. These ants march along the top and right edges, chewing through the thick outer shell of the cassette housing. Because the green area is broad, the lead block expends its points smoothly.
As the first connected block dissolves, the connected Green 25 slides up and becomes ready for deployment. Send the second green block into action alongside an additional Green 9 and Green 14. This concentrated push removes the bulk of the green casing surrounding the top and middle sections. The connected mechanic can easily clog your waiting slots if mismanaged, but because you previously stripped the yellow and pink borders, your green ants have plenty of exposed food to consume without stalling.
Step 6: Consume the cyan buttons and clear inner paths
With the green casing reduced to thin strips, the bright cyan buttons in the middle right sector and along the upper border are completely open. Select the Cyan 32 block, followed by the Cyan 42 block from the lower tray. Cyan ants will march directly toward the upper trim and the center window, rapidly devouring the light blue tiles.
Watch the Cyan 12 block drop down to Cyan 2 as it finishes off the last few accent tiles. Pulling these cyan blocks also uncovers the remaining blocks in the bottom tray, granting you access to the final numbers needed to finish the stage. By keeping only one or two blocks in the waiting slots during this step, you leave ample margin for the endgame sequence.
Step 7: Sweep the remaining green tiles to complete the board
The board now contains only scattered green remnants in the upper right quadrant and along the top center strip. Check your tray for the final green blocks, which include Green 13, Green 15, and any remaining points on your active green tiles. Deploy these green blocks in quick succession.
The green ants will disperse across the remaining food patches, eating away the last fragments of the cassette border. Because no other colors remain on the board to obstruct their movement, the ants move at top speed. The waiting slots clear completely as the final green points hit zero, the entire board clears of food tiles, and the victory sequence activates smoothly.
Key Moments in Colony Flow Level 90
The Move That Opens Up the Board
The critical turning point in this puzzle occurs during the transition from the lower tan rails into the central spool. Deploying the Orange 36 block after thinning the bottom track completely alters the dynamic of the board. Before that move, your ants are restricted to narrow exterior paths along the perimeter, which limits your throughput and makes every block selection dangerous for your waiting slots.
Once that orange spool in the center begins dissolving, it creates an enormous central plaza. Ants traveling from the nest can cut straight through the core of the cassette rather than taking the long way around the outer rim. This newly opened space provides direct access to the interior pink tiles, the cyan buttons, and the back side of the green casing, ensuring that subsequent block choices always have an active target to digest.
Finishing the Remaining Food
Closing out this puzzle requires patience with the green and cyan blocks. The final phase leaves a high volume of green tiles clustered near the top, while the bottom of the board is entirely empty. If you rush and pull multiple green blocks before the cyan paths are fully digested, your waiting slots can suddenly hit capacity with nowhere for extra ants to walk.
The winning finish relies on clearing the cyan accents first so that all remaining green tiles become totally exposed along their interior faces. Once the cyan food is gone, you can drop your final Green 13 and Green 15 blocks into the waiting slots with absolute confidence. The green ants fan out across every surviving tile, wrapping up the level without a single point wasted.
How to Avoid Getting Stuck on Level 90
The primary hazard on this level is premature block selection while managing the Connected Boxes. When you see a pair of connected green blocks linked together in your tray, you might feel tempted to tap them early to get them out of the way. Doing so before the outer green perimeter has a clear pathway will cause the first block to sit idly in your waiting slots while the second block blocks access to other vital colors underneath. Always confirm that your ants have an immediate, uninterrupted line to matching food before touching connected pairs.
Another frequent failure point involves mismanaging the five waiting slots during the middle stage of the game. It is easy to look at the tray, notice several blocks with small numbers, and tap them in rapid succession hoping to clear out low hanging fruit. However, if those small blocks correspond to colors buried behind thick green or pink barriers, those blocks will occupy waiting slots without performing any useful work. You must treat your waiting slots as an active staging ground, never allowing more than three slots to fill at any given moment.
Finally, keep a close watch on the Hidden Box in the lower queue. Since you cannot verify the color of a Hidden Box ahead of time, you must keep at least two empty waiting slots available when revealing it. If you uncover a Hidden Box while your waiting slots are already packed with four dormant blocks, an unexpected color can cause an instant game over. Take the time to clear surrounding paths, keep the waiting area spacious, and let your active ant trails finish their meals before selecting new blocks.
Final Thoughts
Conquering Colony Flow Level 90 comes down to opening the center spool early and respecting the flow of your connected green blocks. By carefully working from the bottom tan tracks up into the central orange core, you create the open pathways necessary to digest the heavy outer casing without jamming your five waiting slots. If you find any particular color transition or block timing tricky to visualize during your run, be sure to watch the video above the article to see every move executed with perfect precision.
Comments